IBM 1403 printer working again

Fixing An IBM 1401 Computer To Get It Printing Again

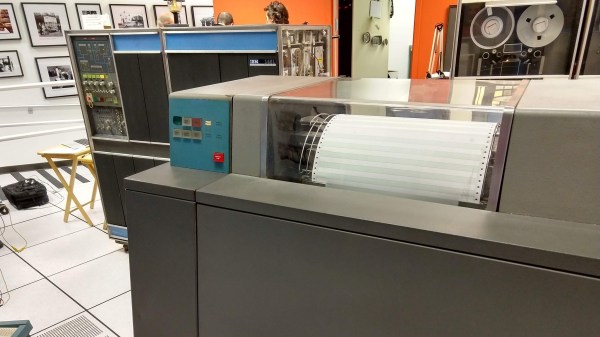
The IBM 1401 is a classic computer which IBM marketed throughout the 1960s, late enough for it to have used transistors rather than vacuum tubes, which is probably a good thing for this story. For small businesses, it was often used as their main data processing machine along with the 1403 printer. For larger businesses with mainframes, the 1401 was used to handle the slower peripherals such as that 1403 printer as well as card readers.

Broken germanium transistor

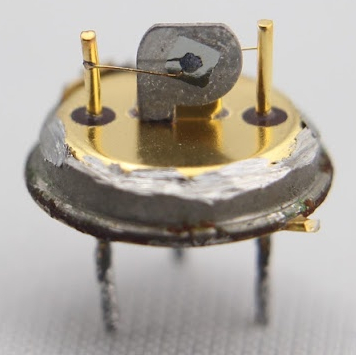
The Computer History Museum in Mountain View, CA has two working 1401s as well as at least one 1403 printer, and recently whenever the printer printed out a line, the computer would report a “print check” error. [Ken Shirriff] was among those who found and fixed the problem and he wrote up a detailed blog entry which takes us from the first test done to narrow down the problem, through IBM’s original logic diagrams, until finally yanking out the suspect board and finding the culprit, a germanium transistor which likely failed due to corrosion and an emitter wire that doesn’t look solidly connected. How do they know that? In the typical [Ken]-and-company style which we love, they opened up the transistor and looked at it under a microscope. We get the feeling that if they could have dug even deeper then they would have.

If you’re unfamiliar with the work of this team who maintain the machines at the museum, you’ll want to read up on how they recently got a 1401 to run FORTRAN II code.

C64 Keyboard Helps Keep The Memory Alive

To say that the Commodore 64 was an important milestone in the history of personal computing is probably a bit of an understatement. For a decent chunk of the 1980s, it was the home computer, with some estimates putting the total number of them sold as high as 17 million. For hackers of a certain age, there’s a fairly good chance that the C64 holds a special spot in their childhood; perhaps even setting them on a trajectory they followed for the rest of their lives.

At the risk of showing his age, [Clicky Steve] writes in to tell us about the important role the C64 played in his childhood. He received it as a gift on his fifth birthday from his parents, and fondly remembers the hours he and his grandfather spent with a mail order book learning how to program it. He credits these memories with getting him interested in technology and electronic music. In an effort to keep himself connected to those early memories, he decided to build a modern keyboard with C64 keycaps.

As you might expect, the process started with [Steve] harvesting the caps from a real Commodore, in fact, the very same computer he received as a child. While the purists might shed a tear that the original machine was sacrificed to build this new keyboard, he does note that his C64 had seen better days.

Of course, you can’t just pull the caps off of C64 and stick them on a modern keyboard. [Steve] found the STLs for a 3D printable C64 to Cherry MX adapter on GitHub, and had 80 of them professionally printed as he doesn’t have access to an SLS printer. He reports the design works well, but that non-destructively removing the adapters from the caps once they are pressed into place probably isn’t going to happen; something to keep in mind for others who might be considering sacrificing their personal C64 for the project.

[Steve] installed the caps on a Preonic mechanical keyboard, which worked out fairly well, though he had to get creative with the layout as the C64 caps didn’t really lend themselves to the keyboard’s ortholinear layout. He does mention that switches a bit heavier than the Cherry MX Whites he selected would probably be ideal, but overall he’s extremely happy with his functional tribute to his grandfather.

If you’re more of a purist, you can always adapt the C64 keyboard directly to USB. Or go in the complete opposite direction and put a Raspberry Pi into a C64 carcass.

This Keyboard And Mouse Also Gives You A Workout

The Ergonomic Handheld Mouse / Keyboard Alternative from [Shervin Emami] is an all-in-one solution for your keyboarding and cursor moving needs.

The core of this build is a ‘grip-strengthening’ device that’s sold to guitarists. While the actual benefit of these devices for guitarists is questionable — there are a few anecdotes any music teacher will tell you about classical pianists ruining their hands with similar devices — the device itself can be converted into a fantastic chording keyboard. All you really need for a full-functioned keyboard is a few buttons in a rugged shell, and this ‘grip strengthener’ has that going in spades.

Underneath the plungers for each button [Shervin] installed a magnet and a magnetic sensor, meaning these buttons are analog, and shouldn’t wear out ever. With just a little bit of code on a Tiny BLE board these analog sensors can become a keyboard, a quadcopter controller, an interface for your VR setup, or anything else that can be controlled with a bunch of buttons.

Not to outdo himself, [Shervin] also managed to add some cursor control functionality to this build. This is done via the IMU onboard the Tiny BLE board, and by all accounts it works great.  You can check out a video of this build pretending it’s both a keyboard and a mouse below.

Continue reading “This Keyboard And Mouse Also Gives You A Workout”

The Use And Abuse Of CT Scanners

David Mills is as a research scientist at the cutting edge of medical imaging. His work doesn’t involve the scanners you might find yourself being thrust into in a hospital should you be unfortunate enough to injure yourself. He’s working with a higher grade of equipment, he pushes the boundaries of the art with much smaller, very high resolution CT scanners for research at a university dental school.

He’s also a friend of Hackaday and we were excited for his talk on interesting uses for CT scanners at EMF Camp this summer. David takes us into that world with history of these tools, a few examples of teeth and bone scans, and then delves into some of the more unusual applications to which his very specialist equipment has been applied. Join me after the break as we cover the lesser known ways to put x-ray technology to work.

Continue reading “The Use And Abuse Of CT Scanners”

Golf Practice Made Easy With Robotics

When you think of sports, you usually think of something that takes a lot of physical effort. Golf is a bit different. Sure, you can get some walking in if you don’t take a cart. But mostly golfing is about coordination and skill and less about physical exertion. Until you want to practice driving. You hit a bucket of balls and then you have to go walk around and pick them up. Unless you have help, of course. In particular, you can delegate the task to a robot.

The robot that [webzuweb] built looks a little like a plywood robot vacuum. However, instead of suction, it uses some plywood disks to lift the balls and deposit them in a hopper. The electronics consist of an Arduino and an Orange Pi Lite. A GPS tells the robot where it is and it develops a search pattern based on its location.

Continue reading “Golf Practice Made Easy With Robotics”

Space Garbage Truck Passes Its First Test

Back in April we reported on the successful launch of the SpaceX Falcon 9 rocket to the International Space Station which carried, along with supplies and experiments for the orbiting outpost, the RemoveDEBRIS spacecraft. Developed by the University of Surrey, RemoveDEBRIS was designed as the world’s first practical demonstration of what’s known as Active Debris Removal (ADR) technology. It included not only a number of different technologies for ensnaring nearby objects, it even brought along deployable targets to use them on.

Orbital debris (often referred to simply as “space junk”) is a serious threat to all space-faring nations, and has become even more pressing of a concern as the cost of orbital launches have dropped precipitously over the last few years, accelerating number and frequency of new objects entering orbit. The results of these first of their kind tests have therefore been hotly anticipated, as the technology to actively remove debris from Low Earth orbit (LEO) is seen by many in the industry to be a key element of expanding access to space for commercial purposes.

Six months after its arrival in space we’ve now starting to see the first results of the groundbreaking tests performed by the RemoveDEBRIS spacecraft, and so far it’s very promising.

Continue reading “Space Garbage Truck Passes Its First Test”

Show That Sega Saturn Save Battery Who’s Boss

Breaking out the Sega Saturn out of the closet for a hit of 90’s nostalgia comes with its own set of compromises: the wired controllers, the composite video, and worst of all that dead CR2032 battery behind the backdoor. Along with the death of that battery went your clock and all those precious hours put into your game save files. While the bulk of us kept feeding the insatiable SRAM, a friendly Canadian engineer named [René] decided to fix the problem for good with FRAM.

The issue with the battery-backed memory in the Saturn stems from the particularly power-hungry factory installed SRAM chip. Normally when the console is plugged-in to a main power source the CR2032 battery is not in use, though after several weeks in storage the battery slowly discharges. [René’s] proposed solution was to use a non-volatile form of RAM chip that would match the pinout of the factory SRAM as close as possible. This would allow for easier install with the minimum number of jumper wires.

Enter the FM1808 FRAM chip complete with a whopping 256 kb of addressable memory. The ferroelectric chip operates at the same voltage as the Saturn’s factory SRAM, and has the added benefit of being able to use a read/write mode similar to that of the Saturn’s original memory chip. Both chips conform to a DIP-28 footprint, and only a single jumper wire on pin 22 was required to hold the FM1808 chip’s output-enable signal active-low as opposed to the active-high enable signal on the Saturn’s factory memory chip. The before and after motherboard photos are below:

After a quick test run of multiple successful read and writes to memory, [René] unplugged his Saturn for a couple days and found that his save files had been maintained. According to the FM1808 datasheet, they should be there for the next 45 years or so. The only downside to the upgrade is that the clock & calendar settings were not maintained upon boot-up and reset to the year 1996. But that’s nothing a bit of button-mashing through couldn’t solve, because after all wasn’t the point of all this to relive a piece of the 90s?

For more Sega Saturn goodness, check out how the Sega Saturn was finally cracked after 20 years.