Kniwwelino Is An ESP8266 Micro:Bit

Kniwwelino is the latest in a line of micro:bit-inspired projects that we’ve seen, but this one comes with a twist: it uses an ESP8266 and WiFi at the core instead of the nR51 ARM/BTLE chip. That means that students can connect via laptop, cellphone, or anything else that can get onto a network.

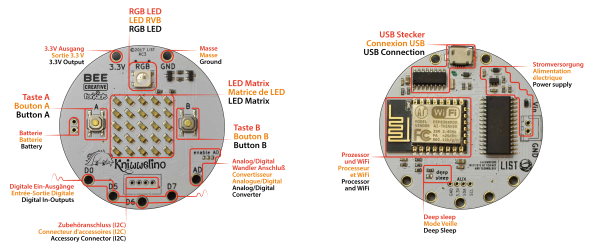
That’s not the only tradeoff, though. In order to get the price down, the Kniwwelino drops the accelerometer/magnetometer of the micro:bit for a programmable RGB LED. With fewer pins to break out, the Kniwwelino is able to ditch the love-it-or-hate-it card-edge connector of the micro:bit as well. In fact, with all these changes, it’s hard to call this a micro:bit clone at all — it’s more like a super-blinky ESP8266 development kit.

So what have they got left in common? The iconic 5×5 LED matrix in the center, and a Blockly visual programming dialect dedicated to the device. Based on the ESP8266, the Kniwwelino naturally also has an Arduino dialect that students can “graduate” to when they’re tired of moving around colored blobs, and of course you could flash the chip with anything else that runs on an ESP8266.

We don’t have one in our hands, but we like the idea. An RGB LED is a lot of fun on Day One, and the fact that the Kniwwelino fits so neatly into existing bodies of code makes the transition from novice to intermediate programmer a lot easier. These things are personal preference, but WiFi beats Bluetooth LE in our book, for sheer ubiquity and interoperability. Finally, the Kniwwelino comes in at about half the manufacturing cost of a micro:bit, which makes it viable in schools without large manufacturer subsidies. They’re estimating $5 per unit. (Retail is higher.) On the other hand, the Kniwwelino is going to use more juice than its ARM-based competitor, and doesn’t have an accelerometer.

Kniwwelino is apparently derived from a luxembourgish word “kniwweln” that apparently means to craft something. The German Calliope Mini is named after Zeus’ daughter, the programmer’s muse. We’re stoked to see so many cute dev boards getting into the hands of students, no matter what you call them.

Lawn Dog Faithfully Cuts The Grass

As a kid, [Josh] always dreamed of building robots to do his boring, dangerous chores like mowing and weed-eating the lawn. Now that he’s built Lawn Dog, an all-terrain robotic lawn mower, he can kick back and mentally high-five his younger self.

Lawn Dog is the result of hitching the business end of a Jazzy electric mobility chair to a Ryobi lawn mower with a custom flexible bracket, and then tweaking it to handle the worst that [Josh]’s lawn has to offer. It’s powered by two 24 V lawn and garden batteries and driven with a Sabertooth 2X12 motor controller. After a slippery maiden voyage, Lawn Dog now masters rough and green with aplomb thanks to doubled-up omniwheels on the Ryobi and very special tires on the Jazzy.

[Josh] wants nothing to do with weed-eating and mowing the ditch, so it’s important that the Lawn Dog is up to the job. He put some solid rubber tires on the Jazzy and then drove 50 screws into each one to add serious traction. Prime the carburetor and pull that cord there to see Lawn Dog’s mowing and ditch handling skills.

Continue reading “Lawn Dog Faithfully Cuts The Grass”

Mechanisms: Couplings

I was splitting wood one day a few years back, getting next winter’s firewood ready on my hydraulic splitter. It normally handled my ash and oak with ease, but I had a particularly gnarly piece of birch queued up, and the splitter was struggling. The 20-ton cylinder slowed as the wedge jammed in the twisted grain, the engine started to bog down, then BANG! I jumped back as something gave way and the engine revved out of control; I figured a hydraulic hose gave out. Whatever it was, I was done for the day.

I later discovered that a coupler between the engine shaft and the hydraulic pump failed dramatically. It was an easy fix once I ordered the right part, and I’ve since learned to keep extras in stock. Couplings are useful things, and they’re the next up in our series on mechanisms.

Continue reading “Mechanisms: Couplings”

Persistence Of Phosphorescence Clock Displays YouTube Stats Too

Looking for an eye-catching and unique way to display the time and date? Want the flexibility to add other critical information, like the number of YouTube subs you’ve got? Care to be able to read it from half a block away, at least at night? Then this scrolling glow-in-the-dark dot-matrix display could be right up your alley.

Building on his previous Morse code transcriber using a similar display, [Jan Derogee] took the concept and went big. The idea is to cover a PVC pipe with phosphorescent tape and rotate it past a row of 100 UV LEDs. The LEDs are turned on as the glow-in-the-dark surface passes over them, charging up a row of spots. The display is built up to two rows of 16 characters by the time it rotates into view, and the effect seems to last for quite a while. An ESP8266 takes care of driving the display and fetching NTP time and YouTube stats.

We’ve seen “persistence of phosphorescence” clocks before, but not as good looking and legible as this one. We like the approach, and we can’t help but think of other uses for glow-in-the-dark displays.

Continue reading “Persistence Of Phosphorescence Clock Displays YouTube Stats Too”

Lazy Hacker Checks Fuel System For Leaks, The Easy Way

Old cars are great. They represent a different time, reflecting the state of society at the point of their design and manufacture, and can charm and delight while also providing useful transport. Except, well… old cars are great, except when they’re not.

With my Volvo 740 hitting its thirtieth birthday and cresting over 200,000 miles, to say its a little worse for wear is an understatement. The turbo dadwagon has suffered transmission issues, and cold starting woes… but most frustrating is the sudden spike in fuel use. After some work, my humble daily driver had slid from using an acceptable 21 miles per gallon, to getting just 15. Add on the fact that the turbocharged engine demands premium fuel, and you can understand my consternation.

Now that I was haemorrhaging cash on a gargantuan weekly fuel bill, I had plenty of motivation to track down the problem. Busy, and eager for a quick solution, I deferred to a mechanic recommended as the local expert in all things Volvo. Sadly, the results were inconclusive — initial appearances were that all the engine’s electronic controls were functioning to specifications, and I was told that it was “probably a bad batch of fuel”.

Unfortunately, several expensive tanks later, sourced from all over town, revealed that the problem was in fact real. With a supposedly reliable report that the fuel mixture was correct, thus ruling out culprits like the oxygen sensor, I began to wonder, was I simply pouring fuel out the tank?

Continue reading “Lazy Hacker Checks Fuel System For Leaks, The Easy Way”

Upgrade Your Mac With A Touchscreen, For Only A Dollar

Imagine how hard it could be to add a touch screen to a Mac laptop. You’re thinking expensive and difficult, right? How could [Anish] and his friends possibly manage to upgrade their Mac with a touchscreen for only a dollar? That just doesn’t seem possible.

The trick, of course, is software. By mounting a small mirror over the machine’s webcam, using stiff card, hot glue, and a door hinge. By looking at the screen and deciding whether the image of a finger is touching its on-screen reflection, a remarkably simple touch screen can be created, and the promise of it only costing a dollar becomes a reality. We have to salute them for coming up with such an elegant solution.

They have a video which we’ve put below the break, showing a few simple applications for their interface. Certainly a lot less bother than a more traditional conversion.

Continue reading “Upgrade Your Mac With A Touchscreen, For Only A Dollar”

Workbench Light Arch On The Cheap

A light arch is exactly what it sounds like: an arch fitted with LED strips that can evenly illuminate the area below. They are becoming very popular in the miniature and model making communities as they put a lot of light where you need it without the shadows that you can get with purely overhead lighting. Those same characteristics make it excellent for electronics work as well, so while we haven’t seen many light arches come our way yet, we expect it won’t be long before they start tricking in.

[Spencer Owen] recently wrote in to tell us about his LED light arch that’s exceptionally easy and cheap to build. Whatever excuse you had before about not trying a light arch over your bench is probably out the window once you check this build out.

The heart of the arch is a length of plastic tile edging, which you can pick up from any big box home improvement store. LED strips are then attached to the inside face of the tile edging, and a suitable power supply wired into one end. [Spencer] mentions he’s strategically wrapped some sections of the arch with a diffuser, which may or may not be necessary for your particular application.

At this point the astute reader may have realized that this doesn’t make an arch, and would just give you a floppy light stick thing. Right you are. The real magic of this design are the 3D printed anchors. All you need to do is bend the tile edging, insert the ends in the anchors, and you’ve got a perfectly formed arch.

The hole in the anchor matches the profile of the tile edging closely, though might need to be adjusted to match a different brand of edging from what [Spencer] has. The tension of the plastic will be enough to hold the arch up without the need for glue or fasteners. As an added bonus, the arch can be taken down by just pulling the edging out and letting it return to its original shape.

Using your newly arisen arch to light up the bench is all well and good, but why stop there? Why not use it as clock, or to play a dungeon crawler?

Continue reading “Workbench Light Arch On The Cheap”