Dual Screen Laptop Is A Slick DIY Build

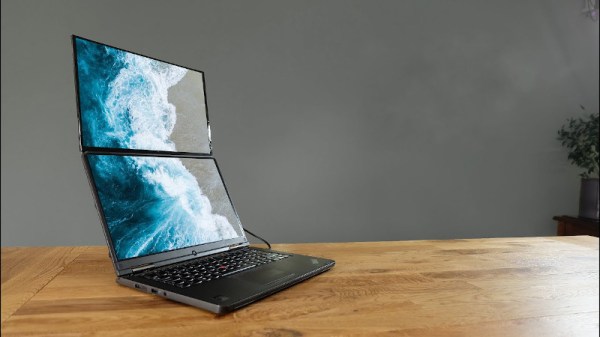
Laptops are great for portable productivity, but ergonomically they can leave something to be desired. They tend to force the user to look down, creating neck strain over extended periods. Rather than invest in expensive massages, [DIY Perks] decided what he really wanted was a dual screen laptop. So he built one! (Video embedded below.)

The build stats with a replacement laptop screen sourced from eBay, a nice full-HD IPS unit with a matching Embedded DisplayPort driver to enable the screen to be driven with the laptop’s existing HDMI port. To power the display, a USB-C Power Delivery board is used, in combination with a high-quality USB-PD compliant battery pack. This provides the 12 V required to run the screen.

To integrate the screen into the laptop, a set of 3D-printed hinges are used to create a folding mechanism, along with a brushed aluminium backing plate. Finished with a set of 3D-printed bezels, the final result is quite attractive from the front, looking almost stock at a glance.

It’s a build that may prove enticing to serious laptop professionals, particularly those that are willing to trade-off productivity against a little added bulk. We’ve seen other great work from [DIY Perks] before too, like these versatile LED panel lights. Video after the break.

Continue reading “Dual Screen Laptop Is A Slick DIY Build”

A CIA In 74HCT

If you owned a classic Commodore home computer you might not have known it at the time, but it would have contained a versatile integrated circuit called the MOS6526. This so-called CIA chip, for Complex Interface Adaptor, contained parallel and serial ports, timers, and a time-of-day counter. Like so many similar pieces of classic silicon it’s long out of production, so [Daniel Molina] decided to replicate a modern version of it on a PCB using 74HGT CMOS logic.

The result will be a stack of boards board that appear to be about the size of a 3.5″ floppy disk covered in surface-mount 74 chips, and connected to the CIA socket of the Commodore by a ribbon cable. The base board is the only one completed so far and contains the data direction registers and parallel ports, but the succeding boards will each carry one of the chip’s other functions.

It seems rather odd to use so much silicon to recreate a single chip, but the point is not of course to provide a practical CIA replacement. Instead it’s instructive, it shows us how these interfaces work as well as just how much circuitry is crammed into the chip. It’s no surprise that it’s inspired by the C74 Project, a TTL 6502 processor that we featured last year.

A Raspberry Pi 4 Video Streaming Backpack

Were you aware that there’s a market for backpack-housed live streaming video systems, and that they can cost as much as $1600? Apparently these things are popular with social media moguls who want to stream themselves living their fabulous lives to people sitting at home watching on YouTube or Twitch. But believing that even slack jawed yokels like us should have access to the same technology, [Speedify Labs] has been working on less expensive DIY alternative based on the Raspberry Pi 4.

Now you’ll note we didn’t use the term “cheap” to describe this build. As detailed here, it’s still going to cost you around $600. You could always swap out the Sony AS-300 camera and Elgato Cam Link capture device with cheaper versions, but the goal of this project was to deliver high quality HD video that’s comparable to what the professional rigs are capable of, so those kinds of concessions were avoided.

Whatever video source your audience and budget are comfortable with, it eventually gets fed into the Raspberry Pi 4 which uses an ffmpeg one-liner to encode the video and ultimately push it out as 720p at 24 FPS, which [Speedify Labs] says seems to be about as good as the Pi can do. The operator is able to start and stop the stream at will using a Circuit Playground Express and a Python script.

Of course, the trick to all of this is getting the video stream uploaded over potentially flaky mobile networks. But as you might have guessed, that’s where [Speedify Labs] gets to flex their eponymous product: a VPN with software channel bonding that allows you to combine multiple Internet connections for higher bandwidth and reliability. With their software, the Pi is able to stream the video through two mobile phones connected to it over USB. As demonstrated in the video below, the setup was able to maintain the stream even as they walked in and out of buildings.

Our very own [Lewin Day] wrote about his experiments with streaming video over 4G on the Raspberry Pi which might be of interest to anyone looking to take their show on the road. Though if you want to get serious it would be worth taking a look at the impressive mobile streaming rig that [Jenny List] saw at the BornHack 2019 hacker camp in Denmark.

Continue reading “A Raspberry Pi 4 Video Streaming Backpack”

Darwin Approves: Berkeley Evolves Analog Design

Digital design is hard. But in the right environment, digital circuits are more forgiving than analog. That 3.3V signal coming out of the chip has to drop a lot along the way to not be a logic level at the destination. If you are trying to push the boundary then digital design has much of analog design, but mostly you get a bit of a pass on many things that plague analog designers. Berkeley’s AI research group has been experimenting with using deep learning to evolve analog IC design.

Analog ICs are plagued with noise sources and often don’t have the margins that digital circuit designers enjoy. According to the post by [Kourosh Hakhamaneshi], designers often build a few blocks and attempt to lay them out in a way that should work and meet other requirements. Then they employ simulation, make changes as required, and simulate again. Accurate simulations can be very time intensive. You can read the actual paper, too, should you want to dig into the details.

Continue reading “Darwin Approves: Berkeley Evolves Analog Design”

When Your Car Breaks Down, Simply Hack It Into A Simulator

When [Nishanth]’s Subaru BRZ came to a sudden halt, he was saddened by the wait to get a new engine installed. Fortunately, he was able to cheer himself up by hacking it into a car simulator in the mean time. This would have the added benefit of not being limited to just driving on the Road Atlanta where the unfortunate mishap occurred, but any course available on Forza and similar racing games.

On paper it seemed fairly straight-forward: simply tap into the car’s CAN bus for the steering, throttle, braking and further signals, convert it into something a game console or PC can work with and you’re off to the races. Here the PC setup is definitely the cheapest and easiest, with a single part required: a Macchina M2 Under the Dash kit ($97.50). The XBox required over $200 worth of parts, including the aforementioned Macchina part, an XBox Adaptive Controller and a few other bits and pieces. And a car, naturally.

https://www.notion.so/image/https%3A%2F%2Fs3-us-west-2.amazonaws.com%2Fsecure.notion-static.com%2Fd49697c6-29ae-4b4d-a27b-e2da019d32de%2FUntitled.png?table=block&id=ed4e1bf2-91c6-4494-8e0f-f10964620869&width=5120&cache=v2

The Macchina M2 is the part that listens to the CAN traffic via the OBD2 port, converting it into something that resembles a USB HID gamepad. So that’s all a matter of plug’n’play, right? Not so fast. Every car uses their own CAN-based system, with different peripherals and addresses for them. This means that with the Macchina M2 acquired, [Nishanth]’s first task was to reverse-engineer the CAN signals for the car’s controls.

At this point the story is pretty much finished for the PC side of things, but the XBox One console is engineered to only accept official peripherals. The one loop-hole here is the Adaptive Controller, designed for people with disabilities, which allows the use of alternative inputs. This also enables using a car as an XBox One controller, which is an interesting side-effect.

Continue reading “When Your Car Breaks Down, Simply Hack It Into A Simulator”

The Zen Of Mechanical Keyboard Wiring

Mechanical keyboards are all the rage right now, but the vast majority of them are purchased commercially. Only the most dedicated people are willing to put in the time and effort required to design and assemble their own custom board, and as you might imagine, we’ve featured a number of such projects here on Hackaday in the past.

But what makes this particular mechanical keyboard build from [kentlamh] so special isn’t the final product (though it’s certainly quite nice), but the care he took when hand-wiring all of the switches to the Teensy 2.0 microcontroller that serves as its controller. There’s no PCB inside this custom board, it’s all rainbow colored wires, individual diodes, and the patience to put it all together with tweezers.

[kentlamh] takes the reader through every step of the wiring process, and drops a number of very helpful hints which are sure to be of interest to anyone who might be looking to embark on a similar journey. Such as bending the diode legs en masse on the edge of a table, or twisting them around a toothpick to create a neat loop that will fit over the pin on the back of the switch.

He also uses a soldering iron to melt away the insulation in the middle of the wires instead of suffering through hundreds of individual jumpers. We’ve seen this trick before with custom keyboards, and it’s one of those things we just can’t get enough of.

Some will no doubt argue that the correct way to do this would be to use an automatic wire stripper, and we don’t necessarily disagree. But there’s something undeniably appealing about the speed and convenience of just tapping the wire with the iron at each junction to give yourself a bit of bare copper to work with.

Even if you aren’t enough of a mechanical keyboard aficionado to travel all the way to Japan to attend the official meetup or discuss the finer points of their design at the Hackaday Superconference, there’s an undeniable beauty to this custom board. With a little guidance from [kentlamh], perhaps it will be your own handwired masterpiece that’s next to grace these pages.

[Thanks to Psybird for the tip.]