Pop-Up Outlet Helps Make The Most Of A Tiny Shop

You’ve got to admire the steps some people take to squeeze a shop into a small space. Finding ways to pack in ever more tools and to work on bigger and bigger projects become ends to themselves for some, and the neat little tricks they find to do so can be really instructive.

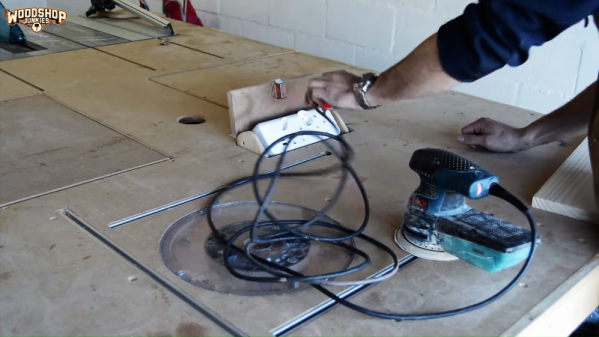
Take this workbench pop-up outlet strip for example. The shop that [Woodshop Junkies] occupies appears to be a single-car garage, on the smallish size in the first place, that is almost entirely filled with a multipurpose workbench. It provides tons of storage underneath and a massive work surface on top, but working with small power tools means stretching extension cords across the already limited floor space and creating a tripping hazard. So he claimed a little space on the benchtop for a clever trap door concealing a small tray holding an outlet strip.

The tray rides on short drawer glides and, thanks to a small pneumatic spring, pops up when the door is unlatched. There was a little trouble with some slop in the glides causing the tray to jam, but that was taken care of with a simple roller bearing. The video below shows its construction and how it stays entirely out of the way until needed.

As cool as this build is, it’s just icing on the small shop cake when compared to the workbench. [Woodshop Junkies] has a complete playlist covering the build which is worth watching. And you might want to refer to our tiny shop roundup for more tips on getting a lot done in a little space.

Continue reading “Pop-Up Outlet Helps Make The Most Of A Tiny Shop”

3D-Printed Extension For Extreme Macro Photography Includes Lens Electronic Control

Macro photography — the art of taking pictures of tiny things — can be an expensive pastime. Good lenses aren’t cheap, and greater magnification inflates the price even further. One way to release a bit more performance from your optics comes in the form of an extension tube, which mounts your lens further from the camera to zoom in a little on the image. Back in the day with a film SLR you could make a rough and ready tube with cardboard and tape, but in the age of the digital camera the lens has become as much a computer peripheral as an optical device. [Nicholas Sherlock] has solved this problem by creating a 3D-printed extension tube for his Canon that preserves connections between camera and lens.

More details of this 300mm monster’s construction go so far beyond a plastic tub formed of two threaded sections with adapter plates at the ends. He’s using off-the-shelf metal rings to fit camera and lens just right, but making the electronic contacts is where it gets interesting. On end uses pogo pins, the other provides a contact block made of nail heads. In both cases the 3D-printed parts are designed to provide mounting points for the pins and nails. The assembly technique is worth a look both because of the design and as an example of how to document all the juicy details we’re constantly looking for in a great hack.

The results speak for themselves, in that the photography provides an impressive level of close-up detail. If you would like to build your own tube, it is available on Thingiverse.

Macro extensions seem far between here, but we’ve brought you a few lens repairs in our time.

[via /r/photography]

Designing An Advanced Autonomous Robot: Goose

Robotics is hard, maybe not quite as difficult as astrophysics or understanding human relationships, but designing a competition winning bot from scratch was never going to be easy. Ok, so [Paul Bupe, Jr’s] robot, named ‘Goose’, did not quite win the competition, but we’re very interested to learn what golden eggs it might lay in the aftermath.

The mechanics of the bot is based on a fairly standard dual tracked drive system that makes controlling a turn much easier than if it used wheels. Why make life more difficult than it is already? But what we’re really interested in is the design of the control system and the rationale behind those design choices.

The diagram on the left might look complicated, but essentially the system is based on two ‘brains’, the Teensy microcontroller (MCU) and a Raspberry Pi, though most of the grind is performed by the MCU. Running at 96 MHz, the MCU is fast enough to process data from the encoders and IMU in real time, thus enabling the bot to respond quickly and smoothly to sensors. More complicated and ‘heavier’ tasks such as LIDAR and computer vision (CV) are performed on the Pi, which runs ‘Robot operating system’ (ROS), communicating with the MCU by means of a couple of ‘nodes’.

The competition itself dictated that the bot should travel in large circles within the walls of a large box, whilst avoiding particular objects. Obviously, GPS or any other form of dead reckoning was not going to keep the machine on track so it relied heavily on ‘LiDAR point cloud data’ to effectively pinpoint the location of the robot at all times. Now we really get to the crux of the design, where all the available sensors are combined and fed into a ‘particle filter algorithm’:

What we particularly love about this project is how clearly everything is explained, without too many fancy terms or acronyms. [Paul Bupe, Jr] has obviously taken the time to reduce the overall complexity to more manageable concepts that encourage us to explore further. Maybe [Paul] himself might have the time to produce individual tutorials for each system of the robot?

We could well be reading far too much into the name of the robot, ‘Goose’ being Captain Marvel’s bazaar ‘trans-species’ cat that ends up laying a whole load of eggs. But could this robot help reach a de-facto standard for small robots?

We’ve seen other competition robots on Hackaday, and hope to see a whole lot more!

Video after the break: Continue reading “Designing An Advanced Autonomous Robot: Goose”

Field Expedient Soldering Iron Will Do In A Pinch

If you think [Dubious Engineering]’s moniker is just a name, have a look at the pretty terrible soldering iron hacked out of a lighter in the video below. No one is suggesting this is a good idea but in an emergency, maybe it would come in handy. We liked the use of a chopstick and the formation of a heat exchanger with the copper wire coil. It was a mild disappointment that you had to drill out the chopstick, but we think you could have figured out a different method with a little thought.

The use of duct tape, of course, lends it instant hacker credibility. We suppose this might be useful not just after the robot uprising, but if you had to make a few quick solder joints far away from power and you don’t have a battery-operated iron.

Continue reading “Field Expedient Soldering Iron Will Do In A Pinch”

3D Printing Glass

For most of us, 3D printing means printing in plastic of some sort — either filament or photo resin. However, we have all wanted to print in other materials — especially more substantial materials. Metal printers exist but they aren’t cheap. However, it is possible to print molds and cast metal parts using them. [Amos Dudley] prints molds. But instead of metal, he casts parts out of glass.

[Amos] covers several techniques. The first is creating a relief (that is a 3D shape that grows out of a base). According to the post, this prevents difficult undercuts. He then casts a mold from silica and uses a kiln to melt glass into the mold. You might expect to do that with a full-size kiln, but you can actually get an inexpensive small kiln that fits in your microwave oven.

Continue reading “3D Printing Glass”

First Look At DEF CON 27 Official Badge; Kingpin Is Back!

The first big surprise Vegas had in store for everyone is that the DEF CON badge is an electronic badge this year. It’s traditionally been the DC practice to alternate years between electronic and non-electronic badges. Last year we had a fantastic electronic badge designed by the ToyMakers, so I had expected something more passive like the vinyl LP badge from a few years ago. What a pleasant surprise to learn otherwise!

Second up on the surprise list is the badge maker himself. The design is a throwback to days of yore as Joe Grand steps up to the plate once again. Veterans know him as Kingpin, and his badge-making legacy runs deep. Let’s jump in and take a look.

Continue reading “First Look At DEF CON 27 Official Badge; Kingpin Is Back!”

CNC Machine Rolls Up An Axis To Machine PVC Pipe

Whether it’s wood, metal, plastic, or otherwise, when it comes to obtaining materials for your builds, you have two choices: buy new stock, or scrounge what you can. Fresh virgin materials are often easier to work with, but it’s satisfying to get useful stock from unexpected sources.

This CNC router for PVC pipe is a great example of harvesting materials from an unusual source. [Christophe Machet] undertook his “Pipeline Project” specifically to explore what can be made from large-diameter PVC pipe, of the type commonly used for sewers and other drains. It’s basically a standard – albeit large-format – three-axis CNC router with one axis wrapped into a cylinder. The pipe is slipped around a sacrificial mandrel and loaded into the machine, where it rotates under what looks like a piece of truss from an antenna tower. The spindle seems a bit small, but it obviously gets the job done; luckily the truss has the strength and stiffness to carry a much bigger spindle if that becomes necessary in the future.

The video below shows the machine carving up parts for some lovely chairs. [Christophe] tells us that some manual post-forming with a heat gun is required for features like the arms of the chairs, but we could see automating that step too. We like the look of the pieces that come off this machine, and how [Christophe] saw a way to adapt one axis for cylindrical work. He submitted this project for the 2019 Hackaday Prize; have you submitted your entry yet?

Continue reading “CNC Machine Rolls Up An Axis To Machine PVC Pipe”