Art Generated From The Dubious Comments Section

[8BitsAndAByte] are back, and this time they’re taking on the comments section with art. They wondered whether or not they can take something as dubious as the comments section and redeem it into something more appealing like art.

They started by using remo.tv, a tool they’ve used in other projects, to read comments from their video live feeds and extract random phrases. The phrases are then analyzed by text to speech, and a publicly available artificial intelligence algorithm that generates an image from a text description. They can then specify art styles like modern, abstract, cubism, etc to give their image a unique appeal. They then send the image back to the original commenter, crediting them for their comment, ensuring some level of transparency.

We were a bit surprised that the phrase dog with a funny hat generated an image of a cat, so I think it’s fair to say that their AI engine could use a bit of work. But really, we could probably say that about AI as a whole.

Continue reading “Art Generated From The Dubious Comments Section”

Aesthetic DIY Bluetooth Speakers

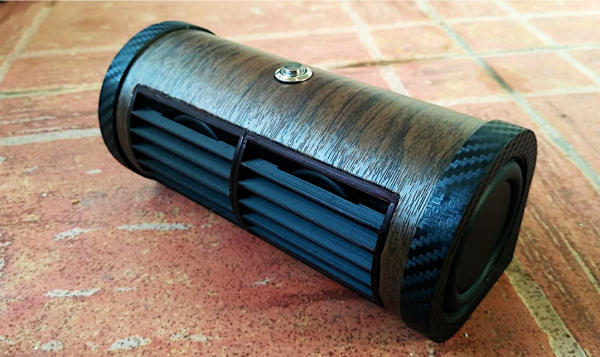
DIY Bluetooth speaker projects are always a staple here at Hackady. In our latest feature of DIY audio builds, we have [Patrick’s] vinyl cylindrical speaker.

He found a pretty inexpensive Bluetooth audio amplifier on AliExpress. However, the amplifier module oddly enough had a few missing components that were critical to its operation, so he had to do a little bit of re-work. Not something you generally expect to do when you purchase a pre-made module, but he was certainly up to the task.

He noticed the board amp module was missing a battery protection circuit even though there was space on the board laid out for those components (maybe an older board revision?). To remedy this problem, he added his own battery protection circuit to prevent any unwanted catastrophes. Secondly, he noticed a lot of distortion at high volumes and figured that some added capacitance on the power supply would help fix the distortion. Luckily, that did the trick.

Finally, and not quite a mistake on the manufacturer’s part this time, but an improvement [Patrick] needed for his own personal use. He wanted the amp module’s board-level LED indicator to be visible once the enclosure was fitted around the electronics. So, he used the built-in status trigger as a digital signal for a simple transistor circuit powering a much brighter ring LED that could be mounted onto the enclosure. That way, he could utilize the firmware for triggering the board-level status indicator for his own ring LED without any software modifications to the amp module.

Now, all that was left was to construct the enclosure he had 3D-printed and fit all the electronics in their place. We’ve gotten pretty used to the always impressive aesthetics of [Patrick’s] designs, having covered a project of his before, and this build is certainly no exception. Great job!

While you’re here, take a look at some other DIY Bluetooth speaker projects on Hackaday.

Continue reading “Aesthetic DIY Bluetooth Speakers”

Rotary Dialer Becomes Numeric Keypad

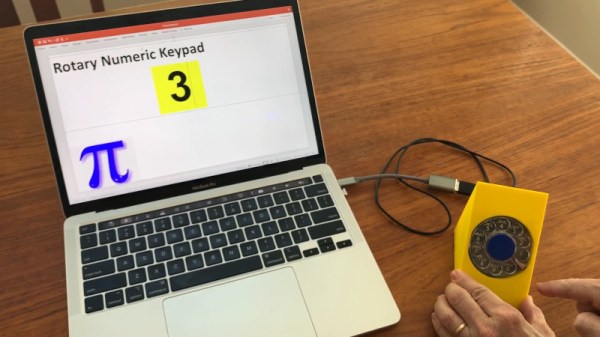
Many laptops eschew the numeric keypad to free up space, and some desktop keyboards have taken on the trend, too. If you want a specialised numeric entry device and have absolutely no interest in speed or ease of use, [jp3141] has just the build for you.

The idea is to use the rotary dial from an old telephone to enter numbers into a computer. It’s slow and cumbersome, but it’s also pretty entertaining. The build uses an old AT&T Trimline dialer, though we’re sure most rotary phones would work. The pulses produced by the dialer are counted by a Teensy microcontroller, which emulates a USB HID keyboard device and enters the relevant keystroke into the computer. There’s also a USB serial interface for debugging, and an LED which flashes along with the pulses from the dialer circuit.

While it’s not the most efficient data entry method, it’s a semi-useful way to repurpose an old phone, and an amusing piece to take along to your next LAN party. We’ve featured a few… alternative… keyboards before, too. If you’ve cooked up a truly convoluted input device for your computer, be sure to let us know.

Learn Software Reverse Engineering: Ghidra Class Videos From HackadayU Now Available!

The HackadayU video series on learning to use Ghidra is now available!

Ghidra is a tool for reverse engineering software binaries — you may remember that it was released as Open Source by the NSA last year. It does an amazing job of turning compiled binaries that tell the computer how to operate into human-readable C code. The catch is that there’s a learning curve to making the most out of what Ghidra gives you. Enter the Introduction to Reverse Engineering with Ghidra class led by Matthew Alt as part of the HackadayU series. This set of four one-hour virtual classroom videos were just made available so that you can take the course at your own pace.

Matthew has actually been schooling us for a while. He’s also known as [wrongbaud] and we’ve been spending a lot of time covering his reverse engineering projects, including the teardowns of NES-on-a-chip hardware and his excellent hacker’s guide to JTAG. His HackadayU class continues that legacy by pulling together course materials for a high-quality hands-on walk through Ghidra. You’ll get a dose of computer architecture, the compilation process, ELF file structure, and x86_64 instructions sets along the way. He’s done a superb job of making example code for the coursework available.

While this was the first HackadayU course, there are more on the way. Anool Mahidharia just finished teaching KiCAD & FreeCAD 101 and videos will be published a soon as the editing process is complete. The fall lineup of classes is shaping up nicely and will be announced soon. As a sneak peak, we have instructors working on classes covering tiny machine learning, a second set of classes on Ghidra reverse engineering, a protocol deep dive (I2C, SPI, one-wire, JTAG etc.), Linux on Raspberry Pi, building interactive art, and all about LEDs, and an intro to design with Rhino. Keep your eye on Hackaday for more info as classes are added to the schedule.

Continue reading “Learn Software Reverse Engineering: Ghidra Class Videos From HackadayU Now Available!”

No-Melt Nuclear ‘Power Balls’ Might Win A Few Hearts And Minds

A nuclear power plant is large and complex, and one of the biggest reasons is safety. Splitting radioactive atoms is inherently dangerous, but the energy unleashed by the chain reaction that ensues is the entire point. It’s a delicate balance to stay in the sweet spot, and it requires constant attention to the core temperature, or else the reactor could go into meltdown.

Today, nuclear fission is largely produced with fuel rods, which are skinny zirconium tubes packed with uranium pellets. The fission rate is kept in check with control rods, which are made of various elements like boron and cadmium that can absorb a lot of excess neutrons. Control rods calm the furious fission boil down to a sensible simmer, and can be recycled until they either wear out mechanically or become saturated with neutrons.

Nuclear power plants tend to have large footprints because of all the safety measures that are designed to prevent meltdowns. If there was a fuel that could withstand enough heat to make meltdowns physically impossible, then there would be no need for reactors to be buffered by millions of dollars in containment equipment. Stripped of these redundant, space-hogging safety measures, the nuclear process could be shrunk down quite a bit. Continue reading “No-Melt Nuclear ‘Power Balls’ Might Win A Few Hearts And Minds”

Saturday: Vintage Computer Festival West

The Vintage Computer Festival West is an annual gathering to celebrate the awesome hardware that ushered in the Information Age. Normally held at the Computer History Museum in Mountain View, California, this year VCF West is happening virtually and it all starts on Saturday!

The lineup of talks looks great, covering everything from operating an Apollo DSKY display panel and how to recover magnetic tape to ENIAC technical manual bugs and the genesis of the 6502. That last one is presented by Bill Mensch who was on the team that created the 6502 in the first place. He’ll be joined by Hackaday’s own Bil Herd (himself a celebrated Commodore and MOS alum) and Eric Schlaepfer (you may remember his Monster 6502 project). You may not be able to wander the exhibits and play with the vintage hardware this year, but you can hear from a lot of people who have spent years learning the hacks and quirks that made these systems tick.

Hacakaday is proud to once again sponsor VCF West. You don’t need a ticket, the conference will live stream on their YouTube channel for all who are interested. We’ve embedded the live stream below, as well as the awesome poster at that Joe Kim produced for display at the festival.

Continue reading “Saturday: Vintage Computer Festival West”

Denim Sunglasses Frames Use A Wicked Set Of Jigs

An obligatory “Future’s so bright I gotta wear… denim” joke is the only way to kick off this article. Sorry!

Now that that’s out of the way, how would you turn your own blue jeans into sunglasses? Well you wouldn’t, unless you’ve built an intricate jig for assembling sunglasses frames like [Mosevic] has done. Boiled down, this is like making parts out of carbon fiber, except you swap in denim for the carbon fiber. Several layers of blue jean material are layered in a mold and impregnated with resin. Once hardened, parts can be milled or laser cut from this stock and then assembled into the frames all of the hipsters are after.

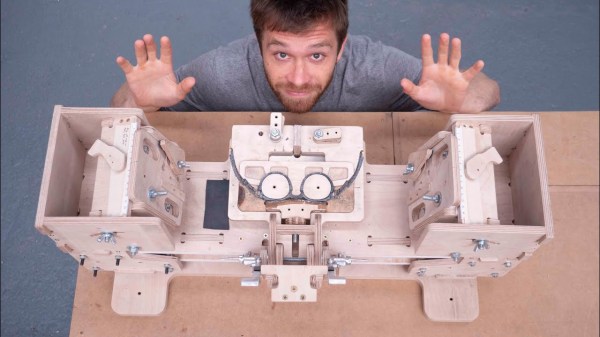
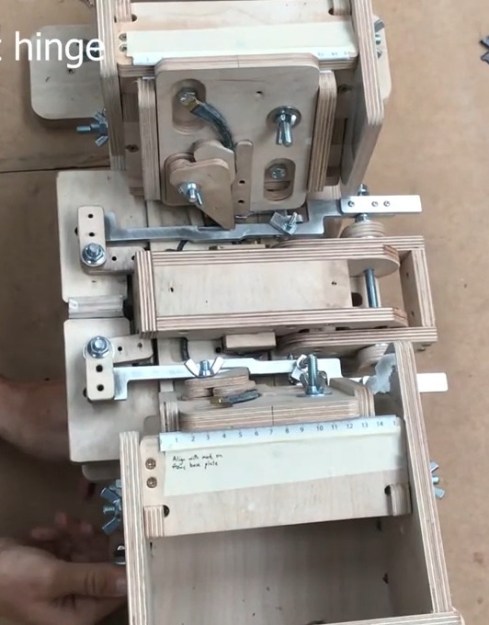
For us its the assembly jig that’s so interesting to see. [Mosevic] shared it in an unlisted video of an update to the Kickstarter campaign which ran at the end of 2019. The jig is used to align machined parts into stack ups that include brass reinforcement and pins to align layers, as well as the joining for the three parts of the frame via the metal hinges. Most of the jig is made from machined plywood. The plates that hold the three parts of the frame, the “frame front” and the two “temples” in eyeglass parlance, are interchangeable so that the same jig can be used to assemble several variants of the frame design. The most notable non-plywood part of the jig are two metal clamps that hold the hinge into the frame front as the glue dries, holding a couple of tiny chunks of denim/resin block in place.

Here you can see the jig with all clamps fully closed. There is not an insignificant amount of time just getting the parts into this jig. But parts still need quite a bit of cleanup after this process to sand, shape, and polish all edges and surfaces of the frames. And of course you have to figure in the time it took to make the parts that went into the jig in the first place. The finished frames are gorgeous, but we have a lot more respect having seen what it takes to pull it off.

Now if you like your glasses like George Washington liked his false teeth, here’s how you can pull a set of shades out of your woodshop.

Continue reading “Denim Sunglasses Frames Use A Wicked Set Of Jigs”