A Raspberry Pi 400 UPS Add-On, It’s Not All Plain Sailing

Since the recent launch of the all-in-one Raspberry Pi 400, the global hardware community have taken to the new platform and are investigating its potential for hardware enhancements. On the back it has the same 40-pin expansion connector as its single-board siblings, but it’s horizontal rather than vertical, which means that all of the conventional HATs sit in a rather ungainly upright position.

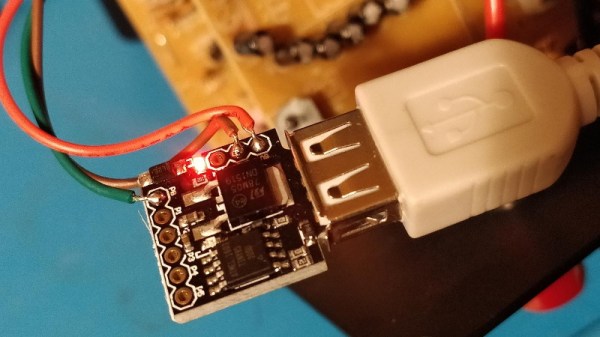
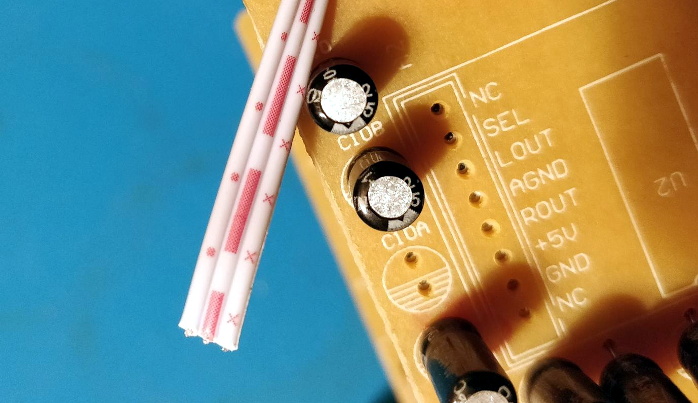
One of the first Pi 400 HATs we’ve seen comes from [Patrick Van Oosterwijck], who has made a very neat 18650-based UPS add-on that is intended to eventually fit in the back of the machine in a similar way to the home computer cartridge peripherals of old. Unfortunately not all has gone according to plan, and in finding out why that is the case we learn something about the design of the 400, and maybe even take a chance to reflect on the Pi Foundation itself.

On the face of it the 400’s interface is the same as that of its single board computer stablemates, but something this project reveals is that its 5 V pins have a current limit of 1 A. This turns out to preclude the type of plug-in Pi UPS that sits on a HAT that we’re used to, in that 1 A through the 5 V pin is no longer enough to run the computer.

This effectively puts a stop to [Patrick]’s project, though he can repurpose it for a Pi 4 and its siblings once he’s dealt with a converter chip overheating problem. He does however make a complaint about the Pi Foundation’s slowness in releasing such data about their products, and given that long-time Pi-watchers will remember a few other blips in the supply of Pi hardware data he has a point. A quick check of the Raspberry Pi GitHub repository reveals nothing related to the Pi 400 at the time of writing, and though it shares much with its Pi 4 sibling it’s obvious that there are enough differences to warrant some extra information.

Hardware hackers may not be part of the core education focus of the Pi range, but a healthy, interested, and active hardware community that feels nurtured by its manufacturer remains key to the supply of interesting Pi-related products feeding into that market. We’d like to urge the Pi Foundation to never forget the hardware side of their ecosystem, and make hardware specification an integral part of every product launch on day one.

If the Pi 400 catches your interest, you can read our review here.

SMD Challenge Extreme Edition Gets Our Flux Flowing

Skills challenges have become a fun way to facilitate friendly competition amongst anyone who appreciates a fine solder joint. If you’ve seen any Supercon / Remoticon coverage there’s surely been a mention of the infamous soldering skills challenge, where competitors test their mettle against surface mount components sized to be challenging but fair. What if there was a less friendly SMD challenge designed to make you hold your breath lest you blow the components away? Well now there is, the SMD Challenge Extreme Edition by friend-of-the-Hackaday and winner of the 2019 Supercon soldering challenge [Freddie].

When assembled the SMD Extreme Edition uses a 555 timer and a 74HC4017 decade counter to light a ring of 10 LEDs lights around its perimeter, powered by a coin cell. However the  Extreme Edition deviates from the typical SMD Challenge format. Instead of ramping up in difficulty with ever-shrinking components, the Extreme Edition only has one size: torturous. See those gray blobs in the title image? Those are grains of rice.

The Extreme Edition’s 0201-sized LEDs aren’t the absolute smallest components around, but to minimize enjoyment all passives are 01005. (Check out the SMD Challange Misery Edition for even 01005 LED action.)

The Extreme Edition has other tricks up its sleeve, too. That 555 may be venerable in age, but this version is in an iron-frustrating 1.41 x 1.43 mm BGA package, which pairs nicely with that decade counter in 2.5 mm x 3.5 mm QFN.

Despite the wordwide pandemic locking down travel and conferences, a few brave challengers have already taken up their iron and succeeded at Extreme SMD. Want to see it in action? Check out the original Tweets after the break.

Continue reading “SMD Challenge Extreme Edition Gets Our Flux Flowing”

True Networked KVM Without Breaking The Bank

For administering many computers at once, an IP KVM is an invaluable piece of equipment that makes it possible to get the job done over the network without having to haul a keyboard, monitor, and mouse around to each computer. The only downside is that they can get pricey, unless of course you can roll one out based on the Raspberry Pi and the PiKVM image for little more than the cost of the Pi itself.

The video linked below shows how to set all of this up, which involves flashing the image and then setting up the necessary hardware. The build shows an option for using HDMI over USB, but another option using the CSI bus would allow for control over options like video resolution and color that a USB HDMI dongle doesn’t allow for. It also makes it possible to restart the computer and do things like configure BIOS or boot from removable media, which is something that would be impossible with a remote desktop solution like VNC.

The creator of PiKVM was mentioned in a previous post about the creation of the CSI bus capture card, and a Pi hat based on this build will be available soon which would include options for ATX controls as well. Right now, though, it’s possible to build all of this on your own without the hat, and is part of what makes the Pi-KVM impressive, as well as its very low cost.

Continue reading “True Networked KVM Without Breaking The Bank”

Real Spectrum Analysis Goes Virtual

One of the hard things about electronics is that you can’t really see the working parts without some sort of tool. If you work on car engines, fashion swords, or sculpt clay, you can see with your unaided eye what’s going on. Electronic components are just abstract pieces and the real action requires a meter or oscilloscope to understand. Maybe that’s what [José] was thinking of when he built a-radio. This “humble experiment” pipes a scan from a software-defined radio into VR goggles, which can be as simple as a smartphone and some cardboard glasses.

The resulting image shows you what the radio spectrum looks like. Granted, so will a spectrum analyzer, but perhaps the immersion will provide a different kind of insight into radio frequency analysis.

Continue reading “Real Spectrum Analysis Goes Virtual”

DIY Camera Motion Rig Is Mostly 3D Printed

These days, Youtube is more competitive than ever. Creators put out videos of wildly expensive, complex projects with equally pricy camera gear. [Do It Whenever?] wanted to join the arms race, building his own camera rig for smooth, swooping shots.

The rig consists of a series of 3D printed axes all joined together into a 6-axis motion rig. Additionally, actuators attached to the lens of the camera allow zoom and focus to be be controlled programmatically too. An Arduino runs the show, interpreting G-code and running the various axes, with a Raspberry Pi acting as a gateway to allow the rig to be commanded from PCs or smartphones.

Currently, control is largely manual, by entering G-code commands to move the rig in various ways. The rig can also have its motors temporarily disengaged by a button, allowing the camera to be aimed by hand, before holding the position. In this way, it acts as a highly versatile tripod. Future plans involve more automation if suitable open-source software can be found.

It’s an impressive rig, even if it hasn’t quite found the perfect software to fully exploit its capabilities yet. We’ve seen similar builds before, too. Video after the break.

Continue reading “DIY Camera Motion Rig Is Mostly 3D Printed”

Digispark Spoofs IR To Get Speakers Under Control

The Microlab 6C are a pretty nice pair of speakers, but [Michał Słomkowski] wasn’t too thrilled with the 8 watts they consume when on standby. The easy fix is to just unplug them when they aren’t in use, but unfortunately the digital controls on the front panel mean he’s got to turn them on, select the correct input, and turn the volume up to the appropriate level every time they’re plugged back in. Surely there must be a better way.

His solution was to use a Digispark to fire off the appropriate IR remote codes so they’d automatically be put back into a usable configuration. But rather than putting an IR LED on one of the GPIO pins, he simply spliced it into the wire leading back from the speaker’s IR receiver. All his code needs to do is generate the appropriate pulses on the line, and the speaker’s electronics think its a signal coming in from the remote.

Distinctive patterns on the IR sensor wires.

Power for the Digispark is pulled from the speaker itself, so it turns on once [Michał] plugs them back in. The code waits five seconds to make sure the hardware has had time to start up, then proceeds with the “Power On”, “Change Input”, and “Volume Up” commands with a few seconds in between each for good measure.

Not only was it easier to skip the IR and inject the signals directly, but it also made for a cleaner installation. Since the microcontroller doesn’t need line of sight to the IR receiver, [Michał] was able to hide it inside the speaker’s enclosure. From the outside, the modification is completely invisible.

We’ve seen similar code injection tricks used before, and it’s definitely one of those techniques you should file away mentally for future reference. Even though more and more modern devices are embracing WiFi and Bluetooth control, the old school IR remote doesn’t seem like it’s going away anytime soon.

Alfred Jones Talks About The Challenges Of Designing Fully Self-Driving Vehicles

The leap to self-driving cars could be as game-changing as the one from horse power to engine power. If cars prove able to drive themselves better than humans do, the safety gains could be enormous: auto accidents were the #8 cause of death worldwide in 2016. And who doesn’t want to turn travel time into something either truly restful or alternatively productive?

But getting there is a big challenge, as Alfred Jones knows all too well. The Head of Mechanical Engineering at Lyft’s level-5 self-driving division, his team is building the roof racks and other gear that gives the vehicles their sensors and computational hardware. In his keynote talk at Hackaday Remoticon, Alfred Jones walks us through what each level of self-driving means, how the problem is being approached, and where the sticking points are found between what’s being tested now and a truly steering-wheel-free future.

Check out the video below, and take a deeper dive into the details of his talk.

Continue reading “Alfred Jones Talks About The Challenges Of Designing Fully Self-Driving Vehicles”