Give 3D Printed Plastic A Well-Worn Metal Look

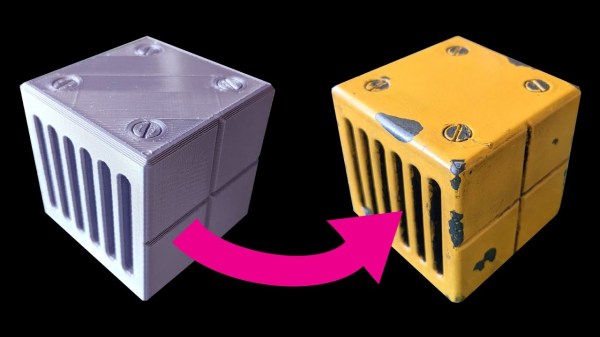
Affordable 3D printers let us turn ideas into physical reality without a big expensive workshop, but with their power came some disadvantages. The nature of FDM printers impart layer lines and nozzle ridges in the parts they produce. They can be minimized with optimized print settings, but never eliminated. [Emily Velasco] loves the power of 3D printing but not how the parts look. So she put in the effort to make 3D-printed plastic look like distressed metal and showed us how she did it. (Video also embedded after the break.)

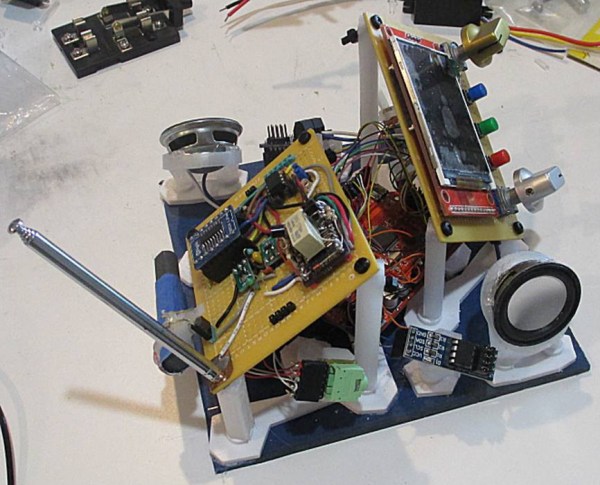
This video is a follow-up to her Pet Eye project in response to feedback on Twitter. She had mentioned that the  salvaged metal box for Pet Eye wasn’t quite big enough to hold everything, so she had to extend its internal volume with a 3D print box on the back. It fit in so well that the offhand comment surprised many people who wanted to know more about how it was done. So she designed a demonstration cube covered with mechanical characteristics, and gave us this walkthrough of its transformation.

Continue reading “Give 3D Printed Plastic A Well-Worn Metal Look”

This Week In Security: Ransomware, WeLock, And Amazon Arbitration

Another week of ransomware, and this time it’s the beef market that’s been shut down, due to a crippling infrastructure attack out of Russia — but hold up, it’s not that simple. Let’s cover the facts. Some time on Sunday, May 30, JBS USA discovered a ransomware attack against their systems. It seems that their response team did exceptionally well, pulling the plug on affected machines, and starting recovery right away. By Wednesday, it was reported that most of their operations were back in action.
Continue reading “This Week In Security: Ransomware, WeLock, And Amazon Arbitration”

Soldering Iron Plus Camera Gimbal Helps Cancel Out Hacker’s Hand Tremors

Soldering requires steady hands, so when [Jonathan Gleich] sadly developed a condition called an essential tremor affecting his hands, soldering became much more difficult. But one day, while [Jonathan] was chatting with a friend, they were visited by the Good Ideas Fairy and in true hacker fashion, he ended up repurposing a handheld camera stabilizing gimbal to hold a soldering iron instead of a camera or smartphone. Now instead of the gimbal cancelling out hand movements to keep a camera steady, it instead helps keep a soldering iron steady.

While the inner workings of the cheap gimbal unit didn’t need modification, there were a couple of things that needed work before the project came together. The first was to set up a way to quickly and easily connect and disconnect the soldering iron from the gimbal. Thanks to a dovetail-like connector, the iron can be safely stored in its regular holster and only attached when needed.

The other modification is more subtle. The stabilizer motors expect to be managing something like a smartphone, but a soldering iron is both lighter and differently balanced. That meant that the system worked, but not as well as it needed to. After using some small lead weights to tweak the mass and center of gravity of the soldering iron — making it feel and move a bit more like an iPhone, as far as the gimbal was concerned — results were improved.

The soldering iron stabilizer works well enough for now, but we don’t doubt that [Jonathan] already has further tweaks in mind. This is a wonderful repurposing of a consumer device into an assistive aid, so watch it in action in the short video embedded below.

Continue reading “Soldering Iron Plus Camera Gimbal Helps Cancel Out Hacker’s Hand Tremors”

An Exercise In Firmware Dumping With The GreatFET

Looking to hone his hardware hacking skills, [James Chambers] recently set out to reverse engineer a common cheap wireless keyboard: the Logitech K360. The chipset it uses has already been fairly well explored (and exploited) by security researchers, but the goal here was more about gaining some practical hands-on experience than it was breaking any new ground.

The first post in what we’re sure will be a fascinating series deals with dumping the board’s firmware using the GreatFET. We actually haven’t seen too many projects that showcase the capabilities of this highly capable open hardware multi-tool, so the post serves as a nice demonstration of how one goes about writing the necessary Python scripts to put it to work in a practical scenario.

Some promising bytes.

Of course, even with the best of tools, there’s always a few stumbling blocks. After identifying what was clearly some kind of programming header on the K360’s diminutive PCB, it took a few failed attempts at reading the firmware before [James] realized he needed to tap into more pins on the keyboard’s nRF24LE1 microcontroller. Once everything was physically wired up, he wrote some code for the GreatFET that would perform the proper incantations on the chip’s PROG and RESET pins to enable its programming interface.

[James] goes on to explain how you can pull some extended chip information out of the hardware and verify the contents of the firmware dump with Gihdra, but any more advanced analysis will have to wait until the next post in the series. In the meantime, if you like reading about hardware hacking from this “over the shoulder” viewpoint, you should check out some of the fantastic work that [wrongbaud] has sent in over the last year or so.

Lamp Sheds Light On Air Quality

It can be difficult to appreciate when the air quality is decent and when it’s poor, unless conditions are so bad that you can literally see the smog hanging in the air. Rather than try to digest a bunch of air quality numbers, [guillaume_slizewicz] built Canari — a lovely lamp that sheds light on the air pollution problem by taking local air quality data and turning it into light patterns.

Canari is of course named after the brave birds that once alerted miners to dangerous air conditions before they were forced to switch to carbon monoxide sensors. This bird has a Raspberry Pi Zero W that gets air quality data from a public API and controls the lights with a PWM bonnet based on the concentration of particulates in the air. The more particulates, the dimmer the LEDs are, and the faster they fade in and out.

The main piece of data that Canari grabs is the amount of particulate matter, and the display can switch between representing the level of PM2.5 (particulate matter with diameter less than 2.5 micrometers)  in the air and PM10. Check out the demo and setup video after the break.

More of a numbers person? All you really need is a microcontroller, an air quality sensor, and a display.

Continue reading “Lamp Sheds Light On Air Quality”

Gdbdiff: Diff-ing A Real RP2040 MCU Against An Emulated MCU

What to do when developing an RP2040 emulator but validating the emulator instruction by instruction is a slow and tedious process? Why, automatically compare it against the real hardware if you’re [Uri Shaked], of course. This is the purpose of gdbdiff. This project uses the GDB remote serial protocol via OpenOCD to run test firmware step by step.

During a livestream (video linked via the above link), this allowed [Uri] to find a number of instruction bugs in the emulator this way. These issues involved issues such as incorrect flags in the APSR register and an edge case in the LSRS register. This gdbdiff livestream is part of an entire series of live-coding sessions during which [Uri] writes an RP2040 emulator from scratch.

We applaud [Uri] for creative thinking here, and assume that this way the livestream was probably more entertaining to watch than when doing instruction-level debugging purely by hand :)

Radio Build Goes Outside The Box

It’s easy to get caught up in a build and forget that the final version usually needs some sort of enclosure, especially things with sensitive electronics in them. The [Director of Legal Evil] at the LVL1 Louisville Hackerspace notes as much in his recent radio build. It seems as though the case was indeed an afterthought, but rather than throwing it in a nondescript black project enclosure it was decided to turn the idea of a project enclosure itself inside-out.

The radio build is based on an SI4732 radio receiver which is a fairly common radio module and is easily adaptable. It needs a microcontroller to run though, so a Maple STM32 platform was chosen to do all of the heavy lifting. The build includes a screen, some custom analog controls, and a small class D audio amplifier, but this is the point it begins to earn its name: the Chaos Radio. While playing around with the project design in CAD, a normal design seemed too bland so one was chosen which makes the radio look like the parts are exploding outward from what would have been a more traditional-style enclosure.

While the project includes a functioning radio receiver, we have to complement the creator for the interesting display style for this particular set of hardware. It can get boring designing the same project enclosures time after time, so anything to shake things up is often welcomed especially when it puts all of the radio components on display like this. In fact, it’s reminiscent of some of [Dmitry]’s projects, an artist known for deconstructing various common household appliances like this CD Player.

Thanks to [Jose] for the tip!