Automated Air Cannon Shoots Smoke Rings

Air cannons are fun, and became a part of mainstream culture with the popular Airzooka toy. Of course, cocking and firing the Airzooka gets tiring after a while, and they’re kind of a little small. This build from [1alembic] delivers on both those counts. 

Cool, huh?

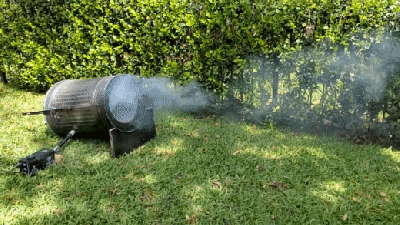
The result is a bigger air cannon that repeatedly fires all by itself. The cannon itself is built out of a trash can with the bottom cut out. It’s then fitted with a diaphragm made out of a heavy-duty trash bag covered in duct tape for added strength. Latex hose is then installed inside the trash can, attached to the diaphragm. Thus, the diaphragm can be pulled back, and when released, it’s pulled forward, creating a rush of air through the trash can which generates a vortex ring just like the smaller Airzooka.

The automation of the cannon is beautifully simple. A string is attached to the back of the diaphragm, and wrapped around a rod so it can be wound up. This allows a wiper motor to turn the rod via a set of gears, pulling the diaphragm back.

However, the drive gear on the wiper motor has half its teeth missing. The system is then set up so that once the diaphragm is pulled right back, the drive gear gets to the missing teeth, allowing the winder rod to spin back freely as the diaphragm shoots forward, firing the air cannon. The cycle then repeats as the drive gear re-engages the winding mechanism.

Paired with a smoke machine, the air cannon will whirr away, firing beautiful smoke rings at regular intervals until it’s switched off. It’s an elegant thing that we’d love to leave set up at a party to add some atmosphere. We’ve seen other air cannons built with some real fire-power, too. Video after the break.

Continue reading “Automated Air Cannon Shoots Smoke Rings”

This Week In Security: Unicode Strikes, NPM Again, And First Steps To PS5 Crack

Maybe we really were better off with ASCII. Back in my day, we had space for 256 characters, didn’t even use 128 of them, and we took what we got. Unicode opened up computers to the languages of the world, but also opened an invisible backdoor. This is a similar technique to last week’s Trojan Source story. While Trojan Source used right-to-left encoding to manipulate benign-looking code, this hack from Certitude uses Unicode characters that appear to be whitespace, but are recognized as valid variable names.

const { timeout,ㅤ} = req.query;
Is actually:
const { timeout,\u3164} = req.query;

The extra comma might give you a clue that something is up, but unless you’re very familiar with a language, you might dismiss it as a syntax quirk and move on. Using the same trick again allows the hidden malicious code to be included on a list of commands to run, making a hard-to-spot backdoor.

The second trick is to use “confusable” characters like ǃ, U+01C3. It looks like a normal exclamation mark, so you wouldn’t bat an eye at if(environmentǃ=ENV_PROD){, but in this case, environmentǃ is a new variable. Anything in this development-only block of code is actually always enabled — imagine the chaos that could cause.

Neither of these are ground-breaking vulnerabilities, but they are definitely techniques to be wary of. The authors suggest that a project could mitigate these Unicode techniques by simply restricting their source code to containing only ASCII characters. It’s not a good solution, but it’s a solution. Continue reading “This Week In Security: Unicode Strikes, NPM Again, And First Steps To PS5 Crack”

Is This 12-layer PCB Coil The Next Step In Ferrofluid Displays?

[Applied Procrastination] is in the business of vertical ferrofluid displays, but struggles somewhat with the electromagnets available off the shelf and the proliferation of wiring that results. [Carl Bugeja] is in the business of making PCB coils, both with rigid and flex PCB substrates, so when the opportunity for a collaboration arose, [AP] jumped at the opportunity.

As [Simen from AP] mentions in the video after the break, they had considered using a large PCB with embedded coils for Fetch their ferrofluid display unit, but the possible magnetic field was just too weak, and attempting to crank up the amps, just overheats them. Some improvements were made, first sticking the coil PCB to a small disk of ferrous metal, which doubled up as a handy heatsink. Next, he tried adding a permanent magnet, which added a bit of bias field. Alone this was not enough to hold the ferrofluid in place, but with the coil powered, it was starting to look encouraging.

Much more progress was made when [Carl] sent over a new design of his, a 12-layer PCB coil. This obviously had a much larger field, but still not enough without the extra boost from permanent magnet.

[Simen] currently doesn’t think the PCB approach is quite there yet, and is looking for help to source PCB-mounted electromagnets of the wired variety. We would imaging prototyping with such a large 12-layer PCB would be rather prohibitively expensive anyway.

Continue reading “Is This 12-layer PCB Coil The Next Step In Ferrofluid Displays?”

M5Paper Gets Open Source Weather Display Firmware

We know you like soldering irons, we’re quite fond of them ourselves. But the reality is, modular components and highly capable development boards allow the modern hardware hacker to get things done with far less solder smoke then ever before. In fact, sometimes all you need to finish your project is the right code.

Case in point, check out the slick electronic paper weather display that [Danko Bertović] shows off in the latest Volos Projects video. While it certainly fits the description of a DIY project, he didn’t have to put any of the hardware together himself. The M5Paper is an ESP32 development kit designed around a crisp 4.7″, 960 x 540 e-paper panel that includes everything from environmental sensors to an internal 1150 mAh battery. To make your handheld e-paper dreams come true, the only thing you need to provide is the software.

The weather display code provided by [Danko] should certainly get you going in the right direction. Now don’t get us wrong, there’s certainly no shame in just flashing his code to the device and plunking it on your desk. It’s a gorgeous looking interface, and we all know that a sprinkling of open source code is often all it takes to make a standard consumer device extraordinary. But by using the code he’s provided as a launching point, you can take this turn-key device and really make it your own.

Continue reading “M5Paper Gets Open Source Weather Display Firmware”

Three-Dimensional Design Yields Compact Seven-Segment Hex Displays

Computers, from the simplest to the most complex, aren’t very useful if they can’t provide feedback to a user. Whether that interface takes the form of a monitor, a speaker, or a simple LED, there’s almost always some kind of output. One of the most ubiquitous is the ever-present seven-segment display. They’re small, they’re easy to use, and, perhaps most important, they’re cheap.

While the displays themselves are relatively compact, they often require some sort of driver circuitry — something that translates a digit into voltage at the correct pins. These drivers can take up valuable space, especially on a breadboard, and can sometimes make using seven-segment displays cumbersome. Thankfully, [John Lonergan] has a great solution: driver boards that sit completely beneath the displays. His dual seven-segment hex display project was born out of necessity — he needed it for the breadboard CPU SPAM-1, which was getting a bit too bulky. Each module is two seven-segment displays atop a small PCB. Beneath the displays lives an 8-bit PIC microcontroller, which acts as a driver for both of the displays.

It’s so easy to restrict ourselves to thinking in two dimensions when working on electronic design — even designing multilayer PCBs often feels like working on several, distinct two-dimensional areas rather than one three-dimensional one. The concept of stacking components to save space, while fairly straightforward to implement, is a great example of the kind of problem-solving we love to see here at Hackaday. Of course, if you like the idea of 3D circuit design, you have to check out some of these incredible circuit sculptures we’ve featured in the past.

Continue reading “Three-Dimensional Design Yields Compact Seven-Segment Hex Displays”

Pumpkin OS running on x86

Palm OS: Reincarnate

[pmig96] loves PalmOS and has set about on the arduous task of reimplementing PalmOS from scratch, dubbing it Pumpkin OS. Pumpkin OS can run on x86 and ARM at native speed as it is not an emulator. System calls are trapped and intercepted by Pumpkin OS. Because it doesn’t emulate, Palm apps currently need to be recompiled for x86, though it’s hoped to support apps that use ARMlets soon. Since there are over 800 different system traps in PalmOS, he hasn’t implemented them all yet.

Generally speaking, his saving grace is that 80% of the apps only use 20% of the API. His starting point was a script that took the headers from the PalmOS SDK and converted them into functions with just a debug message letting him know that it isn’t implemented yet and a default return value. Additionally, [pmig96] is taking away some of the restrictions on the old PalmOS, such as being limited to only one running app at a time.

As if an x86 desktop version wasn’t enough, [pmig96] recompiled Pumpkin OS to a Raspberry Pi 4 with a ubiquitous 3.5″ 320×480 TFT SPI touch screen. Linux maps the TFT screen to a frame buffer (dev/fb0 or dev/fb1). He added a quick optimization to only draw areas that have changed so that the SPI writes could be kept small to keep the frame rate performance.

[pmig96] isn’t the only one trying to breathe some new life into PalmOS, and we hope to see more progress on PumpkinOS in the future.

LEDBOY Is A Retro-Modern Handheld Game

Back in the 1970s, there were a few LED-based games on the market that were quickly superseded by the rise of LCDs and other fancier technologies. However, [grossofabian] wanted to recreate that classic style of game but with more modern hardware. The result is the LEDBOY, a colorful handheld game built in tribute to that era.

The handheld is based around the ATtiny 1614 microcontroller, driving a 10×10 array of NeoPixel Nano 2427 LEDs, named for their small 2.4 mm x 2.7 mm form factor. They’re RGB, too, so there’s lots of wonderful colors to play with.

Wrapped up in a neat enclosure with a rechargeable 130 mAh lithium-ion battery and some simple tactile buttons, it’s a tidy little handheld game console. Add in the CH340C chip for USB to serial duties, and it’s easy to program with the Arduino IDE, too.

Code is available on Github for those keen to take a closer look. Amusingly, the project bears a striking resemblance to a similarly-named build we featured just under 12 years ago. Time is a flat circle, and the video, my friends, is after the break.

Continue reading “LEDBOY Is A Retro-Modern Handheld Game”