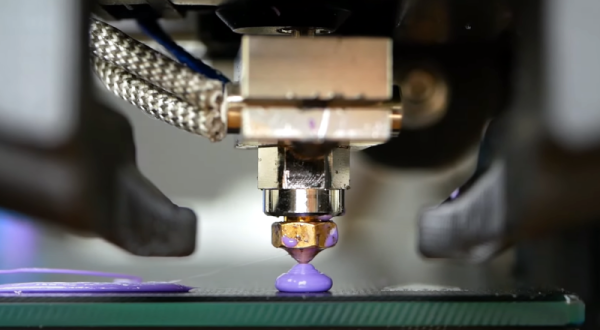
Want Faster Extrusion But Don’t Have A Volcano? Nuts!

A lot of people want to print faster. Maybe they don’t like to wait, or they need to print a lot of things. Maybe it is just human nature to want to push things to go faster. The problem is, if you move filament too fast it may not have time to melt inside the hot end. To combat that, some people install a “volcano” — a larger heat block that takes a special longer nozzle. The melt zone is longer so there is more time for the filament to liquefy before shooting out of the nozzle. This is also a problem if you are using a very large nozzle size. But what if you don’t have one of these special hot ends? According to [Stefan], you can use a normal hotend with a volcano-style nozzle just by adding some common nuts. You can see the explanation in the video, below.

The idea came from a few commercial offerings that allow converting between different-sized melt zones. Some of these use the same idea. But, if you are familiar with [Stefan’s] videos, you know he tested the results thoroughly. The tests reveal that a standard V6-style hotend can handle rates of just over 9.8mm/second. with a 0.4mm nozzle at 210C and is usable beyond that. A true volcano hotend. starts deviating from the ideal at about 15mm/second and, also, is usable at even higher rates. But what about just using a long nozzle in a regular block with or without the nuts?

Continue reading “Want Faster Extrusion But Don’t Have A Volcano? Nuts!”

Photo of the MCH2022 badge's screen, showing the "Hack me if you can" app's start splashscreen, saying "Service is accessible on IP ADDRESS : 1337"

MCH2022 Badge CTF Solved, With Plenty To Learn From

Among all the things you could find at MCH2022, there were a few CTFs (Capture The Flag exercises) – in particular, every badge contained an application that you could  try and break into – only two teams have cracked this one! [dojoe] was part of one of them, and he has composed an extensive reverse-engineering story for us – complete with Ghidra disassembly of Xtensa code, remote code execution attempts, ROP gadget creation, and no detail left aside.

There was a catch: badges handed out to the participants didn’t contain the actual flag. You had to develop an exploit using your personal badge that only contained a placeholder flag, then go to the badge tent and apply your exploit over the network to one of the few badges with the real flag on them. The app in question turned out to be an echo server – sending back everything it received; notably, certain messages made it crash. One man’s crashes are another man’s exploit possibilities, and after a few hacking sessions, [dojoe]’s team got their well-deserved place on the scoreboard.

If you always thought that firmware reverse-engineering sounds cool, and you also happen to own a MCH2022 badge, you should try and follow the intricately documented steps of [dojoe]’s writeup. Even for people with little low-level programming experience, repeating this hack is realistic thanks to his extensive explanations, and you will leave with way more reverse-engineering experience than you had before.

The MCH2022 badge is a featureful creation of intricate engineering, with the ESP32 portion only being part of the badge – we’re eager to hear about what you’ve accomplished or are about to accomplish given everything it has to offer!

Laptoppin’ Like 1975

When we first saw the PZ1 laptop — a 6502 laptop-style computer with a small display and 512K of RAM — we couldn’t help but think of the old AIM 65 computer from Rockwell, although that only had 1K of memory. The other thing the AIM didn’t have was an ancillary microcontroller to help out that is way more powerful than the main processor.

There are actually several versions of the PZ1 and you can find some very detailed information over on Hackaday.io and GitHub. Recently, [Adam] release version 2.0 and tested some PC boards that are working well.

Continue reading “Laptoppin’ Like 1975”

Compare PDFs Visually

Sometimes a problem seems hard, but the right insight can make it easy. If you were asked to write a program to compare two PDF files and show the differences, how hard do you think that would be? If you are [serhack], you’ll make it much easier than you might guess.

Of course, sometimes making something simple depends on making simplifying assumptions. If you are expecting a “diff-like” utility that shows insertion and deletions, that’s not what’s going on here. Instead, you’ll see an image of the PDF with changes highlighted with a red box. This is easy because the program uses available utilities to render the PDFs as images and then simply compares pixels in the resulting images, drawing red boxes over the parts that don’t match.

Continue reading “Compare PDFs Visually”

This Stainless Steel Knife Build Starts With Raw Iron Ore

Making knives at home has become a popular hobby, thanks partly to reality TV and the free time and idle hands afforded by lockdowns. Depending on how far you get into the hobby, builds can range from assembling and finishing a kit with pre-forged parts, to actual blacksmithing with a hammer and anvil. But pretty much every build includes steel from a commercial supplier.

Not this one. Rather than buy his metal from the usual sources, [Thoisoi]’s first stop was an iron mine in the Italian Alps, where he picked up a chunk of iron ore — magnetite, to be precise. Smelting one’s own iron from raw ore and alloying it into steel is generally not a backyard project thanks to the high temperatures needed, a problem [Thoisoi] solved with the magic of thermite. The iron oxide and aluminum in the thermite mix react in an exceptionally exothermic manner to generate elemental iron, which under controlled conditions can be captured as a more or less pure ingot, ready for forging.

After a test with commercially obtained iron oxide, [Thoisoi] tried his pulverized magnetite. And thanks to the addition of goodies like graphite, manganese, nickel, silicon, and chromium, he was eventually able to create a sizable lump of 402 stainless steel. He turned the metal over to an actual blacksmith for rough forging; it sure seemed to act like steel on the anvil. The finished knife looks good and performs well, and the blade has the characteristic look of stainless. Not a bad result, and all at the cost of a couple of clay flowerpots.

Continue reading “This Stainless Steel Knife Build Starts With Raw Iron Ore”

A family of PixMob bracelets being coltrolled by an ESP32 with an IR transmitter attached to it. All the bracelets are shining a blue-ish color

PixMob Wristband Protocol Reverse-Engineering Groundwork

The idea behind the PixMob wristband is simple — at a concert, organizers hand these out to the concertgoers, and during the show, infrared projectors are used to transmit commands so they all light up in sync. Sometimes, attendees would be allowed to take these bracelets home after the event, and a few hackers have taken a shot at reusing them.

The protocol is proprietary, however, and we haven’t yet seen anyone reuse these wristbands without tearing them apart or reflashing the microcontroller. [Dani Weidman] tells us, how with [Zach Resmer], they have laid the groundwork for reverse-engineering the protocol of these wristbands.

Our pair of hackers started by obtaining a number of recordings from a helpful stranger online, and went onto replaying these IR recordings to their wristbands. Most of them caused no reaction – presumably, being configuration packets, but three of them caused the wristbands to flash in different colors. They translated these recordings into binary packets, and Dani went through different possible combinations, tweaking bits here and there, transmitting the packets and seeing which ones got accepted as valid. In the end, they had about 100 valid packets, and even figured out some protocol peculiarities like color animation bytes and motion sensitivity mode enable packets.

The GitHub repository provides some decent documentation and even a video, example code you can run on an Arduino with an IR transmitter, and even some packets you can send out with a  Flipper Zero. If you’re interested in learning more about the internals of this device, check out the teardown we featured back in 2019.

Hackaday Prize 2022: DIY Brushless Hand Cranked Generator

A standard part of travel kit for the 2020s is now a battery pack — a hefty lithium-ion cell with onboard electronics for USB charging, that ensures all of our devices stay topped up while we’re out of range of a socket. But what happens when there is no handy mains supply to recharge it from? Step in [Chleba], with a hand cranked generator.

There are plenty of hand cranked generators to be found online, from tiny devices intended to top up a single phone to sturdy metal boxes intended for battery charging. This one differs from those in that most use a brushed DC motor as a cheap generator, while here that function comes from a stepper motor feeding a rectifier pack and thence a DC-to-DC converter. A step-up gearbox provides the necessary shaft speed, and a neat 3D-printed case rounds everything off.

The result is about as neat a generator as you could imagine, and would certainly be of use shoved into any off-grid backpack. Meanwhile it’s not the first we’ve shown you, we’ve even see one that could start a car.