Raspberry Pi Pico Gets A Tiny Keyboard On Its Back

With hackers and makers building custom computing devices that don’t necessarily follow conventional design paradigms, there’s been a growing demand for smaller and smaller keyboards. Many of the cyberdecks we’ve seen over the last couple of years have used so-called 60% or even 40% keyboards, and there’s been a trend towards repurposing BlackBerry keyboards for wearables and other pocket-sized gadgets. But what if you need something even smaller?

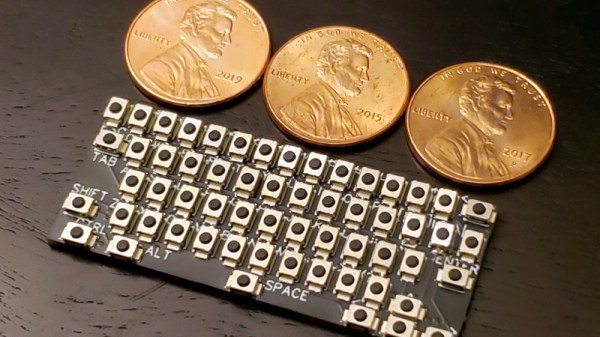
Enter this incredibly diminutive keyboard created by [TEC.IST]. With 59 keys crammed into an area scarcely larger than three US pennies, it may well be the smallest keyboard ever made. The PCB has been designed to mount directly onto the back of a Raspberry Pi Pico, which is running some CircuitPython code to read the switch matrix and act as a standard USB Human Interface Device. The board design files as well as the source code for the Pico have been released on the project’s Hackaday.io page, giving you everything you need to spin up your own teeny tiny input device.

The Pi Pico’s castellated pads make attaching the PCB a snap.

Of course, you probably won’t be breaking any speed records when banging out text on this thing. We know from past Hackaday badges that an array of microswitches make for a functional, if somewhat unpleasant, method of text entry.

Continue reading “Raspberry Pi Pico Gets A Tiny Keyboard On Its Back”

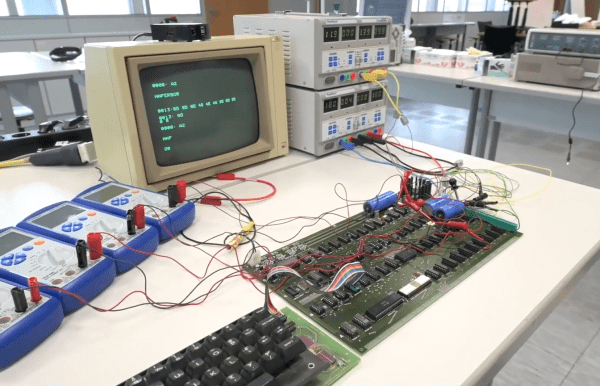
An Apple I hooked up to lab power supplies and a monitor

Powering Up An Original Apple I After Three Decades In A Museum

The Apple I is the stuff of legend. Designed and marketed in 1976 by Steve Wozniak and Steve Jobs, it was the very first product released by what would become today’s multi-trillion-dollar manufacturer of iPhones and iMacs. With about 60 original ones known to exist today, prices at auction are commonly in the $300,000 range, while confirmed working ones are even more valuable.

The Heinz Nixdorf Museumsforum (HNF), a computer museum in the German city of Paderborn, is fortunate enough to have an original Apple I in its collection. Although it has been there since 1996, it was always on static display and had never been powered on. In fact, it was unknown whether it would even work, and with it being the most valuable exhibit in the entire museum, simply firing it up would be a seriously risky project.

But computers are meant to be used, so museum director [Jochen Viehoff] decided to take the plunge and attempt to get the classic Apple to run again. In the four-part video series embedded below, [Jochen] explains the history of Apple’s first product and the steps he took to bring it back to life. This began with taking it out of its bullet-proof display case and bringing it upstairs to the museum’s workshop.

In order to make a complete system, HNF staff also dug up a period-correct keyboard as well as a slightly newer Apple monitor that could display the 60 Hz composite video output. Hooking up an original power supply would have been way too risky, because a single mistake or malfunction could send their top exhibit up in flames. Instead, they used a set of lab power supplies with a programmable current limit; this way, even a dead short on the PCB would not result in any serious damage.

Not that there were any shorts: after a bit of fiddling with the keyboard and adjusting the video output level, the 45-year-old computer came to life and began to respond to commands. With just 256 bytes of ROM, its default feature set is rather limited, but the computer duly executed a simple “Hello, World” program writen in 6502 machine code. It thereby joined the elite club of confirmed working Apple I’s, of which there are thought to be about twenty.

If you haven’t got $300,000 to spare but would still like to try your hand at programming the Apple I, you’ll be happy to hear that you can get a modern copy at a far more affordable price. And if all that classic hardware is too fiddly for you, you might want to try implementing the Apple I on an FPGA.

Continue reading “Powering Up An Original Apple I After Three Decades In A Museum”

Blink An LED On A PIC32 With Rust, Easily

Got a PIC32 microcontroller and a healthy curiousity about the Rust programming language and its low-level capabilities, but unsure how to squash the two of them together with a minimum of hassle? If that’s the case, then today is your lucky day!

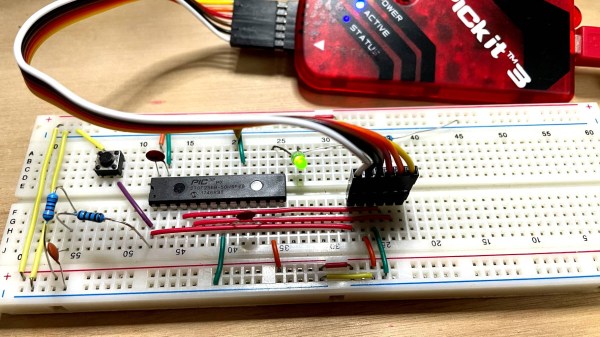
[Harry Gill] has you covered with his primer on programming a PIC32 with Rust, which will have you blinking an LED in no time. [Harry] admits that when he got started, his microcontroller programming skills were a bit rusty, so don’t let yourself think setting this up is beyond your abilities. If you have a working knowledge of the basics of microcontroller programming, you’ll be fine. [Harry] had to jump through a few hoops to get the right tools working, but thoughtfully documented the necessary steps, and provides a bare minimum hardware list.
Unsure what Rust is or what it offers? Check out the basics here, and see if it’s something that interests you. If you want to look even deeper, check out the kind of work that goes into writing a bare metal kernel in Rust.

Peek Behind The Curtain Of This Robotic Mouse

At first glance, this little animatronic mouse might seem like a fairly simple affair. A door opens, our rodent friend pops its head out, looks around, and goes back in. But just like in The Wizard of Oz, a strategically placed curtain is hiding the impressive array of gadgetry that makes the trick possible.

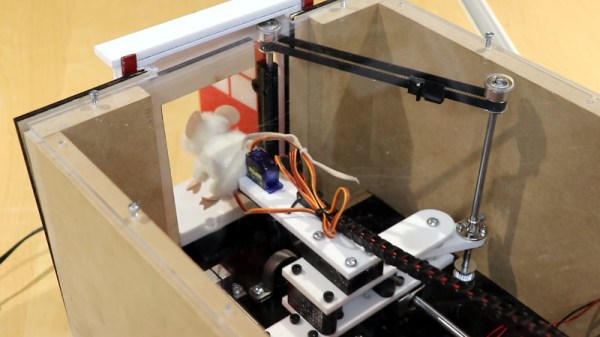
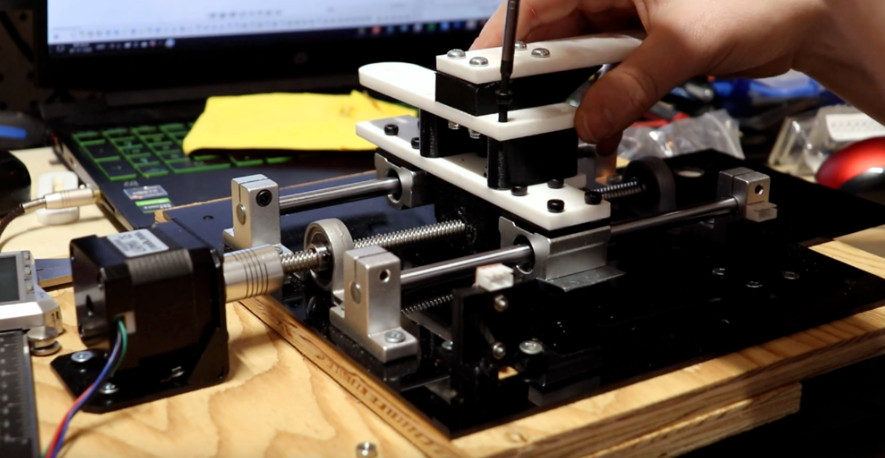
Creator [Will Donaldson] has put together a fantastic write-up of just what went into creating this little fellow, and we think you’ll be surprised at just how serious the mechanics involved are. Take for example the rig that provides horizontal motion with a NEMA 17 stepper motor mated to a 200 mm leadscrew and dual 8 mm rail assembly that would like right at home as part of a 3D printer.

The star of the show rides atop a beefy sliding carriage assembly made of printed components and acrylic, which is linked to the door via a GT2 timing belt and pulley in such a way that it automatically opens and closes at the appropriate time. To inject some life into the puppet, [Will] stuffed it with a pair of SG90 servos in a sort of pan-and-tilt arrangement: the rear servo turns the mouse’s body left and right, while the forward one moves the head up and down.

An Arduino Uno controls the servos, as well as the stepper motor by way of a TB6600 controller, and optical limit switches are used to make sure nothing moves out bounds. [Will] is keeping the CAD files and source code to himself for the time being, though we imagine a sufficiently dedicated mouseketeer could recreate the installation based on the available information.

This would appear to be the first animatronic mouse to grace the pages of Hackaday, but we’re certainly no strangers to seeing folks imbue inanimate objects with lifelike motion.

Continue reading “Peek Behind The Curtain Of This Robotic Mouse”

Hackaday Links Column Banner

Hackaday Links: January 9, 2022

It looks like we have a new space observatory! According to NASA, all the major deployments on the James Webb Space Telescope have been completed successfully. This includes the tricky sunshield deployment and tensioning, which went off this week without much in the way of trouble. The final major deployment, the unfolding of the starboard wing of the primary mirror of the telescope, was completed on Saturday while the spacecraft was still almost 400,000 km from its forever home orbiting Lagrange point L2. Mission controllers had allotted two weeks for the 300-odd deployments needed to turn the packaged machine into a working observatory. The remaining two weeks or so of flight include less dramatic tasks, such as trimming the shape of the primary mirror with servos that subtly alter the position and curvature of each of the 18 segments, plus a bunch of calibration tasks. But it looks like most of the really scary stuff is behind us now.

From the “Interesting Innards” department, if you’re a fan of either gaming or industrial CT scans, check out Scan of the Month’s look inside Nintendo handheld game consoles. They’ve put a bunch of games through computed tomography scans, and the results are really interesting, false-colored though they may be. Seeing the progression of technology from the original 1989 Game Boy to the Switch is fascinating. The side notes on the history and tech inside each one are pretty cool too.

A couple of weeks ago we mentioned Andrew Sink’s online low-poly generator, which takes any 3D model and allows you to control the number of polygons used to render it. He dropped us a line to let us know the tool proved popular enough that he had to move it off GitHub and onto a dedicated site. Check it out at its new home.

When something like this pops up in your feed, it seems like the best approach is to share it. It’s called DentalSlim, and claims to be the first intra-oral device designed for weight loss. It’s a hardware lock for your teeth, and it looks perfectly horrifying. The device is designed to be applied by a sadist dentist and effectively locks the lower jaw to the upper with magnets, allowing the wearer to open his or her mouth only enough to take a liquid diet. There’s also a provision for the wearer to unlock the device in an emergency, which is wise — can you imagine catching a stomach bug with your jaw locked shut? — but that seems to defeat the “hardware-enforced willpower” that the device is based on.

Have you got a bunch of filament spools lying around from all that 3D printing? Rather than put them to use rolling up strings of lights from the Christmas tree, here’s another idea: turn them into nice covered bird feeders. All you need to do is apply a rim around one side to hold the seed before hanging them out for the birds. We suppose walling off the space between the sides completely and drilling some holes could also turn them into birdhouses, too.

And finally, if your filament spool bird feeder isn’t attracting the attention of the neighborhood cats, perhaps it’s because they’ve found a nice, cozy spot to soak up some heat. At least that’s what some Starlink users are seeing as their feline friends cuddle up on Dishy McFlatface for a long winter’s nap. You see, the phased array antenna inside the enclosure gets pretty toasty, and cats are pretty much any-port-in-a-storm critters, so it’s only natural. We can’t imagine their choice of basking locale does much for data throughput, and it’s probably quite a laugh when the dish pivots to track a satellite. But it’s hard to feel sorry for something that sleeps 23-½ hours a day.

Fail Of The Week: 3D Printed Parts That Burn Like NASA’s Rocket Fuel

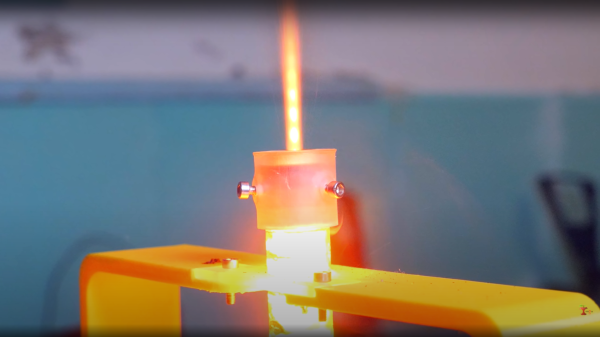
[Integza] is on a mission to find as many ways as possible to build rockets and other engines using 3D printing and other accessible manufacturing techniques. He had an a great idea – is it possible to 3D print a solid fuelled rocket, (video, embedded below) specifically can you 3D print the rocket grain itself? By using the resin as a fuel and mixing in a potent oxidiser (ammonium perchlorate specifically – thanks for the tip NASA!) he has some, erm, mixed success.

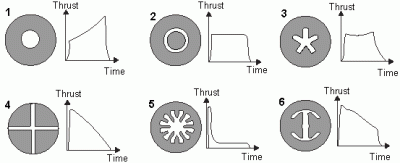
Effective thrust vs grain cross-sectional profile

As many of us (ahem, I mean you) can attest to, when in the throes of amateur solid-propellant rocket engine experimentation (just speaking theoretically, you understand) it’s not an easy task to balance the thrust over time and keep the combustion pressure within bounds of the enclosure’s capability. Once you’ve cracked making and securing a nozzle within the combustion chamber, the easiest task is to get control of the fuel/oxidiser/binder (called the fuel grain) ratio, particle size and cast the mixture into a solid, dry mass inside. The hard part is designing and controlling the shape of the grain, such that as the surface of the grain burns, the actively burning surface area remains pretty constant over time. A simple cylindrical hole would obviously increase in diameter over time, increasing the burning surface area, and causing the burn rate and resulting pressure to constantly increase. This is bad news. Various internal profiles have been tested, but most common these days is a multi-pointed star shape, which when used with inhibitor compounds mixed in the grain, allows the thrust to be accurately controlled.

[Integza] tried a few experiments to determine the most appropriate fuel/binder/oxidiser ratio, then 3D printed a few fuel grain pellets, rammed them into an acrylic tube combustion chamber (obviously) and attached a 3D printed nozzle. You can see for yourself the mach diamonds in the exhaust plume (which is nice) due to the supersonic flow being marginally over-expanded. Ideally the nozzle wouldn’t be made from plastic, but it only needs to survive a couple of seconds, so that’s not really an issue here.

The question of whether 3D printed fuel grains are viable was posed on space stack exchange a few years ago, which was an interesting read.

We’ve seen some more sophisticated 3D printed rocket engines lately, such as this vortex-cooled, liquid-fuel engine, and over on Hackaday,IO, here’s a 3D printed engine attempting to use PLA as the fuel source.

Continue reading “Fail Of The Week: 3D Printed Parts That Burn Like NASA’s Rocket Fuel”

Macro-popsicle

Macropopsicle Melts On Your Desk, Not In Your Mouth

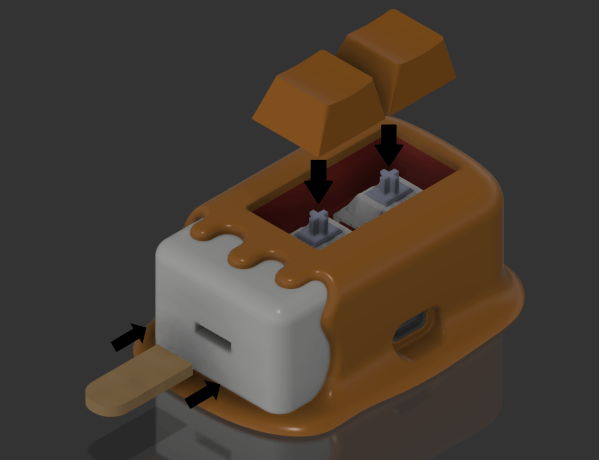
We all know by now that macropads are super cool shortcut machines. And what’s cooler than a popsicle? Well, this cute little thing, which goes by the name of Macropopsicle.

The freezer’s open if you want your own Macropopsicle. There’s not much more to this tasty and practical desktop treat than an adafruit QT Py, a couple of Cherry MX-style switches, some wires, and a handful of printed parts. One cool thing about this design is that all the pieces print with little to no supports, and many of them snap together.

We say there’s a lot to like about Macropopsicle — it’s cute, it’s useful, and there’s even a little bite taken out of it that you can see in some of the renders. [oxisidia] even shoved a real popsicle stick in there to complete the look.

Keyboard aficionados will no doubt recognize Macropopsicle as a great companion to Milk, a 2% keyboard.