A miniature Vectrex console being used

Finally, The Venerable Vectrex Gets A Mini Makeover

It appears that every great console is bound to get a miniature remake: we’ve had the PlayStation Classic, the Mini NES and SNES, and even a miniature Sega Genesis/Mega Drive. But one great console that was sorely missing from that list, at least according to [Brendan], was the Vectrex. So he went ahead and built a fully-functioning miniature Vectrex Console.

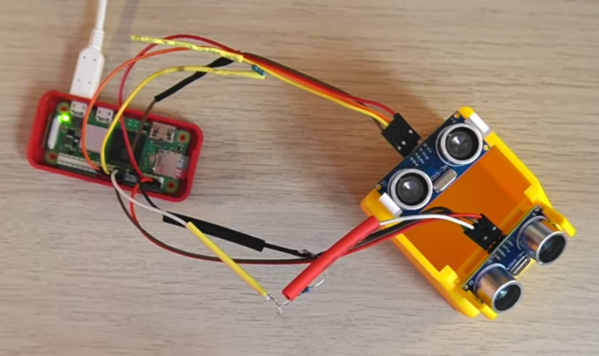
If the name “Vectrex” doesn’t ring a bell in your mind, you’re not alone: a commercial failure, it was quickly forgotten by most following the 1983 video game crash. But it has retained a cult status among enthusiasts due to its unique design featuring a monochrome vector monitor, onto which you can place transparent overlays to obtain a sort-of color display. Its games can now all be emulated using software like RetroPie, which is what [Brendan] chose to run on a Raspberry Pi Model 2 that he had lying around.

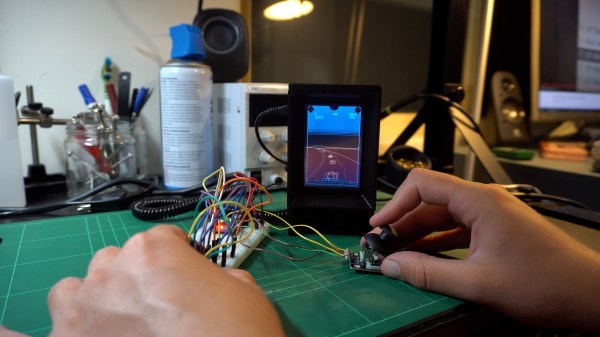
As for the display, he settled on a Pi-compatible 3.5″ TFT device. Hooking it up to the Pi was easy enough, but getting the image rendered in its proper portrait orientation was quite a headache, requiring endless fiddling with drivers and configuration files.

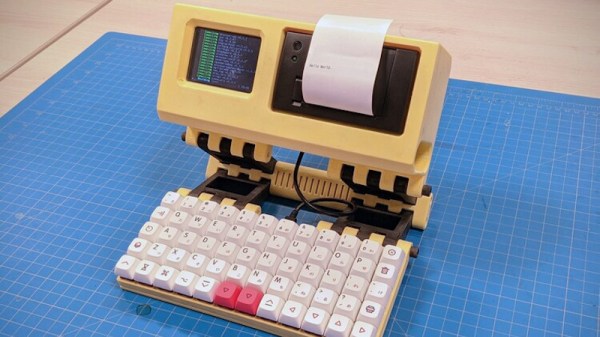
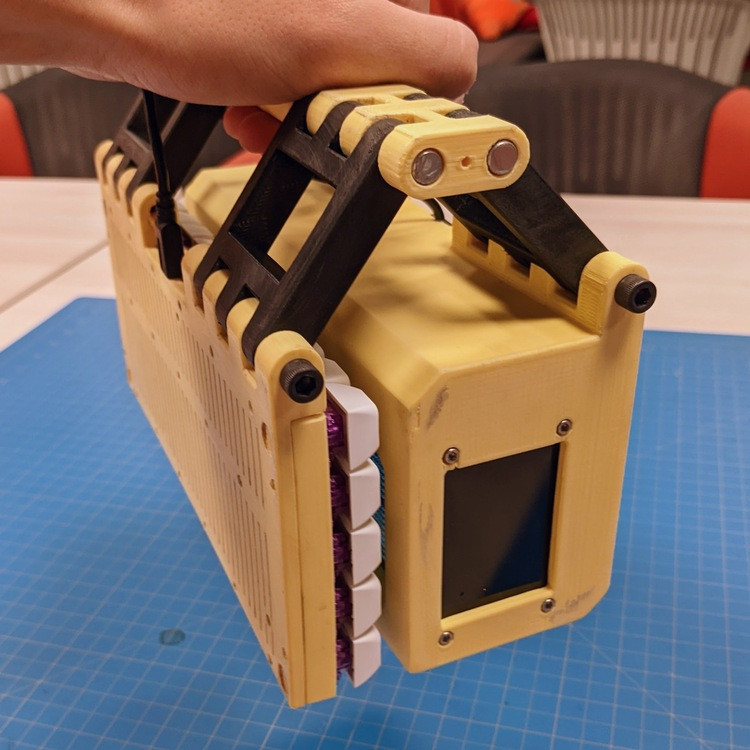
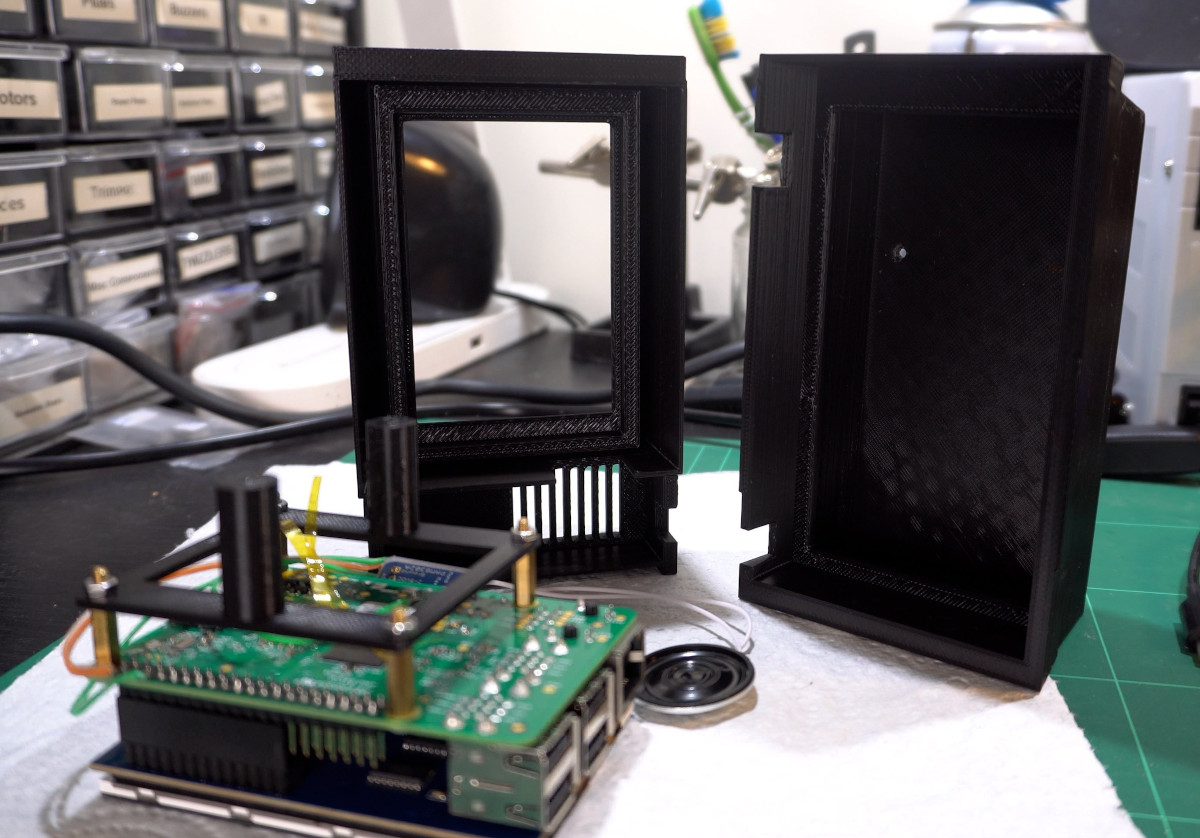
Once he got this working, [Brendan] set to work designing a miniature copy of the Vectrex’s original case. It took a few iterations and several 10-hour runs on his 3D printer before he ended up with a sturdy case that securely held the Pi and its display in place. A few more hours of printing later he also had a handheld controller, which he based on an Arduino Pro Mega. The Arduino reads out four regular pushbuttons and a joystick, and communicates with the Pi through a coiled USB cable.

The end result, as you can see in the video embedded below, is the cutest little Vectrex we’ve ever seen. It’s really the opposite of this big-screen Vectrex project. We’ve also seen a Vectrex projector, and even one with a real color monitor hacked in. Continue reading “Finally, The Venerable Vectrex Gets A Mini Makeover”

LEGO String Winder Hints At Greater Possibilities

Unless you’re an avid fan of 1997’s box office hit Mouse Hunt, or actively working in the string industry, you probably don’t spend a lot of time thinking about how those balls of string are made. [ord] has, however, and built a tidy little winding machine that has us contemplating the possibilities of how useful LEGO machines can really be. 

The design uses a large and imposing-looking ring gear to drive a spinning arm which carries the string onto the bobbin. The bobbin itself is rotated along with the spinning arm as the hand crank that operates the machine is mechanically linked to both. As the arm and bobbin turn, string is deposited onto the bobbin, building up into a pleasing ball of string that looks just like the ones you buy at the store.

We suspect that, unless [ord] is doing some very interesting things that we haven’t seen yet, the string was probably sourced off a reel or ball anyway, and this machine just serves to demonstrate how the process works.

However, it does go to show how LEGO machines can do real work. We’d love to see LEGO put to more practical uses like winding pickups or transformers, or other jobs that are maddeningly tedious when done by hand. Video after the break.

Continue reading “LEGO String Winder Hints At Greater Possibilities”

Raspberry Pi Creates Melody

For those who are not into prog rock in the 70s or old radio shows from the 40s, the Theremin may be an unfamiliar musical instrument. As a purely electronic device, it’s well outside the realm of conventional musical instruments. Two radio antennas detect the position of the musician’s hands to make a unique sound traditionally associated with eeriness or science fiction.

Normally a set of filters and amplifiers are used to build this instrument but this build instead replaces almost everything with a Raspberry Pi Zero 2, and instead of radio antennas to detect the position of the musician’s hands a set of two HC-SR04 distance sensors are used instead. With the processing power available from the Pi, the modernized instrument is able to output MIDI as well which makes this instrument easily able to interface with programs like GarageBand or any other MIDI-capable software.

The project build is split into two videos, the second of which is linked below. The project code is also available on the project’s GitHub page, so anyone with the Pi and other equipment available can easily start experimenting with this esoteric and often overlooked musical instrument. It’s been around for over 100 years now, and its offshoots (including this build) are as varied as the sounds they can produce.

Continue reading “Raspberry Pi Creates Melody”

Circuits board from a PDP-11 minicomputer with inset terminal display

PDP-11/34 Restoration And The Virtue Of Persistence

The wildly successful PDP-11 minicomputer was a major influence on the evolution of computing throughout the 1970s. While fondly remembered in modern day emulation, there’s nothing like booting up the real thing, as [Jerry Walker] explores in his video series on restoring a PDP-11/34. Examples of PDP-11 hardware are becoming increasingly rare, which makes restoration and preservation of remaining equipment even more critical. [Jerry] has gone to exhaustive lengths to restore his PDP-11/34 to working condition, painstakingly troubleshooting wire-wrapped backplane and replacing suspect ICs across the entire system. With scant documentation on some of the cards, it was often a matter of sheer will and technical know-how that saw the system eventually come back to life.

If you’ve got a couple of hours, make sure to check out the entire series of videos documentation the restoration over on YouTube. If you’ve ever thought about restoring vintage computers, this series offers an insight into the satisfying yet oh-so-tedious process of chasing down broken traces and faulty logic. Exorcising the demons from decades-old computers is almost never straightforward, but [Jerry] demonstrates that persistence can yield exciting results. After the break is the latest installment of this series, which shows the system booting into the RT-11 operating system from floppy disk.

If you don’t have the time or real estate to restore a real PDP-11, you might want to check out modern hassle-free replicas. Or, if we’ve piqued your interest in restoring minicomputers, don’t miss what we had to say about previous PDP-11 resurrections, like this PDP-11/04.

Continue reading “PDP-11/34 Restoration And The Virtue Of Persistence”

Old Boat Becomes Toasty Floating Sauna

A sauna is a great place to feel warm and toasty and refreshed, but few of us have one at home. [Linus Strothmann] decided to build his own, using an old boat as the perfect base for his steamy build.

Finding the right boat was the first challenge; the vessel should be big enough to fully house the intended number of occupants, and be able to withstand sitting outside in the weather year-round. If it’s to be used in a place where it gets icy in winter, it’s best to go with a steel-hulled vessel.  [Linus] found a steel-hulled boat just under 8 m in length for less than 1000 Euros, and set to work on his project.

The boat was stripped out, and given high-quality glass windows capable of resisting the steam and high temperatures inside. A stove was installed for producing steam, and the boat-sauna was designed with multiple entries and exits for safety reasons. Insulation was also fitted to help keep heat in.

The result is a floating sauna that is an absolute pleasure to use in the winter months. Floating out on the lake, one can take in a steam, have a quick dip in the icy water, and then return to warm back up inside. [Linus] hopes to soon fit a small motor in order to allow the vessel to head out to the middle of the lake for an even better view during a steam session.

It’s not the first mobile sauna we’ve seen; a trailer-based design graced these pages last year. If you’re working on your own hot and steamy build, though, do share your work with us promptly!

Retro Portable Computer Packs Printer For The Trip

Looking like it dropped out of an alternate reality version of the 1980s, the Joopyter Personal Terminal is a 3D printed portable computer that includes everything you need for life in the retro-futuristic fastlane: a mechanical keyboard, a thermal printer, and the obligatory tiny offset screen. It’s a true mobile machine too, thanks to it’s onboard battery and a clever hinge design that lets you fold the whole thing up into something akin to a PLA handbag. You won’t want to leave home without it.

This gorgeous machine comes our way from [Gian], and while the design isn’t exactly open source, there’s enough information in the GitHub repository that you could certainly put together something similar if you were so inclined. While they might not serve as documentation in the traditional sense, we do love the faux vintage advertisements that have been included.

The upper section of the Joopyter holds a Raspberry Pi Zero W (though the new Pi Zero 2 would be a welcome drop-in upgrade), an Adafruit PiTFT 2.8″ display, a CSN-A2 panel mount thermal printer, and a Anker PowerCore 15600 battery to keep it all running. On the opposite side of the hinge is a hand wired keyboard powered by a Raspberry Pi Pico running KMK.

Speaking of that printed hinge, [Gian] says it comes on loan from [YARH.IO], which Hackaday readers may recall have produced a number of very slick 3D printed portable Linux machines powered by the Raspberry Pi over the last couple of years.

Continue reading “Retro Portable Computer Packs Printer For The Trip”

the water gravity air powered engine running

Gravity-Water-Air Powered Engine

Air engines are a common occurrence here on Hackaday. They’re relatively novel and reasonably easy to 3D print without requiring any fluids or supporting machinery. For example, [Tom Stanton] took a previous air engine design, did away with the air compressor, and instead used gravity and water to create just a few PSI to run the engine.

The basic setup is to have a large jug of water up somewhere high. Flexible tubing runs down to [Tom’s] custom acrylic pressure chamber. A little CNC-ing and some epoxy made a solid chamber, and we’re happy to report that [Tom] did some initial simulation before construction to make sure he wasn’t accidentally building a bomb. Some back of the napkin math showed that he could expect around 0.6 bar (around eight psi) with his setup. His first test showed almost precisely that. Unfortunately, [Tom] ran into some issues despite the early success. His engine would stop as it drew air and the pressure dropped, and the replenishing rate of the pressure was limited by the relatively small inlet hole he had drilled.

To fix this, he printed a larger diaphragm for the engine, so the lower air pressure had more to push against. This allowed the engine to run for a good while before the tank filled up. Additionally, he smoothed and polished everything, so it was as low friction as possible. We know we often state it here, but it is incredible what can be achieved with 3D printed parts these days.

We love seeing the iteration evident in this video. The various engine versions splayed across the table offer a powerful story about [Tom’s] persistence. Powering an engine is a small step to powering your whole home.

Continue reading “Gravity-Water-Air Powered Engine”