Winamp Reborn With The Adafruit PyPortal

One look at the default Winamp skin is sure to reawaken fond memories for a certain segment of the community. For those who experienced the MP3 revolution first hand, few audio players stick out in the mind like Winamp and its llama whipping reputation. No, the proprietary Windows-only media player isn’t the sort of thing you’d catch us recommending these days; but it was the 1990s, and things were very different.

For those who want to relive those heady peer-to-peer days, [Tim C] has posted a tutorial on how to turn Adafruit’s PyPortal into a touch screen MP3 player that faithfully recreates the classic Winamp look. As you can see in the video below it certainly nails the visuals, down to the slightly jerky scrolling of the green track info which we’re only now realizing was probably the developer’s attempt to mimic some kind of a physical display like a VFD.

With minimal UI functionality, playlists must be created manually.

[Tim] has even included support for original Winamp themes, although as you might expect, some hoop-jumping is required. In this case, it’s a Python script that you have to run against an image of the original skin pulled from the Winamp Skin Museum. From there, you just need to edit a couple of lines of code to point the player at the right skin files. In other words, switching between skins is kind of a hassle, but you should at least be able to get your favorite flavor from back in the day up and running.

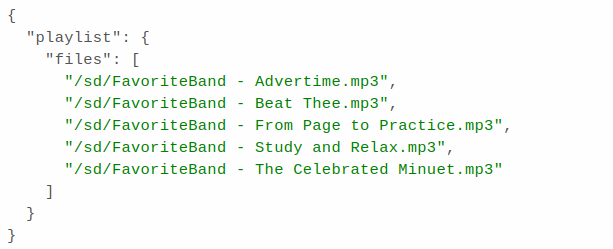
But before you get too excited, there’s a bit of a catch. For one thing, the Winamp UI isn’t actually functional. You can tap the top section of the screen to pause the playback, and tapping down in the lower playlist area lets you change songs, but all the individual buttons and that iconic visual equalizer are just for show. Managing your playlists also requires you to manually edit a JSON file, which even in the 1990s we would have thought was pretty wack, to use the parlance of the times.

Of course, things could easily be streamlined a bit with further revisions to the code, and since [Tim] has released it into the public domain under the Unlicense, anyone can help out. As it stands, it’s still a very slick media display that we certainly wouldn’t mind having on our desk.

Continue reading “Winamp Reborn With The Adafruit PyPortal”

All About Dichroic Optical Filters

[IMSAI Guy] presents for your viewing pleasure, a nice video on the topic of optical filters and mirrors. (Video, embedded below) The first optical device is a simple absorption filter, where incoming light is absorbed in a wavelength-selective manner. Much more interesting however is the subject of interference or dichroic filters. These devices are constructed from many thin layers of a partially reflective material, and operate on the principle of interference. This means that photons hitting the filter stack will interfere either constructively or destructively giving the filter a pass or stop response for a particular wavelength.

As [IMSAI Guy] demonstrates, this makes the filters direction-specific, as photons hitting the stack at a different angle will travel slightly further. Longer travel means the interference effect will be different, and so will the filtering response. You can see this by playing around with one in your hands and seeing the color change as your rotate it. Dichroic filter films can also make for some stunning optical effects. Very cool stuff.

By creating a filter stack with a wide enough range of inter-layer thicknesses, it’s possible to construct a mirror that covers the full spectrum with excellent reflectivity.  Since you can tune the layers, you can make it reflect any range of wavelengths you like. One thing we’ve not seen before is a wedge-like optical filter device, where the layer thicknesses progressively increase lengthways, creating a variable optical frequency response along the length. We guess this would be useful for diagnostics in the field, or perhaps for manually tuning a beam path?

We like the applications for dichroic films – here’s an Infinity Mirror ‘Hypercrystal’. If you don’t want to buy off-the-shelf films, perhaps you could sputter yourself something pretty?

Continue reading “All About Dichroic Optical Filters”

How A Pentester Gets Root

Have you ever wanted to be a fly on the wall, watching a penetration tester attack a new machine — working their way through the layers of security, ultimately leveraging what they learned into a login?  What tools are used, what do they reveal, and how is the information applied? Well good news, because [Phani] has documented a step-by-step of every action taken to eventually obtain root access on a machine — amusingly named DevOops — which was set up specifically for testing.

[Phani] explains every command used (even the dead-end ones that reveal nothing useful in this particular case) and discusses the results in a way that is clear and concise. He starts from a basic port scan, eventually ending up with root privileges. On display is an overall process of obtaining general information.  From there, [Phani] methodically moves towards more and more specific elements. It’s a fantastic demonstration of privilege escalation in action, and an easy read as well.

For some, this will give a bit of added insight into what goes on behind the scenes in some of the stuff covered by our regular feature, This Week in Security.

Homemade Panadapter Brings Waterfall To Old Radio

Ham radio operators can be pretty selective about their gear. Some are old-school tube purists who would never think of touching a rig containing transistors, and others are perfectly happy with the small Software Defined Radio (SDR) hooked up to their PC. The vast majority, though, of us are somewhere in between — we appreciate the classic look and feel of vintage radios as well as the convenience of modern ones. Better yet, some of us even like to combine the two by adding a few modern bells and whistles to our favorite “boat anchor.”

[Scott Baker] is one such Ham. He’s only had his license for a few months now and has already jumped into some great projects, including adding a panadapter to an old Drake R-4B Receiver. What’s a panadapter, you may ask? As [Scott] explains in his excellent writeup and video, a panadapter is a circuit that grabs a wideband signal from a radio receiver that typically has a narrowband output. The idea is that rather than just listen to somebody’s 4kHz-wide transmission in the 40m band, you can listen to a huge swath of the spectrum, covering potentially hundreds of transmissions, all at the same time.

Well, you can’t actually listen to that many transmissions at once — that would be a garbed mess. What you can do with that ultrawide signal, however, is look at it. If you take an FFT of the signal to put it in the frequency domain (by using a spectrum analyzer, or in [Scott]’s case, an SDR), you can see all sorts of different signals up and down the spectrum. This makes it a heck of a lot easier to find something to listen to — rather than spinning the dial for hours, hoping to come across a transmission, you can just see where all of the interesting signals are.

This isn’t the first (or even the twentieth) time that [Scott]’s work has graced our pages, so make sure to check some of his other incredible projects in our archives!

Continue reading “Homemade Panadapter Brings Waterfall To Old Radio”

The inside of a Laser-Induced Breakdown Spectrometer

Spectrometer Detects Chemicals By Zapping Samples With A Laser Beam

Here at Hackaday, we love projects that result in useful lab equipment for a fraction of the cost of professional gear. [Lorenz], over at Advanced Tinkering, built his own instrument for Laser-Induced Breakdown Spectroscopy, or LIBS, and it’s quite an impressive device. LIBS is a technique for analyzing substances to find their chemical composition. Basically, the idea is to zap a sample with a powerful laser, then look at the little cloud of plasma that results and measure the wavelengths emitted by it.

A plot showing the spectrum of hematite
The spectrum of hematite (iron oxide), compared to that of pure iron

The laser [Lorenz] used is a Nd:YAG unit salvaged from a tattoo removal machine. After it fires a pulse, a photodiode detects the light and triggers a spectrometer, which consists of a diffraction grating, a few lenses and mirrors, and a linear CCD sensor. The grating splits the incoming lights into its constituent components, which fall onto the CCD and trigger its pixels. An STM32 Nucleo board reads out the results and sends them to a PC for further processing.

That processing bit turned out to be a full project on its own. [Lorenz] called upon [g3gg0], who software that simplifies the operation of the spectrometer. First, it helps with the instrument’s calibration. Point the detector at a well-known light source like a laser or a fluorescent lamp, then select the expected wavelengths on the resulting spectral plot. The software then automatically calculates the correct coefficients to map each pixel to a specific wavelength.

The software also contains a database of spectra corresponding to chemical elements: once you’ve taken a spectrum of an unknown sample, you can overlay these onto the resulting plot and try to find a match. The resulting system seems to work quite well. Samples of iron oxide and silver oxide gave a reasonable match to their constituent components.

We’ve seen other types of spectrometers before: if you simply want to characterize a light source, check out this Raspberry Pi-based model. If you’re interested in chemical analysis you might also want to look at this open-source Raman spectrometer.

Continue reading “Spectrometer Detects Chemicals By Zapping Samples With A Laser Beam”

Make Your Own Tabletop Game Organizers With Online Tool

There is a vibrant cottage industry built around selling accessories to improve the storage and organization of tabletop games, but the more DIY-minded will definitely appreciate [Steve Genoud]’s deckinabox tool, which can create either 3D-printable designs, or ones more suited to folded paper or cardstock. Making your own organizer can be as satisfying as it is economical, and [Steve]’s tool aims to make customization simple and easy.

The tool can also generate models for folded paper or cardstock.

The interface for customizing the 3D-printable token tray, for example, begins with a simple filleted receptacle which one can split into additional regions by adding horizontal or vertical separators. The default is to split a given region down the middle, but every dimension can of course be specified.  Things like filleting of edges (for easier token scooping) and other details are all handled automatically. A handy 3D view gives a live render of the design after every change.

[Steve] has a blog post that goes into some added detail about how the tool was made, and it makes heavy use of replicad, [Steve]’s own library for generating browser-based 3D models in code. Intrigued by the idea of generating 3D models programmatically, and want to use it to make your own models? Don’t forget to also check out OpenSCAD; chances are it’s both easier to use and more capable than one might think.

DIY Hydrophone Listens In On The Deep For Cheap

The microphone is a pretty ubiquitous piece of technology that we’re all familiar with, but what if you’re not looking to record audio in the air, and instead want to listen in on what’s happening underwater? That’s a job for a hydrophone! Unfortunately, hydrophones aren’t exactly the kind of thing you’re likely to find at the big-box electronics store. Luckily for us, [Jules Ryckebusch] picked up a few tricks in his 20-year career as a Navy submariner, and has documented his process for building a sensitive hydrophone without needing a military budget.

Fascinated by all the incredible sounds he used to hear hanging around the Sonar Shack, [Jules] pored over documents related to hydrophone design from the Navy and the National Oceanic and Atmospheric Administration (NOAA) until he distilled it all down to a surprisingly straightforward build. The key to the whole build is a commercially available cylindrical piezoelectric transducer designed for underwater communication that, incredibly, costs less than $20 USD a pop.

The transducer is connected to an op-amp board of his own design, which has been adapted from his previous work with condenser microphones. [Jules] designed the 29 x 26 mm board to fit neatly within the diameter of the transducer itself. The entire mic and preamp assembly can be cast inside a cylinder of resin. Specifically, he’s found an affordable two-part resin from Smooth-On that has nearly the same specific gravity as seawater. This allows him to encapsulate all the electronics in a way that’s both impervious to water and almost acoustically transparent. A couple of 3D-printed molds later, the hydrophone was ready to cast.

Interestingly, this isn’t the first homebrew hydrophone we’ve seen. But compared to that earlier entry, which basically just waterproofed a standard microphone pickup, we think this more thoughtful approach is likely to have far better performance.

Continue reading “DIY Hydrophone Listens In On The Deep For Cheap”