How To Cram 945 LEDs Into A Teeny Tiny Vegas-Style Sphere

[Carl Bugeja] finds the engineering behind the Las Vegas Sphere fascinating, and made a video all about the experience of designing and building a micro-sized desktop version. [Carl]’s version is about the size of a baseball and crams nearly a thousand RGB pixels across the surface.

A four-layer flexible PCB is the key to routing data and power to so many LEDs.

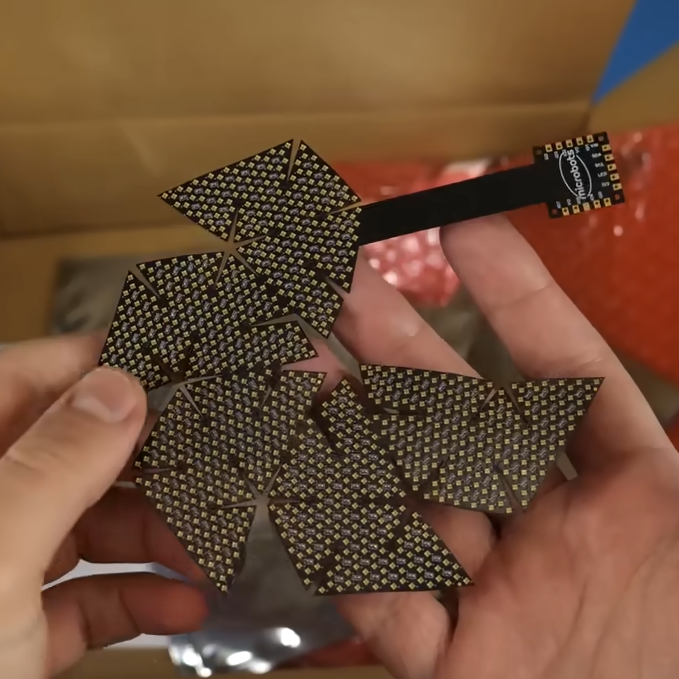
Putting that many addressable LEDs — even tiny 1 mm x 1 mm ones — across a rounded surface isn’t exactly trivial. [Carl]’s favored approach ended up relying on a flexible four-layer PCB and using clever design and math to lay out an unusual panel shape which covers a small 3D printed geodesic dome.

Much easier said that done, by the way. All kinds of things can and do go wrong, from an un-fixable short in the first version to adhesive and durability issues in later prototypes. In the end, however, it’s a success. Powered over USB-C, his mini “sphere” can display a variety of patterns and reactive emojis.

As elegant and impressive as the engineering is in this dense little display, [Carl] has some mixed feelings about the results. 945 individual pixels on such a small object is a lot, but it also ends up being fairly low-resolution in the end. It isn’t very good at displaying sharp lines or borders, so any familiar shapes (like circles or eyes) come out kind of ragged. It’s also expensive. The tiny LEDs may be only about 5 cents each, but when one needs nearly a thousand of them for one prototype that adds up quickly. The whole bill of materials comes out to roughly $250 USD after adding up the components, PCB, controller, and mechanical parts. It’s certainly a wildly different build than its distant cousin, the RGB cube.

Still, it’s an awfully slick little build. [Carl] doubts there’s much value in pursuing the idea further, but there are plenty of great images and clips from the build. Check out the video, embedded below.

Continue reading “How To Cram 945 LEDs Into A Teeny Tiny Vegas-Style Sphere”

Photo of a Nice-Power supply

Quick & Capable WiFi For Your Nice-Power Supply

Rejoice, those of us who have purchased a Nice-Power lab PSU from an Eastern source. Yes, the name might sound like a re-brand of a generic product, maybe you will even see this exact PSU on a shelf at a physical store near you, under a more local brand name and with a fair markup. Nevermind the circumstances, the most important part is that [Georgi Dobrishinov] found a way to add an ESP8266 to the PSU by tapping its internal UART control interface, and wrote a web UI for all your Internet-of-Lab-PSUs needs, called the PowerLinkESP project.

All you need is a Wemos D1 development board, or any other ESP8266 board that has UART pins exposed and handles 5 V input. [Georgi] brings everything else, from pictures showing you where to plug it in and where to tap 5 V, to extensive instructions on how to compile and upload the code, using just the Arduino IDE. Oh, and he tops it off with STLs for a 3D printed case, lest your Wemos D1 board flop around inside.

With [Georgi]’s software, you can monitor your PSU with interactive charts for all readings, export charts in both PNG and CSV, and access a good few features. Your ESP8266’s network uplink is also highly configurable, from an STA mode for a static lab config, to an AP mode for any on-the-go monitoring from your phone, and it even switches between them automatically! The firmware makes your PSU all that more practical, to the point that if you’re about to build an interface for your PSU, you should pay attention to [Georgi]’s work.

Lab PSUs with WiFi integration are worth looking into, just check out our review of this one; smart features are so nice to have, we hackers straight up rewrite PSU firmware to get there if we have to. Oh, and if you ever feel like standardizing your work so that it can interface to a whole world of measurement equipment, look no further than SCPI, something that’s easier to add to your project than you might expect, even with as little as Python and a Pi.

A Look Inside The Geochron Clock

There are plenty of cool clocks out there, and maps by their very essence are cool, too. But a map that’s also a clock — or is it a clock that’s also a map? — has to be the coolest thing ever.

Of course we’re talking about the Geochron, a world clock that makes the relationship between the Earth and the Sun clear and has graced the offices of executives who want to impress visitors with the global nature of their importance for decades. [Attoparsec] has long coveted one of these electromechanical beauties, and when a used one popped up online for a pittance, at least compared to what they cost new, he jumped at the chance.

The Geochron he ended up with was in need of some TLC, but surprisingly little considering its mid-1980s vintage. The real treat in the video below is getting to see how these wonderful devices work. They’re basically simple slide projectors. While we here in the future would simply do everything in software on a nice flat-screen display, the base map, night-day terminators, and calendar are all contained on transparent elements that move under the power of a synchronous motor across a lighted platen. The analemma display is particularly cool; an indicator tracks the Sun’s position over the Earth with a cam that encodes the equation of time in its shape, moving through its familiar bi-lobed loop as the seasons progress.

Any clock that comes with a set of blueprints for installation purposes is alright in our book, and kudos to [Attoparsec] for landing this prize and getting it back in shape. His description of it as “the greatest clock of all time” is apt, but perhaps with a little competition. Or maybe a lot.

Continue reading “A Look Inside The Geochron Clock”

CH32V003 Makes For Dirt Cheap RISC-V Computer

These days, when most folks think of a computer they imagine a machine with multiple CPUs, several gigabytes of RAM,  and a few terabytes of non-volatile storage for good measure. With such modern expectations, it can be difficult to see something like a microcontroller as little more than a toy. But if said MCU has a keyboard, is hooked up to a display, and lets you run basic productivity and development software, doesn’t that qualify it as a computer? It certainly would have in the 1980s.

With that in mind, [Olimex] has teased the RVPC, which they’re calling the “world lowest cost Open Source Hardware All-in-one educational RISC-V computer” (say that three times fast). The tiny board features the SOIC-8 variant of the CH32V003 and…well, not a whole lot else. You’ve got a handful of passives, a buzzer, an LED, and the connectors for a PS/2 keyboard, a power supply, and a VGA display. The idea is to offer this as a beginner’s soldering kit in the future, so most most of the components are through-hole.

On the software side, the post references things like the ch32v003fun development stack, and the PicoRVD programmer as examples of open source tools that can get your CH32V computer up and running. There’s even a selection of retro-style games out there that would be playable on the platform. But what [Olimex] really has their eye on is a port of VMON, a RISC-V monitor program.

When paired with the 320×200 VGA text mode that they figure the hardware is capable of, you’ve got yourself the makings of an educational tool that would be great for learning assembly and playing around with bare metal programming.

It might not have the timeless style of the Voja4, but at least you can fit it in a normal sized pocket.

Thanks to [PPJ] for the tip.

Generating A Lost Password By Traveling Back In Time

It’s probable that some of you reading this will have been approached in the past by people who’ve lost the password to their crypto wallets. They hear that you’re involved in some kind of “hacking”, and they cling to the forlorn hope that you might just be able to recover their lost wealth. For most of us there’s little chance we can help, but in [Joe Grand]’s case he has made it something of a specialism. He’s given an account of how he and a friend recovered a particularly difficult password.

The password in question had been generated by RoboForm, a long random string that was impossible for its owner to remember. The only chance of finding it lay in discovering a flaw in RoboForm, and that seemed hopeless until the discovery of a changelog reference to improving the random number generation of the software.

The video below details some of the detective work required to find the password, first reverse engineering an old version of RoboForm to find the flaw, and then the discovery that the random seed was derived from the system time. A range of passwords could be created for a given time frame, reducing the odds of finding the password considerably. The story is not without its twists, but it ends with the wallet’s owner rather theatrically being presented with a giant fake Bitcoin check.

Continue reading “Generating A Lost Password By Traveling Back In Time”

Hackaday Podcast Episode 273: A Tube Snoot, Dynamic Button Blobs, And Tokamaks Aren’t Whack

This week, it was Kristina’s turn in the hot seat with Editor-in-Chief Elliot Williams. First up in the news: Germany’s solar and wind power generation have resulted in excess energy, which some people think is bad. In Hackaday news, the entries in the 2024 Business Card Challenge are really stacking up.

Then it’s on to What’s That Sound, which Kristina provided this week and managed to stump Elliot. Can you get it? Can you figure it out? Can you guess what’s making that sound? If you can, and your number comes up, you get a special Hackaday Podcast t-shirt.

Then it’s on to the hacks, beginning with an improved spectrometer that wasn’t easy, and a rotary phone kitchen timer that kind of was. We’ll talk about badges turned invitations, reinventing rotary switches, and dynamic button blobs. Finally, we get the lowdown on the state of nuclear fusion, and posit why chatting online isn’t what it used to be.

Check out the links below if you want to follow along, and as always, tell us what you think about this episode in the comments!

Download and savor at your leisure.

Continue reading “Hackaday Podcast Episode 273: A Tube Snoot, Dynamic Button Blobs, And Tokamaks Aren’t Whack”

Schematic of the Pi Pico wireup, showing the various outputs that the firmware will generate on the GPIOs

A Scope Test Tool You Can Build With Just A Pico

Ever wanted to see how well your oscilloscope adheres to its stated capabilities? What if you buy a new scope and need a quick way to test it lest one of its channels its broken, like [Paul Wasserman] had happen to him? Now you only need a Pi Pico and a few extra components to make a scope test board with a large variety of signals it can output, thanks to [Paul]’s Sig Gen Pi Pico firmware.

description of the signals generated by the software, that can be read in detail on the project website
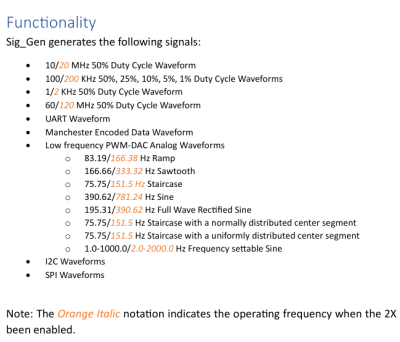
Despite the name it’s not a signal generator as we know it, as it’s not flexible in the signals it generates. Instead, it creates a dozen signals at more or less the same time — from square waves of various frequencies and duty cycles, to a PWM-driven DAC driving eight different waveforms, to Manchester-encoded data I2C/SPI/UART transfers for all your protocol decoder testing.

Everything is open source under the BSD 3-Clause license, and there’s even two PDFs with documentation and a user manual, not to mention the waveform screenshots for your own reference.

It’s seriously impressive how many features [Paul] has fit into a single firmware. Thanks to his work, whenever you have some test equipment in need of being tested, just grab your Pico and a few passive components.