Porting Dragon’s Lair To The Game Boy Color Was A Technical Triumph

If you remember the 80s arcade game Dragon’s Lair, you probably also remember it was strikingly unlike anything else at the time. It didn’t look or play like anything else. So it might come as a surprise that it was ported to Nintendo’s Game Boy Color, and that took some doing!

Dragon’s Lair used LaserDisc technology, and gameplay was a series of what we’d today call quick-time events (QTE). The player essentially navigated a series of brief video clips strung together by QTEs. Generally, if the player chose correctly the narrative would progress. If they chose poorly, well, that’s what extra lives (and a stack of quarters) were for.

More after the break!

Continue reading “Porting Dragon’s Lair To The Game Boy Color Was A Technical Triumph”

Full Color 3D Printing With PolyDye And Existing Inkjet Cartridges

The PolyDye system installed on an Elegoo Neptune 2 printer. (Credit: Teaching Tech, YouTube)

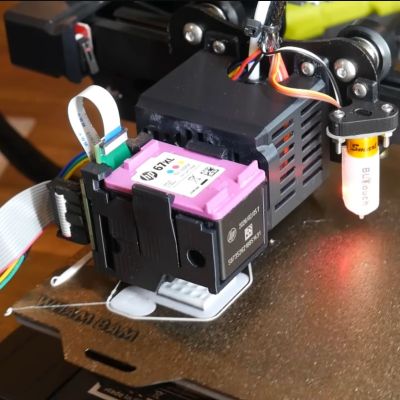
Being able to 3D print FDM objects in more than one color is a feature that is rapidly rising in popularity, assisted by various multi-filament systems that allow the printer to swap between differently colored filaments on the fly. Naturally, this has the disadvantage of being limited in the number of colors, as well as wasting a lot of filament with a wipe tower and filament ‘poop’. What if you could print color on the object instead? That’s basically what the community-made PolyDye project does, which adds an inkjet cartridge to an existing FDM printer.

In the [Teaching Tech] video the PolyDye technology is demonstrated, which currently involves quite a few steps to get the colored 3D model from the 3D modelling program into both OrcaSlicer (with custom profile) and the inkjet printing instructions on the PolyDye SD card. After this the 3D object will be printed pretty much as normal, just with each layer getting a bit of an ink shower.

Although it could theoretically work with any FDM printer, currently it’s limited to Marlin-based firmware due to some prerequisites. The PolyDye hardware consists of a main board, daughter board, printed parts (including inkjet cartridge holder) and some wiring. A Beta Test unit is available for sale for $199, but you should be able to DIY it with the files that will be added to the GitHub project.

Even for a work-in-progress, the results are quite impressive, considering that it only uses off-the-shelf translucent filament and inkjet cartridges as consumables. With optimizations, it could give multi-filament printing a run for its money.

Continue reading “Full Color 3D Printing With PolyDye And Existing Inkjet Cartridges”

38C3: Towards An Open WiFi MAC Stack On ESP32

At the 38th Chaos Communications Congress, [Frostie314159] and [Jasper Devreker] gave us a nice update on their project to write an open-source WiFi stack for the ESP32. If you’re interested in the ESP32 or WiFi in general, they’ve also got a nice deep dive into how that all works.

On the ESP32, there’s a radio, demodulator, and a media access controller (MAC) that takes care of the lowest-level, timing-critical bits of the WiFi protocol. The firmware that drives the MAC hardware is a licensed blob, and while the API or this blob is well documented — that’s how we all write software that uses WiFi after all — it’s limited in what it lets us do. If the MAC driver firmware were more flexible, we could do a lot more with the WiFi, from AirDrop clones to custom mesh modes.

The talk starts with [Jasper] detailing how he reverse engineered a lot of Espressif’s MAC firmware. It involved Ghidra, a Faraday cage, and a lucky find of the function names in the blob. [Frostie] then got to work writing the MAC driver that he calls Ferris-on-Air. Right now, it’s limited to normal old station mode, but it’s definite proof that this line of work can bear fruit.

This is clearly work in progress — they’ve only been at this for about a year now — but we’ll be keeping our eyes on it. The promise of the ESP32, and its related family of chips, being useful as a more general purpose WiFi hacking tool is huge.

close up hands holding lighting pcb

Circuit Secrets: Exploring A $5 Emergency Light

Who would’ve thought a cheap AliExpress emergency light could be packed with such crafty design choices? Found for about $5, this unit uses simple components yet achieves surprisingly sophisticated behaviors. Its self-latching feature and decisive illumination shut-off are just the beginning. A detailed analysis by [BigCliveDotCom] reveals a smart circuit that defies its humble price.

The circuit operates via a capacitive dropper, a cost-effective way to power low-current devices. What stands out, though, is its self-latching behavior. During a power failure, transistors manage to keep the LEDs illuminated until the battery voltage drops below a precise threshold, avoiding the dreaded fade-to-black. Equally clever is the automatic shut-off when the voltage dips too low, sparing the battery from a full drain.

Modifications are possible, too. For regions with 220V+ mains, swapping the dropper capacitor with a 470nF one can reduce heat dissipation. Replacing the discharge resistor (220k) with a higher value improves longevity by running cooler. What remarkable reverse engineering marvels have you come across? Share it in the comments!  After all, it is fun to hack into consumer stuff. Even if it is just a software hack.

Continue reading “Circuit Secrets: Exploring A $5 Emergency Light”

Let It Snow With A Sub $100 Snowmaking Machine.

[Mattmopar] figured out how to get a white Christmas even if the weather isn’t frightful. He built a simple DIY snow making machine with a few plumbing parts, and tools you probably already have. Snowmaking machines used on the ski slopes cost tens of thousands of dollars. Even the “low-cost” home versions are $400 and up.

[Matt] cut things down to the basics.  Snowmaking requires two ingredients: Water and compressed air.  The water is coming from a cheap electric pressure washer he found used.  The air pressure is from an old air compressor. [Matt] is using his shop compressor – but even a cheap compressor will do fine.

The cold is an unforgiving environment though – so a few changes are needed. The trick is to use garden hose instead of air hose. Traditional air hose has a rather small hole. This leads to ice clogs coming from the compressor itself.  A check valve also ensures that water from the pressure washer doesn’t back up into the compressor.

The nozzles are pressure washer nozzles.  Two 40 degree nozzles for the water, and a 65 degree nozzle for the air/water mix. In true hacker style, the frame of the machine is a ladder, and the gun attached via zip-ties.

Of course you still need cold temperatures for this to work, but that’s not too hard in the winter months. Now if you have the opposite problem of too much snow, check out this self clearing concrete.

Continue reading “Let It Snow With A Sub $100 Snowmaking Machine.”

A Low-Cost Spectrometer Uses Discrete LEDs And Math

A spectrometer is a pretty common lab instrument, useful for determining the absorbance of a sample across a spectrum of light. The standard design is simple; a prism or diffraction grating to break up a light source into a spectrum and a detector to measure light intensity. Shine the light through your sample, scan through the spectrum, and graph the results. Pretty easy.

That’s not the only way to do it, though, as [Markus Bindhammer] shows with this proof-of-concept UV/visible spectrometer. Rather than a single light source, [Marb] uses six discrete LEDs, each with a different wavelength. The almost-a-rainbow’s-worth of LEDs are mounted on circular PCB, which is mounted to a stepper motor through a gear train. This allows the instrument to scan through all six colors, shining each on the sample one at a time. On the other side of the flow-through sample cuvette is an AS7341 10-channel color sensor, which can measure almost the entire spectrum from UV to IR.

The one place where this design seems iffy is that the light source spectrum isn’t continuous, as it would be in a more traditional design. But [Marb] has an answer for that; after gathering data at each wavelength, he applies a cubic spline interpolation to derive the spectrum. It’s demonstrated in the video below using chlorophyll extracted from spinach leaves, and it seems to generate a reasonable spectrum. We suppose this might miss a narrow absorbance spike, but perhaps this could be mitigated by adding a few more LEDs to the color wheel.

Continue reading “A Low-Cost Spectrometer Uses Discrete LEDs And Math”

Building A 3D Printed Phone Handset With Mil-Spec Style

In general, military gear is designed to be rugged and reliable. A side effect of this is that the equipment usually has a distinct visual look that many people find appealing. You might not need a laptop that can survive being in a war zone, but plenty of hackers have picked such machines up on the second hand market anyway.

Case in point, the H-250 telephone handset. [Tobias] didn’t actually need a combat-ready phone handset, but loved the way it looked. Technically you can pick these up on eBay for a reasonable price, but then you’ve still got to deal with the weirdo military components inside it. So why not design a look-alike and 3D print it?

[Tobias] came up with a design in OpenSCAD that has a very close resemblance to its military counterpart. Not only has he made the source code for the 3D model available for others who might want to print their own look-alike handset, but the Hackaday.io page also includes a breakdown of the hardware that needs to be added to the printed parts to make it a functional handset.

If you think the H-250 handset looks familiar, it’s probably because it comes standard issue on the TA-1042 field telephone — another very slick looking piece of military gear that we’ve covered previously.