Rainwater From The Road To The Garden

Most small-scale, residential rainwater harvesting systems we’ve seen rely on using an existing roof and downspout to collect water that would otherwise be diverted out into the environment. These are accessible for most homeowners since almost all of the infrastructure needed for it is already in place. [SuburbanBiology] already built one of these systems to take care of his potable water, though, and despite its 30,000 gallon capacity it’s not even close to big enough to also water his garden. But with some clever grading around his yard and a special rainwater system that harvests rain from the street instead of his roof, he’s capable of maintaining a lush food forest despite living through a drought in Texas.

For this build there are actually two systems demonstrated, one which is gravity-fed from the road and relies on one’s entire property sloping away from the street, and a slightly more complex one that’s more independent of elevation. Both start with cutting through a section of sidewalk to pass a 4″ PVC pipe through to the street where the stormwater runoff can be collected. The gravity-fed system simply diverts this into a series of trenches around the property while the second system uses a custom sump pump to deliver the water to the landscaping.

For a system like this a holding tank is not necessary; [SuburbanBiology] is relying on the soil on his property itself to hold onto the rainwater. Healthy, living soil can hold a tremendous amount of water for a very long time, slowly releasing it to plants when they need it. And, at least where he lives, a system like this is actually helpful for the surrounding environment as a whole since otherwise all of the stormwater runoff has to be diverted out of the city or cause a flood, and it doesn’t end up back in an aquifer. If you’re more curious about a potable water system instead, take a look at [SuburbanBiology]’s previous system.

Continue reading “Rainwater From The Road To The Garden”

Wago Terminals Make This Ham Radio Dipole Light And Packable

For the amateur radio operator with that on-the-go lifestyle, nothing is more important than having your gear as light and packable as possible. If you’re lugging even a modest setup out into the woods, every ounce counts, which is why we love projects like this packable dipole antenna feedpoint.

At its simplest, a dipole antenna is just two pieces of wire cut to a specific, frequency-dependent length connected to a feedline. In practical terms, though, complications arise, such as keeping common-mode currents off the feedline and providing sturdy mechanical support for the antenna to suspend it safely. [Ham Radio Dude]’s design handles both those requirements while staying as small and packable as possible. The design starts with a bifilar 1:1 current balun, which is wound on an FT82-43 ferrite toroid with 22 AWG magnet wire. One side of the balun is connected to a BNC connector while the other is connected to a pair of Wago splice connectors that are glued together. A loop of paracord for mechanical strain relief is added, and the whole thing gets covered in heat-shrink tubing. The antenna is deployed by attaching a feedline to the BNC, clipping quarter-wave wires into the Wago terminals, and hoisting the whole thing aloft. Full build details are in the video below.

People will no doubt be quick to point out that these Wago terminals are rated for a minimum of 18 AWG wire, making them inappropriate for use with fine magnet wire. True enough, but [Dude] was able to get continuity through the Wagos, so the minimum gauge is probably more of an electrical code thing. Still, you’ll want to be careful that the connections stay solid, and it might pay to look at alternatives to the Wago brand, too. Continue reading “Wago Terminals Make This Ham Radio Dipole Light And Packable”

An IPhone Case Study

Way back in 2008, Apple unveiled the first unibody Macbook with a chassis milled out of a single block of aluminum. Before that, essentially all laptops, including those from Apple, were flimsy plastic screwed together haphazardly on various frames. The unibody construction, on the other hand, finally showed that it was possible to make laptops that were both lightweight and sturdy. Apple eventually began producing iPhones with this same design style, and with the right tools and a very accurate set of calipers it’s possible to not only piece together the required hardware to build an iPhone from the ground up but also build a custom chassis for it entirely out of metal as well.

The first part of the project that [Scotty] from [Strange Parts] needed to tackle was actually getting measurements of the internals. Calipers were not getting the entire job done so he used a flatbed scanner to take an image of the case, then milled off a layer and repeated the scan. From there he could start testing out his design. After an uncountable number of prototypes, going back to the CAD model and then back to the mill, he eventually settles into a design but not before breaking an iPhone’s worth of bits along the way. Particularly difficult are the recessed areas inside the phone, but eventually he’s able to get those hollowed out, all the screw holes tapped, and then all the parts needed to get a working iPhone set up inside this case.

[Scotty] has garnered some fame not just for his incredible skills at the precision mill, but by demonstrating in incredible detail how smartphones can be user-serviceable or even built from scratch. They certainly require more finesse than assembling an ATX desktop and can require some more specialized tools, but in the end they’re computers like any other. For the most part.

Continue reading “An IPhone Case Study”

ESP8266 Keeps Tabs On Wood Stove Temperature

Wood heat offers unique advantages compared to more modern heating systems, especially in remote areas. But it also comes with its own challenges, namely, keeping the fire going at the optimum temperature. If it’s too cold you risk buildup in the chimney, but if you’ve got it stoked up more than necessary, you’ll end up burning through your wood faster.

To keep the fire in that sweet spot, [Jay] decided to put an ESP8266 and a thermocouple to work. Now, this might seem like an easy enough job at first, but things are complicated by the fact that the flue temperature above the stove lags considerably behind the temperature inside the stove. There’s also the fact that the top of the chimney will end up being much colder than the bottom.

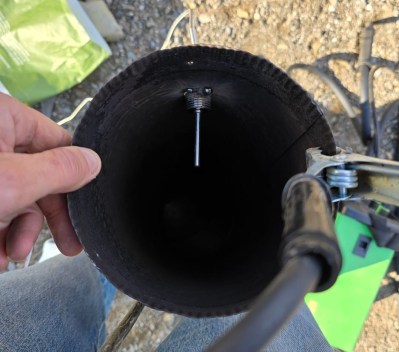
Mounting the thermocouple in the flue pipe.

In an effort to get a more complete view of what’s happening, [Jay] plans on putting at least two thermocouples in the chimney. But as getting on the roof in December isn’t his idea of fun, for now, he’s starting with the lower one that’s mounted right above the stove. He popped a hole in the pipe to screw in a standard K-type probe, and tapped it a few times with the welder to make sure it wasn’t going anywhere.

From there, the thermocople connects to a MAX6675 amplifier, and then to the WeMos D1 Mini development board that’s been flashed with ESPHome. [Jay] provides the configuration file that will get the flue temperature into Home Assistant, as well as set up notifications for various temperature events. The whole thing goes into a 3D printed box, and gets mounted behind the stove.

This project is a great example on how you can get some real-world data into Home Assistant quickly and easily. In the future, [Jay] not only wants to add that second thermocouple, but also look into manipulating the stove’s air controls with a linear actuator. Here’s hoping we get an update as his woodstove learns some new tricks.

Running Fusion 360 On Linux With Wine

One of the major reasons why using Linux on a desktop system is unsuitable for many is due to the lack of Linux support for many major applications, including Autodesk Fusion 360. Naturally, using Wine this should be easy in an ideal world, but realistically getting something like Fusion 360 set up and ready to log in with Wine will take some serious time. Fortunately [Steve Zabka] created some shell scripts to automate the process. As demonstrated by [Tech Dregs] on YouTube, this seems to indeed work on a Fedora system, with just a few glitches.

Among these glitches are some rendering artefacts like application controls remaining on the desktop after closing the application, in-application line rendering and [Tech Dregs] was unable to switch from the DirectX 9 renderer to the DirectX 11 one. Since Fusion 360 will soon drop DirectX 9 and OpenGL support, this would seem to be rather an important detail. The GitHub project seems to indicate that this should work, but [Tech Dregs] reported only getting a black screen after switching.

Clearly, using applications like Fusion 360 on Linux isn’t quite what you’d want to use for a production workflow in a commercial setting (even ignoring lack of Autodesk support), but it could be useful for students and others who’d like to not switch to Windows or MacOS just to use this kind of software for a course or hobbyist use.

Continue reading “Running Fusion 360 On Linux With Wine”

A Portable Chainsaw Sawmill

Unless you’re running a commercial logging operation, with specialized saws, log grapples, mills, transportation for the timber, and the skilled workers needed to run everything, it’s generally easier to bring a sawmill to the wood instead of taking the wood to the sawmill. Especially for a single person, something like a chainsaw mill is generally a much easier and cost effective way to harvest a small batch of timber into lumber. These chainsaw mills can still be fairly cumbersome though, but [izzy swan] has a new design that fits an entire mill onto a hand cart for easy transportation in and out of a forest.

The entire mill is built out of a sheet and a half of plywood, most of which is cut into strips and then assembled into box girders for the track. The remainder of plywood is machined on a CNC to create the carriage for the chainsaw to attach as well as a few other parts to fix the log in place. The carriage has a 4:1 reduction gear on it to winch the chainsaw along the length of the log which cuts the log into long boards. After the milling is complete, the entire mill can be disassembled and packed down onto its hand cart where it can be moved on to the next project fairly quickly.

For a portable mill, it boasts respectable performance as well. It can cut logs up to 11 feet in length and about 30 inches across depending on the type of chainsaw bar used, although [izzy swan] has a few improvements planned for the next prototypes that look to make more consistent, uniform cuts. Chainsaws are incredibly versatile tools to have on hand as well, we’ve seen them configured into chop saws, mortisers, and even fixed to the end of a CNC machine.

Thanks to [Keith] for the tip!

Continue reading “A Portable Chainsaw Sawmill”

Might Morphin’ Antenna

The shape of an antenna can make a big difference in its performance. Researchers at the Johns Hopkins Applied Physics Laboratory have used shape memory alloy to construct an antenna that changes shape depending on the signals it is receiving. Nitinol, a common shape memory alloy made from nickel and titanium, is an obvious choice, but it’s not obvious how you’d make a shape-changing antenna out of nitinol wire. That changed when a mechanical engineer found a way to 3D print the substance. You can find a paper about the research online from Applied Engineering Materials.

In practice, the antenna is a double spiral made of nitinol. A channel contains a copper wire that can heat the antenna and, therefore, change its shape. Having a powered wire in the antenna can cause problems, so special designs route the signal away from the heating element. It looks like the antenna can assume a flat configuration or a spiral conic configuration.

Continue reading “Might Morphin’ Antenna”