A Modern Version Of Famous, Classic Speaker

Modern musicians may take for granted that a wide array of musical instruments can either be easily connected to a computer or modeled entirely in one, allowing for all kinds of nuanced ways of creating unique sounds and vivid pieces of music without much hardware expense. Not so in the 1930s. Musicians of the time often had to go to great lengths to generate new types of sounds, and one of the most famous of these was the Leslie speaker, known for its unique tremolo and vibrato. Original Leslies could cost thousands now, though, so [Levi Graves] built a modern recreation.

The Leslie speaker itself got its characteristic sound by using two speakers. The top treble speaker was connected to a pair of horns (only one of which produced sound, the other was used for a counterweight) on a rotating platform. The second speaker in the bottom part of the cabinet faced a rotating drum. Both the horns and drum were rotated at a speed chosen by the musician and leading to its unique sound. [Levi] is actually using an original Leslie drum for his recreation but the sound is coming out of a 100-watt “mystery” speaker, with everything packaged neatly into a speaker enclosure. He’s using a single-speed Leslie motor but with a custom-built foot switch can employ more fine-tuned control over the speed that the drum rotates.

Even though modern technology allows us to recreate sounds like this, often the physical manipulation of soundwaves like this created a unique feeling of sound that can’t be replicated in any other way. That’s part of what’s driven the popularity of these speakers throughout the decades, as well as the Hammond organs they’re often paired with. The tone generators on these organs themselves are yet another example of physical hardware providing a unique, classic sound not easily replicated.

Continue reading “A Modern Version Of Famous, Classic Speaker”

Building A Color Teaching Toy For Tots

Last year, [Deep Tronix] wished to teach colors to his nephew. Thus, he built a toy to help educate a child about colors by pairing them with sounds, and Color Player was born.

The build is based around the TCS34725, an off-the-shelf color sensor. It’s paired with an ESP32, which senses colors and then plays sounds in turn. [Deep Tronix] made this part harder by insisting on creating their own WAV playback system, using the microcontroller, an SD card, and its on-board digital-to-analog hardware.

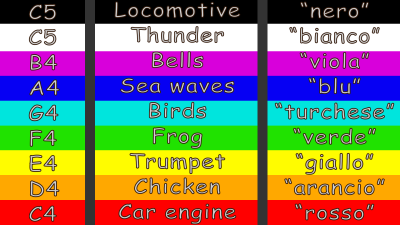
The map of colors and sounds.

The toy operates in three primary modes. Color-to-tone, color-to-sound, color-to-voice. Basically, a color is scanned, and then the Color Player creates a tone, plays back a pre-recorded audio sample, or spells out the name of the color that was just scanned.

[Deep Tronix] also included jolly mode, which just color cycles a few RGB LEDs. However, there’s a game inside jolly mode as well, created for an older nephew to play with. Enter the right button combination, and you unlock it. Then, the device suggests a color and you have to run around, find it, and scan it to score.

We love a good color game; somehow this build seems even more compelling than Milton Bradley’s classic Simon toy.

Continue reading “Building A Color Teaching Toy For Tots”

Zine Printing Tips From A Solopreneur

Zines (self-produced, small-circulation publications) are extremely DIY, and therefore punk- and hacker-adjacent by nature. While they can be made with nothing more than a home printer or photocopier, some might benefit from professional production while losing none of their core appeal. However, the professional print world has a few gotchas, and in true hacker spirit [Mabel Wynne] shares things she learned the hard way when printing her solo art zine.

As with assembling hardware kits, assembling a zine can take up a lot of physical table space.

[Mabel] says the most useful detail to nail down before even speaking to printers is the zine’s binding, because binding type can impact layout and design of an entire document. Her advice? Nail it down early, whether it’s a simple saddlestitch (staples through a v-shaped fold of sheets), spiral binding (which allows a document to lay flat), or something else.

Aside from paper and print method (which may be more or less important depending on the zine’s content) the other thing that’s important to consider is the finishing. Finishing consists of things like cutting, folding, and binding of the raw printed sheets. A printer will help arrange these, but it’s possible to do some or even all of these steps for oneself, which is not only more hands-on but reduces costs.

Do test runs, and prototype the end result in order to force unknown problems to the surface before they become design issues. Really, the fundamentals have a lot in common with designing and building kits or hardware. Check out [Mabel]’s article for the full details; she even talks a little about managing money and getting a zine onto shelves.

Zine making is the DIYer’s way to give ideas physical form and put them into peoples’ hands more or less directly, and there’s something wonderfully and inherently subversive about that concept. 2600 has its roots in print, but oddball disk magazines prove one doesn’t need paper to make a zine.

Massive Aluminum Snake Casting Becomes Water Cooling Loop For PC

Water cooling was once only the preserve of hardcore casemodders and overclockers. Today, it’s pretty routinely used in all sorts of performance PC builds. However, few are using large artistic castings as radiators like [Mac Pierce] is doing. 

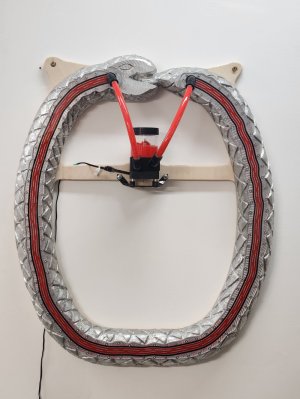
The casting itself was inspired on the concept of the ouroboros, the snake which eats its own tail if one remembers correctly. [Mac] built a wooden form to produce a loop approximately 30″ tall and 24″ wide, before carving it into the classic snake design. The mold was then used to produce a hefty sand cast part which weighed in at just over 30 pounds.

The next problem was to figure out how to create a sealed water channel in the casting to use it as a radiator. This was achieved by machining finned cooling channels into the surface of the snake itself. A polycarbonate face plate was then produced to bolt over this, creating a sealed system. [Mac] also had to work hard to find a supply of aluminum-compatible water cooling fittings to ensure he didn’t run into any issues with galvanic corrosion.

The final product worked, and looked great to boot, even if it took many disassembly cycles to fix all the leaks. The blood-red coolant was a nice touch that really complemented the silvery aluminum. CPU temperatures weren’t as good as with a purpose-built PC radiator, but maxed out at 51 C in a heavy load test—servicable for [Mac]’s uses. The final touch was to simply build the rest of the PC to live inside the ouroboros itself—and the results were stunning.

We’ve featured a few good watercooling builds over the years. If you’ve found your own unique way to keep your hardware cool and happy, don’t hesitate to notify the tipsline!

2025 One Hertz Challenge: A Discrete Component Divider Chain

Most of us know that a quartz clock uses a higher frequency crystal oscillator and a chain of divider circuits to generate a 1 Hz pulse train. It’s usual to have a 32.768 kHz crystal and a 15-stage divider chain, which in turn normally sits inside an integrated circuit. Not so for [Bobricius], who’s created just such a divider chain using discrete components.

The circuit of a transistor divider is simple enough, and he’s simply replicated it fifteen times in surface mount parts on a PCB with an oscillator forming the remaining square in a 4 by 4 grid. In the video below the break we can see him measuring the frequency at each point, down to the final second. It’s used as the timing generator for an all transistor clock, and as we can see it continues that trend. Below the break is a video showing all the frequencies in the chain.

This project is part of our awesome 2025 One Hertz Challenge, for all things working on one second cycles. Enter your own things that go tick and tock, we’d live to see them!

Continue reading “2025 One Hertz Challenge: A Discrete Component Divider Chain”

Hackaday Podcast Episode 330: Hover Turtles, Dull Designs, And K’nex Computers

What did you miss on Hackaday last week? Hackaday’s Elliot Williams and Al Williams are ready to catch you up on this week’s podcast. First, though, the guys go off on vibe coding and talk about a daring space repair around Jupiter.

Then it is off to the hacks, including paste extruding egg shells, bespoke multimeters, and an 8-bit mechanical computer made from a construction toy set.

For can’t miss articles, you’ll hear about boring industrial design in modern cell phones and a deep dive into how fresh fruit makes it to your table in the middle of the winter.

Check out the links below if you want to follow along, and as always, tell us what you think about this episode in the comments!

The DRM-free MP3 was stored in a public refrigerated warehouse to ensure freshness. Why not download it and add it to your collection?

Continue reading “Hackaday Podcast Episode 330: Hover Turtles, Dull Designs, And K’nex Computers”

Compass CNC

Human In The Loop: Compass CNC Redefines Workspace Limits

CNCs come in many forms, including mills, 3D printers, lasers, and plotters, but one challenge seems universal: there’s always a project slightly too large for your machine’s work envelope. The Compass CNC addresses this limitation by incorporating the operator as part of the gantry system.

The Compass CNC features a compact core-XY gantry that moves the router only a few inches in each direction, along with Z-axis control to set the router’s depth. However, a work envelope of just a few inches would be highly restrictive. The innovation of the Compass CNC lies in its reliance on the operator to handle gross positioning of the gantry over the workpiece, while the machine manages the precise, detailed movements required for cutting.

Most of the Compass CNC is constructed from 3D printed parts, with a commercial router performing the cutting. A Teensy 4.1 serves as the control unit, managing the gantry motors, and a circular screen provides instructions to guide the operator on where to position the tool.

Those familiar with CNC routers may notice similarities to the Shaper Origin. However, key differences set the Compass CNC apart. Primarily, it is an open source project with design files freely available for those who want to build their own. Additionally, while the Shaper Origin relies on a camera system for tracking movement, the Compass CNC uses four mouse sensors to detect its position over the workpiece.

The Compass CNC is still in development, and kits containing most of the necessary components for assembly are available. We’re excited to see the innovative creations that emerge from this promising new tool.

Continue reading “Human In The Loop: Compass CNC Redefines Workspace Limits”