Very Efficient APFC Circuit In Faulty Industrial 960 Watt Power Supply

The best part about post-mortem teardowns of electronics is when you discover some unusual design features, whether or not these are related to the original fault. In the case of a recent [DiodeGoneWild] video involving the teardown of an industrial DIN-rail mounted 24 V, 960 Watt power supply, the source of the reported bang was easy enough to spot. During the subsequent teardown of this very nicely modular PSU the automatic power factor correction (APFC) board showed it to have an unusual design, which got captured in a schematic and is explained in the video.

Choosing such a APFC design seems to have been done in the name of efficiency, bypassing two of the internal diodes in the bridge rectifier with the external MOSFETs and ultrafast diodes. In short, it prevents some of the typical diode voltage drops by removing diodes in the path of the current.

Although not a new design, as succinctly pointed out in the comments by [marcogeri], it’s explained how even cutting out one diode worth of voltage drop in a PSU like this can save 10 Watt of losses. Since DIN rail PSUs rarely feature fans for active cooling, this kind of APFC design is highly relevant and helps to prevent passively cooled PSUs from spiraling into even more of a thermal nightmare.

As for the cause behind the sooty skid marks on one of the PCBs, that will be covered in the next video.

Continue reading “Very Efficient APFC Circuit In Faulty Industrial 960 Watt Power Supply”

The Shady School

We can understand why shaderacademy.com chose that name over “the shady school,” but whatever they call it, if you are looking to brush up on graphics programming with GPUs, it might be just what you are looking for.

The website offers challenges that task you to draw various 2D and 3D graphics using code in your browser. Of course, this presupposes you have WebGPU enabled in your browser which means no Firefox or Safari. It looks like you can do some exercises without WebGPU, but the cool ones will need you to use a Chrome-style browser.

You can search by level of difficulty, so maybe start with “Intro” and try doing “the fragment shader.” You’ll notice they already provide some code for you along with a bit of explanation. It also shows you a picture of what you should draw and what you really drew. You get a percentage based on the matching. There’s also a visual diff that can show you what’s different about your picture from the reference picture.

We admit that one is pretty simple. Consider moving on to “Easy” with options like “two images blend,” for example. There are problems at every level of difficulty. Although there is a part for compute shaders, none seem to be available yet. Too bad, because that’s what we find most interesting. If you prefer a different approach, there are other tutorials out there.

The camera, lens off to show the 1" sensor.

There’s Nothing Mini About This Mini Hasselblad-Style Camera’s Sensor

When someone hacks together a digital camera with a Raspberry Pi, the limiting factor for serious photography is usually the sensor. No offense to the fine folks at the foundation, but even the “HQ” camera, while very good, isn’t quite professional grade. That’s why when photographer [Malcolm Wilson] put together this “Mini Hasselblad” style camera, he hacked in a 1″ sensor.

The sensor in question came in the form of a OneInchEye V2, from [Will Whang] on Tindie. The OneInch Eye is a great project in its own right: it takes a Sony IMX283 one-inch CMOS image sensor, and packages it with an IMU and thermal sensor on a board that hooks up to the 4-lane MIPI interface on the Raspberry Pi CM4 and Pi 5.

Sensor in hand, [Malcolm] needed but to figure out power and view-finding. Power is provided by a Geekworm X1200 battery hat. That’s the nice thing about the Pi ecosystem: with so many modules, it’s like LEGO for makers. The viewfinder, too, uses 4″ HDMI screen sold for Pi use, and he’s combined it with a Mamiya C220 TLR viewfinder to give that look-down-and-shoot effect that gives the project the “Mini Hasselblad” moniker.

These are a few images [Malcom] took with the camera. We’re no pros, but at least at this resolution they look good.
The steel-PLA case doesn’t hurt in that regard either, with the styling somewhat reminiscent of vintage film cameras. The “steel” isn’t just a colour in this case, and the metal actually makes the PLA conductive, which our photographer friend learned the hard way. Who hasn’t fried components on a surface they didn’t realize was conductive, though? We bet the added weight of the steel in the PLA makes this camera much nicer to hold than it would be in plain plastic, at least.

The OneInchEye module came set up for C-mount lenses, and [Malcolm] stuck with that, using some Fujinon TV lenses he already had on hand. [Malcolm] has released STL files of his build under a Creative Commons NonCommercial license, but he’s holding the code back for subscribers to his Substack.

This isn’t the first Pi-based camera we’ve seen from [Malcolm], and there’ve been quite a few others on these pages over the years. There was even a Hackaday version, to test out the “official” module [Malcolm] eschewed.

Butta Melta Stops Rock-solid Butter From Tearing Your Toast

Ever ruin a perfectly serviceable piece of toast by trying (and failing) to spread a little pat of rock-solid butter? [John Dingley] doesn’t! Not since he created the Butta Melta to cozily snug a single butter serving right up against a warm beverage, softening it just enough to get nice and spreadable. Just insert one of those foil-wrapped pats of butter into the Melta, hang its chin on the edge of your mug, and you’ll have evenly softened butter in no time.

The Butta Melta is intentionally designed with a bit of personality, but also has features we think are worth highlighting. One is the way it’s clearly designed with 3D printing in mind, making it an easy print on just about any machine in no time at all. The second is the presence of the hinge point which really helps the Butta Melta conform to a variety of cup designs, holding the payload as close as possible to the heat regardless of cup shape. A couple of minutes next to a hot beverage is all it takes for the butter to soften enough to become easily spreadable.

You may remember [John] (aka [XenonJohn]) from his experimental self-balancing scooters, or from a documentary he made about domestic ventilator development during COVID. He taught himself video editing and production to make that, and couldn’t resist using those skills to turn a video demo of the Butta Melta into a mock home shopping style advertisement. Watch it below, embedded just under the page break, then print one and save yourself from the tyranny of torn toast.

Continue reading “Butta Melta Stops Rock-solid Butter From Tearing Your Toast”

Pi Port Protection PCB

We’re used to interfaces such as I2C and one-wire as easy ways to hook up sensors and other peripherals to microcontrollers. While they’re fine within the confines of a small project, they do have a few limitations. [Vinnie] ran straight into those limitations while using a Raspberry Pi with agricultural sensors. The interfaces needed to work over long cable runs, and to be protected from ESD due to lightning strikes. The solution? A custom Pi interface board packing differential drivers and protection circuits aplenty.

The I2C connection is isolated using an ISO1541 bus isolator from TI, feeding a PCA9615DP differential I2C bus driver from NXP. 1-wire is handled by a Dallas DS2482S 1-wire bus master and an ESD protection diode network. Even the 5-volt power supply is delivered through an isolated module.

Whether or not you need this Raspberry Pi board, this is still an interesting project for anyone working with these interfaces. If you’re interested, we’ve looked at differential I2C in the past.

Debugging The Instant Macropad

Last time, I showed you how to throw together a few modules and make a working macropad that could act like a keyboard or a mouse. My prototype was very simple, so there wasn’t much to debug. But what happens if you want to do something more complex? In this installment, I’ll show you how to add the obligatory blinking LED and, just to make it interesting, a custom macro key.

There is a way to print data from the keyboard, through the USB port, and into a program that knows how to listen for it. There are a few choices, but the qmk software can do it if you run it with the console argument.

The Plan

In theory, it is fairly easy to just add the console feature to the keyboard.json file:

{
...
    "features": {
        "mousekey": true,
        "extrakey": true,
        "nkro": false,
        "bootmagic": false,
        "console": true
    },
...

That allows the console to attach, but now you have to print.

Continue reading “Debugging The Instant Macropad”

CERN’s Large Hadron Collider Runs On A Bendix G-15 In 2025

The Bendix G-15 refurbished by [David at Usagi Electric] is well known as the oldest fully operational digital computer in North America. The question [David] gets most is “what can you do with it?”.  Well, as a general-purpose computer, it can do just about anything. He set out to prove it. Can a 1950s-era vacuum tube computer handle modern physics problems? This video was several years in the making, was a journey from [David’s] home base in Texas all the way to CERN’s Large Hadron Collider (LHC) in Switzerland.

Command breakdown
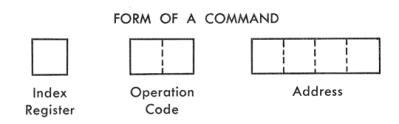
The G-15 can run several “high-level” programming languages, including Algol.  The most popular, though, was Intercom. Intercom is an interactive programming language – you can type your program in right at the typewriter. It’s much closer to working with a basic interpreter than, say, a batch-processed IBM 1401 with punched cards. We’re still talking about the 1950s, though, so the language mechanics are quite a bit different from what we’re used to today.

To start with, [Usagi’s] the G-15 is a numeric machine. It can’t even handle the full alphabet. What’s more, all numbers on the G-15 are stored as floating-point values. Commands are sent via operation codes.  For example, ADD is operation 43.  You have to wrangle an index register and an address as well.  Intercom feels a bit like a cross between assembler and tokenized BASIC. Continue reading “CERN’s Large Hadron Collider Runs On A Bendix G-15 In 2025”