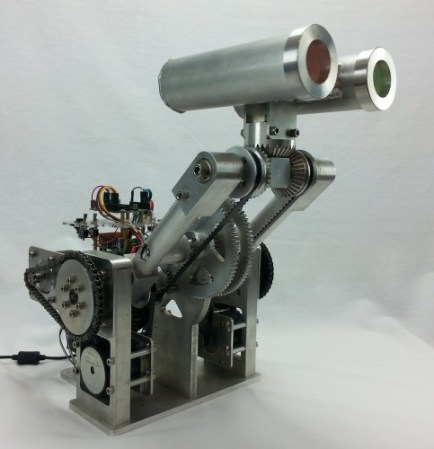
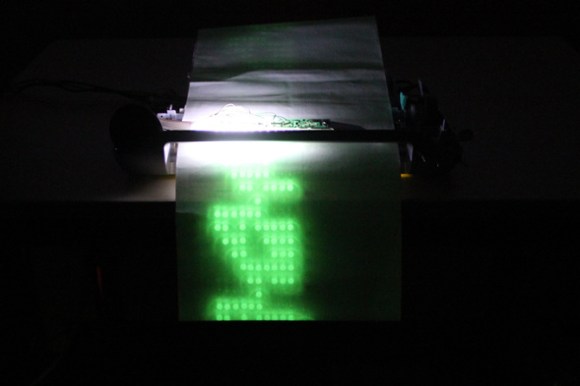
Inexpensive Robot Tracking System Is Swarm Ready

RobotWebcam

[Ladvien] has figured an inexpensive way to control a robot from a remote PC with a static webcam. Inspired by swarming robot videos such as those from the UPENN Grasp lab, [Ladvien] wanted to build his own static camera based system. He’s also managed to create one of the more eclectic Instructables we’ve seen. You don’t often find pseudo code for robot suicide mixed in with the project instructions.

Fixed cameras are used in many motion capture systems, such as the Vicon system used by numerous film, game, and animation studios. Vicon and similar systems cost tens of thousands of dollars. This was a bit outside [Ladvien’s] budget. He set about building his own system from scratch. The first step was the hardest – obtaining permission from his wife to screw a webcam into the ceiling. With that problem overcome, [Ladvien] brought openCV and python to bear. He created Overlord, his webcam vision and control system. A vision system with nothing to control would be rather boring, so [Ladvien] created DotMuncher, Overlord’s radio controlled robot slave.

The basic processing system is rather simple. DotMuncher carries a magnetometer on board, which it uses to send heading information to Overlord. Overlord is pre-calibrated with an offset from magnetic north to “video game north” (toward the top of the screen). Overlord then uses openCV’s color detection to find DotMuncher in the current scene.
Overlord finally generates a virtual “Dot” on screen, and directs DotMuncher to drive over to it. When the robot gets to the dot, it is considered munched, and a new dot is generated.

Continue reading “Inexpensive Robot Tracking System Is Swarm Ready”

Table Saw Kickback Video Ends Badly

Our comments section has been pretty busy lately with talk of table saws and safety, so we decided to feature this sobering video about table saw kickback. [Tom] is a popular YouTube woodworker. He decided to do a safety video by demonstrating table saw kickback. If you haven’t guessed, [Tom] is an idiot – and he’ll tell you that himself before the video is over. There are two hacks here. One is [Tom’s] careful analysis and preparation for demonstrating kickback (which should be fail of the week fodder). The other “hack” here is the one that came breathtakingly close to happening – [Tom’s] fingers.

Kickback is one of the most common table saw accidents. The type of kickback [Tom] was attempting to demonstrate is when a board turns and catches the blade past the axle. On a table saw kickback is extremely dangerous for two reasons. First, the piece of wood being cut becomes a missile launched right back at the saw operator. We’ve seen internal injuries caused by people being hit by pieces of wood like this. Second, the saw operator’s hand, which had just been pushing the wood, is now free to slid right into the blade. This is where a SawStop style system, while expensive, can save the day.

The average 10 inch table saw blade has an edge traveling at around 103 mph, or 166 kmh. As [Tom] demonstrates in his video, it’s just not possible for a person to react fast enough to avoid injury. Please, both personal users and hackerspaces, understand general safety with all the tools you’re using, and use proper safety equipment. As for [Tom], he’s learned his lesson, and is now using a SawStop Table.

Continue reading “Table Saw Kickback Video Ends Badly”

3D Printed Cutaway Jet Engine Sounds Great

Thanks to the wonders of 3D printing, you can now have a 3D printed a jet engine of your very own. Unlike jet engines we’ve seen before, this one comes with no chance of the operator getting burned to a crisp. [Gerry] is a self-proclaimed “broken down motor mechanic” from New Zealand. He’s designed a rather awesome jet engine in 3D Software, and printed it on his UP Plus printer. The engine itself is a cutaway model of a high-bypass turbofan engine. While we’re not sure which make and model of jet engine this cutaway represents, we’re still very impressed.

This isn’t just a static display model – the engine will actually spin up with the help of compressed air.  Separate start and run tubes send air to the turbine and main fain respectively. It even has that distinctive turbofan “buzz saw” sound. While this model is relatively safe, [Gerry] does warn to keep the pressure down, or it could come apart. To that end we’d recommend adding a regulator before the quick disconnect.

The Thingiverse project is a bit light on instructions.  However this situation is remedied by [hacksaw], who posted a pictorial and build log up on pp3d. [Hacksaw] did run into a few problems with the build, but nothing a little bit of superglue couldn’t fix. It may have fewer moving parts, but this definitely puts our old Visible V8 Engine kit to shame.

Continue reading “3D Printed Cutaway Jet Engine Sounds Great”

HeartBeat Boombox Creates Bio Beats

sophi1

If you happened to be wandering the hall of science during MakerFaire NY, you may have noticed a woman walking around with a rather odd boombox strapped around her neck. That was [Sophi Kravitz] with her HeartBeat Boombox. Thankfully [Sophi] lives within driving distance of Makerfaire, and didn’t attempt to get through airport security with her hardware. She started with three medical grade pulse oximeters. These oximeters output a “beep” for every beat of your heart. [Sophi] rolled her own AVR board running Arduino firmware to capture pulses on their way to the oximeter audio transducer. The AVR uses a sound board to convert the pulses into various percussion sounds. The pulse indicators also activate one of three LED strips.

[Sophi’s] biggest frustrations with the hack were the JST connectors on the LIPO batteries powering the entire system. She found that they fell apart rather easily. We’ve used JST connectors in the past with no problem, so we’re guessing she ended up with one of the many knock off connectors out there. [Sophi] tied the entire system together with a custom milled acrylic plate mounted to the front of the boombox.

The final result was very slick. With three people connected to the finger inputs of the pulse oximeters, some complex beats could be formed. We thought we were listening to dubstep when she first walked by. One feature we would like to see implemented would be the ability to record and play back some of the beats created by the boombox.

Piano Repurposed As A Resonant Synth Speaker

piano-synth

[Richard] recently rediscovered some files from a hack he did back in 2004. He was experimenting with exciting piano strings via electromagnetic fields. The idea shares some elements with the self tuning piano we saw back in 2012. Piano strings, much like guitar strings, are made of steel alloys. This means they create electricity when vibrated in a magnetic field. This is the basic principle upon which electric guitar pickups are built. The idea also works in reverse. The strings will vibrate in response to a modulated electromagnetic field. Anyone who has seen an E-bow knows how this can be applied to the guitar. What about the piano?

[Richard] started with the Casio CZ-101, a classic synth in its own right. The Casio’s output was run through a Peavy 100 watt amplifier. The amplified output was then used to drive custom coils mounted on a piano. The coils had to be custom wound to ensure they would be compatible with the 4 – 8 ohm impedance expected by the amplifier. [Richard] ended up winding the coils to 28 ohms. Six of these coils in parallel put him just over the 4 ohm mark. The coils effectively turned the piano into a giant speaker for the synth. In [Richard’s] write-up (word doc link) he mentions that the strings basically act as a giant comb filter, each resonating strongly in response to frequencies in its harmonic series.

The results are rather interesting. The slow attack of the magnetic fields coupled with the synth’s patch results in a surprising variety of sound. The three examples on [Richard’s] blog vary from sounding like a power chord on a guitar to something we’d expect to find in an early horror movie. We would love to see this idea expanded upon. More efficient coils, and more coils in general would add to the effect. The coils on various string groups could also be switched in and out of the system using MIDI control, allowing for even more flexibility. Continue reading “Piano Repurposed As A Resonant Synth Speaker”

Walter Is A Robot Head Built From Scratch.

walter

[Chris] has put together a robot head that is impressive at first sight. [Chris’] robot, Walter II, becomes even more impressive when you realize that [Chris] built every single part from scratch. Many of Walter’s parts were created using machines [Chris] built himself. Walter is a robot neck and head. His upper neck joint is based upon three bevel gears.Two steppers drive the side gears. When the steppers are driven in the same direction, Walter’s head nods. When they are driven in opposite directions, the head turns. The end result allows Walter’s head to be panned and tilted into almost any position.

A second pair of motors raise and lower Walter’s neck via a chain drive. What isn’t immediately visible is the fact that a system of gears and belts maintains the tilt on Walter’s head as his lower neck joint is actuated. For example, if Walter’s head is facing directly forward with his neck raised, one would expect him to be facing the ground when the neck is lowered. The gear/belt system ensures that Walter will still be facing forward when the neck joint reaches its lower limit. All this happens without any movement of the neck motors. [Chris] definitely put a lot of thought into the mechanical design of this system.

Continue reading “Walter Is A Robot Head Built From Scratch.”

Alas, Poor Yorick! I Tweeted Him

yoreck the talking skull

You know Halloween is coming around when the tweet reading skulls start popping up. [Marc] wanted to bring the Halloween spirit into his workplace, so he built “Yorick”. In case you’re worried, no humans were harmed (or farmed for parts) in the creation of this hack. Yorick started life as an anatomical skull model, the type one might find in a school biology lab. Yorick’s skull provided a perfect enclosure for not one but two brains.

A Raspberry Pi handles his higher brain function. The Pi uses the Twitter API to scan for tweets to @wedurick. Once a tweet is found, it is sent to Google’s translate server. A somewhat well-known method of performing text to speech with Google translate is the next step. The procedure is simple: sending “http://translate.google.com/translate_tts?tl=en&q=hackaday” will return an MP3 file of the audio. To get a British accent, simply change to google.co.uk.

The Pi pipes the audio to a speaker, and to the analog input pin of an Arduino, which handles Yorick’s lower brain functions.  The Arduino polls the audio in a tight loop.  An average of the last 3 samples is computed and mapped to a servo position. This results in an amazingly realistic and automatic mouth movement. We think this is the best part of the hack.

It wouldn’t’ be fair for [Marc] to keep the fruits of his labors to himself, so Yorick now has his own Livestream channel. Click past the break to hear Yorick’s opinion on the Hack A Day comments section! Have we mentioned that we love pandering?

Continue reading “Alas, Poor Yorick! I Tweeted Him”