Milling Curved Objects With A G-Code Ripper

HaD Mouse

Milling and routing flat surfaces is pretty much the point of a CNC router, but how about curved surfaces? Auto leveling of hobby CNC machines and 3D printers is becoming commonplace, but Scorch Works is doing just the opposite: using a probe touch probe on a CNC machine to transform a G-Code file into something that can be milled on a curved surface.

The technique is pretty much the complete opposite of Autoleveller, the tool of choice for milling and routing objects that aren’t completely flat or perpendicular to the bed with a MACH3 or LinuxCNC machine. In this case, a touch probe attached to the router scans a curved part, applies bilinear interpolation to a G-Code file, and then starts machining.

The probe can be used on just about anything – in the videos below, you can see a perfect engraving in a block of plastic that’s about 30 degrees off perpendicular to the bed, letters carved in a baseball bat, and a guaranteed way to get your project featured on Hackaday.

Continue reading “Milling Curved Objects With A G-Code Ripper”
ZX Spectrum Turned Into A USB Keyboard

ZX

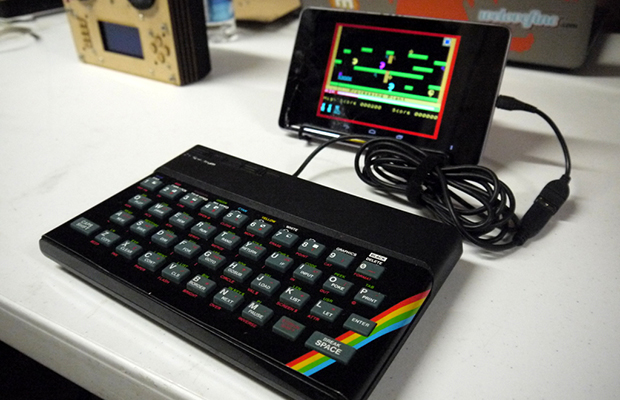
They’re a little hard to find in the US, but the ZX Spectrum is right up there with the Commodore 64 and the Atari 8-bit computers in England. [Alistair] wanted to recreate the feeling of sitting right in front of the TV with his Speccy, leading him to create the ZX Keyboard, a Spectrum repurposed into a USB keyboard.

While most projects that take an old key matrix and turn it into a USB keyboard use the TMK firmware, [Alistair] wanted to flex his programming muscles and wrote the firmware from scratch. It runs on an Arduino Pro Mini, scanning the matrix of five columns and eight half rows to turn combinations of keypresses into an astonishing number of commands, given the limited number of keys on the ZX.

The firmware is available on [Alistair]’s repo, available to anyone who doesn’t want to pay the £50 a new ZX Spectrum keyboard will cost. As far as the usability of a Spectrum keyboard goes, at least [Alistair] didn’t have an Atari 400 sitting in the attic.

Playing StarCraft On An ARM

Starcraft

Except for the really terrible Nintendo 64 port, StarCraft has always been bound to desktop and laptop PCs. Blizzard could take the code for StarCraft, port it to an ARM platform, put a version on the Google Play an iTunes store, and sit there while the cash rolls in. This would mean a ton of developer time, though, and potentially years tracking down hard to find bugs.

Or one random dude on the Internet could port StarCraft to an ARM platform. Yes, this means all the zerg rushes and dark templar ambushes you could possibly want are available for tablets and Raspberry Pis.

This godlike demonstration of compiler wizardry is a months-long project of [notaz] over on the OpenPandora team. Without the source for StarCraft, [notaz] was forced to disassemble the Win32 version of the game, convert the disassembly to C with some custom tools, and recompile it for ARM while linking in all the necessary Win32 API calls from the ARM port of Wine. Saying this was not easy is an understatement.

If you have an OpenPandora and want to relive your heady days of youth, you can grab everything you need here. For anyone without an OpenPandora that wants to play StarCraft on a Raspi, you might want to get working on your own recompiled port. Video below.

Continue reading “Playing StarCraft On An ARM”

A 3D(ollar) Scanner

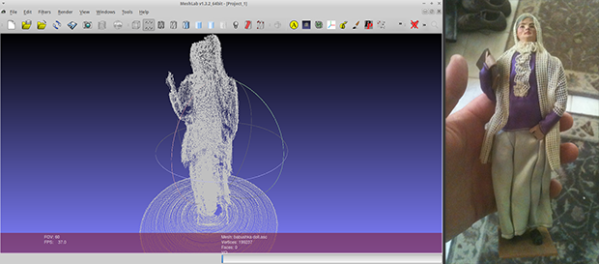
Once you have a 3D printer, making copies of objects like a futuristic Xerox machine is the name of the game. There are, of course, 3D scanners available for hundreds of dollars, but [Joshua] wanted something a bit cheaper. He built his own 3D scanner for exactly $2.73 in parts, salvaging the rest from the parts bin at his local hackerspace.

[Josh]’s scanner is pretty much just a lazy suzan (that’s where he spent the money), with a stepper motor drive. A beam of laser light shines on whatever object is placed on the lazy suzan, and a USB webcam feeds the data to a computer. The build is heavily influenced from this Instructables build, but [Josh] has a few tricks up his sleeve: this is the only laser/camera 3D scanner that can solve a point cloud with the camera in any vertical position. This potentially means algorithmic calibration, and having the copied and printed object come out the same size as the original. You can check out that code on the git.

Future improvements to [Josh]’s 3D scanner include the ability to output point clouds and STLs, meaning anyone can go straight from scanning an object to slicing it for a 3D printer. That’s a lot of interesting software features for something that was basically pulled out of the trash.

This Hackaday Prize Entry Sucks

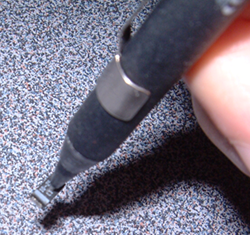
Sucker [K.C. Lee] is busy working on his entry to The Hackaday Prize, and right now he’s dealing with a lot of assembly. For his entry, that means tiny SMD parts, and the vacuum pen he ordered from DealExtreme hasn’t come in yet. The solution? The same as anyone else who has found themselves in this situation: getting an air pump for an aquarium.

For this quick build until the right tool has time to arrive from China, [K.C.] took an old fish pump and modified it for suction. He doesn’t go over the exact modification to the pump, but this can be as easy as drilling a hole and stuffing some silicone tubing in there.

The ‘tool’ for this vacuum pen is a plastic disposable 0.5mm mechanical pencil. [K,C.] found this worked alright on smaller parts down to 0402 packages, but heavy parts with smooth surfaces – chips, for example – are too much for the mechanical pencil and aquarium pump to handle.

A Dead Simple, Well Constructed FM Transmitter

[Angelo] is only 15, but that doesn’t mean his fabrication skills are limited to Lego and K’Nex. He’s built himself an amazingly well constructed FM transmitter that’s powerful enough to be received a quarter mile away.

The FM transmitter circuit itself is based off one of [Art Swan]’s builds, but instead of the solderless breadboard construction you would expect to find in a small demo circuit, [Angelo] went all the way, etching his own PCB and winding his own coil.

Using photosensitized copper clad board, [Angelo] laid out the circuit with Fritzing, etched a board, and went at it with a drill. The components found in the transmitter are pretty standard and with the exception of the trimmer cap and electret mic, can be picked up in the parts drawers of any Radio Shack. He gets bonus points for using a 1/4 – 20 bolt for winding the coil, too.

The power supply for the transmitter is a single 9V battery, the battery connector being salvaged from a dead 9V. Awesome work, and for someone so young, [Angelo] already seems to have a grasp of all the random, seemingly useless information that makes prototyping so much easier. Video below.

Continue reading “A Dead Simple, Well Constructed FM Transmitter”

A Real Raspberry Pi Clone (Not ‘Inspired By’)

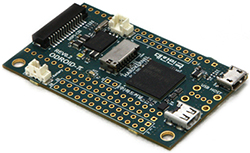
odroid A few years ago, Broadcom had a pretty nice chip – the BCM2835 – that could do 1080 video, had fairly powerful graphics performance, run a *nix at a good click, and was fairly cheap. A Broadcom employee thought, “why don’t we build an educational computer with this” and the Raspberry Pi was born. Since then, Broadcom has kept that chip to themselves, funneling all of them into what has become a very vibrant platform for education, tinkering, and any other project that could use a small Linux board. Recently, Broadcom has started to sell the BCM2835 to anyone who has the cash and from the looks of it, real Raspberry Pi clones are starting to make their way into the marketplace.

Other Raspberry Pi clone boards out there like the Banana Pi and the HummingBoard don’t use the same BCM2835 found in the Raspi and the new Odroid. The new board also has the same 26 pin GPIO expansion socket, and runs the same binaries as the Raspberry P;. It is a clone in every sense, with a slightly different form factor geared towards very tiny, portable, and battery-powered use cases.

Unlike the official Raspberry Pi Compute Module, the Odroid isn’t meant to be used as a system on module, shoved into any product that needs a fast-ish ARM core without needing engineers to actually design a circuit with an ARM. The Odroid is a cut-down, extremely minimalist version of the Raspi, perfect for any project where space is at a premium.

There are a few interesting features included on the Odroid: there’s an on-board battery connector, a real-time clock on the board, and more of the BCM2835 GPIOs are exposed (although not the same ones as the upgraded RPi Model B+). There’s no Ethernet, but odds are if you’re building something that’s battery-powered, you won’t need that anyway.

As far as price goes, you can pick one of these Odroids up for $30 USD, with $9 shipping from South Korea. That’s pretty comparable to the price of a real Raspberry Pi, but if the features in the Odroid are worth it to you, it might be a worthwhile clone.