Scooterputer, The All-in-one Scooter Computer

ScootDisplay-2

We’ve seen a fair share of carputer builds involving a Raspberry Pi in the last few months, but even the power of a Raspi can’t compete with the awesomeness of this Arduino-powered scooterputer.

Like all awesome projects, this build is the product of a massive case of feature creep. Initially, [Kurt] only wanted a voltage monitor for his battery. With an  Arduino Duemilanove, a voltage divider, and an evening of coding, [Kurt] whipped up a simple device with three LEDs to indicate the status of the batter: either low, good, or charging.

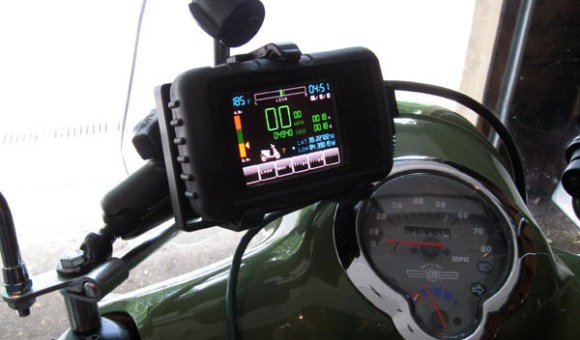
The project was complete until he ran across an awesome OLED screen. Using a touch screen display for just battery monitoring is a bit overkill, so [Kurt] made a trip over to Sparkfun and got his hands on a temperature sensor, real-time clock, accelerometer, GPS sensor, and even a cellular shield.

The resulting scooterputer is a masterpiece of in-vehicle displays: there’s a digital speedometer and GPS unit, and the cellular shield works as a tracking device and a way to download real-time maps of the scooter’s current location with itouchmap.

While the majority of the electronics are hidden under the hood of the scooter, the display of course needed to be out in the weather. To do this, [Kurt] found a nice enclosure with a rubber boot that perfectly fit the OLED display. The display is connected to the Arduino with a cat5 cable, and everything should hold up pretty well as long as [Kurt] doesn’t drive through a hurricane.

You can check out a video of the scooterputuer below.

Continue reading “Scooterputer, The All-in-one Scooter Computer”

Automated Cat Feeder And Large Plastic Screws

We’ve seen automated food dispensers for pets, but none that go so far as to build large plastic screws for dispensing kibble.

This isn’t [Mathieu]’s first automatic cat feeder; an earlier version used a wheel to dispense cat food in excessively large version. To improve upon his first build, [Mathiu] decided to use an Archimedean screw to dispense food in 5 gram increments. There was a problem, though: a proper industrial screw cost about $1500 and the ‘consumer’ versions of what he wanted were trash. He though about casting one in epoxy but didn’t want to poison his cat with strange chemicals. He ended up using PolyMorph for his screw, a plastic that melts at 60º C and is also used in medical devices.

The electronics of the build are an Arduino, a  DS1307 real-time clock, LCD display, and a relay board powering an electric screwdriver motor. From the video demo below, we’re going to say [Mathieu] put together a pretty nice automated cat feeder.

Continue reading “Automated Cat Feeder And Large Plastic Screws”

Turning A Phone Into A Media Center Remote

IMG_2061

[Kees] wanted a remote for an XBMC audio system. He had a classic T65 Dutch telephone in one of his project boxes and thought this phone with the addition of a Raspberry Pi he could have a functional media remote with classic lines and 70s styling.

Each of the digits on the phone were wired up to a small solderless breadboard. With a handful of resistors, [Kees] set up a simple pull up/pull down circuit feeding in to his Raspi’s GPIO input.

With a short Python script, [Kees] managed to map the buttons to XMBC’s play/pause, volume up/down, next, and previous commands. There were a few buttons left over, so those were mapped to online radio stations, playlists, and a strange setting known only as ‘moo’. We’re not sure what that button does, but you can see the other functions of this XMBC phone remote in action in the video below.

Continue reading “Turning A Phone Into A Media Center Remote”

Adding LEDs To An Engagement Ring

ring

Once upon a time, a nerd met a girl. Things happen as they do, and eventually [Ben] wanted to create the be-all, end-all engagement ring. (here’s a cache) It’s a simple titanium affair with 23 stones around the perimeter. What makes this ring so cool, though, is that it lights up whenever [Ben] and his girl are holding hands.

The metalworking portion of the build was about as easy as you would expect machining titanium to be. After the ring was cut off its bar stock, [Ben] brought it over to a mill where 23 holes for each of the stones were drilled. The stones were affixed to the ring with  jewelers epoxy and the entire ring was buffed to an amazing shine.

The electronics are where this project really shines. Putting a battery of capacitor inside a ring is nigh impossible, so [Ben] decided to power the LEDs with an inductive charging circuit. A coil of wire wound around kapton tape serves as the inductor and a small SMD capacitor powers three very bright and very tiny LEDs.

The inductive charging unit itself is a masterpiece of hackery; [Ben] wanted the ring to light up whenever he and his ladyfriend were holding hands. To do this, [Ben]’s inductive charger is also a wearable device: a large coil of wire is the charger’s transformer and was would to fit around [Ben]’s wrist. The entire charging circuit can be easily hidden under a jacket sleeve, making for a nearly magical light-up ring.

An awesome piece of work, and one of the best jewelry builds we’ve seen in a long time. You can see the inductive coupling and shining LEDs in the video below.

Continue reading “Adding LEDs To An Engagement Ring”

Wireless Microcontroller/PC Interface For $3

uc

Sending data from a microcontroller to a PC usually requires some sort of serial connection, either through fiddly on-chip USB, FTDI chips, or expensive radio ICs. [Scott] didn’t want to deal with this when creating a network of wireless temperature sensors, so he hacked up a few cheap 433 MHz radio transmitters and receivers to transmit data to a PC for about $3.

After sensor data is collected on a microcontroller and sent over radio, there’s still the issue of getting it into a PC. For this, [Scott] piped the data into the microphone port of a cheap USB sound card. We’ve seen this trick before both in the world of microcontrollers and loading programs onto a Commodore 64 via a cassette interface.

Once the data is sent into the sound card, it’s decoded with a a small Python app. Given the range and quality of the RF transmitters and receivers  [Scott] says it’s not an extremely reliable way to send data to a PC. It is cheap, though, and if you need to read sensors wirelessly on a budget, it’s hard to do much better.

Check out [Scott]’s demo of his creation below.

[youtube=http://www.youtube.com/watch?v=GJHFldPwZvM&w=580]

Controlling A Terminal With Google Voice

sms

For how awesome Google Voice is, we’re surprised we haven’t seen this before. [Steve] is using Google Voice to run commands on just about any Linux box.

Google Voice doesn’t have an official API, and existing unofficial APIs weren’t up to snuff for [Steve]’s project. He ended up writing his own that checks his unread message inbox every minute and looks for new text messages beginning with the phrase, ‘Cmd’. If a series of checks pass – the text coming from a known phone number and a proper terminal command – the command runs and sends the a text back indicating success or failure.

While [Steve] probably won’t be playing nethack or Zork via SMS anytime soon, we can see this being very useful for a Raspi home automation task. Just send a text message and a properly configured Linux box can open your garage door, turn on the lights, or even start a webcam.

Dermal Implants Means Strapless Watch

dermal

Google Glass is a year or so out, and even after that we’re still looking at about five years until we’re all upgraded at the behest of our robotic overlords. [justurn] simply can’t wait, so he decided to submit to the cybermen early with his Android-controlled wristwatch attached with dermal implants.

[justurn]’s got the inspiration for his project from this earlier Hackaday post involving dermal implants and an iPod nano. The iPod nano doesn’t have a whole lot of functionality, though, but the Sony SmartWatch does, and without the inevitable accusations of fanboyism.

To prep his arm for the hardware upgrade, [justurn] had four titanium dermal anchors placed in his wrist. After letting his anchors heal for a few months, [justurn] installed very strong neo magnets in the bases for his anchors and the clip for the SmartWatch’s strap.

The result is a magnetically mounted, Android-controlled watch semi-permanently attached to [justurn] at the wrist. We love it too.