Replace Legacy CNC PCs With A Gerbil

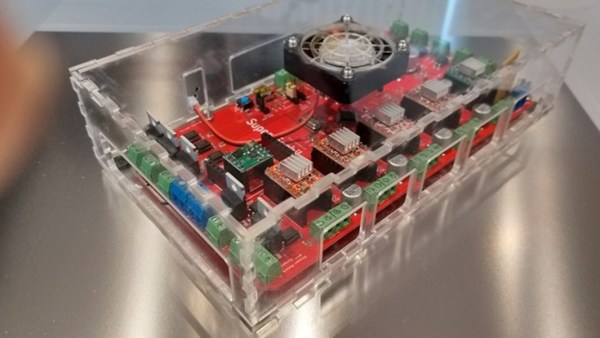
There are lots of laser cutters and other CNC machines available for a decent price online, but the major hurdle to getting these machines running won’t be the price or the parts. It’s usually the controller PC, which might be running Windows XP or NT if you’re lucky, but some of them are still using IBM XT computers from the ’80s. Even if the hardware in these machines is working, it might be impossible to get the software, and even then it will be dated and lacking features of modern computers. Enter the Super Gerbil.

[Paul] was able to find a laser cutter with one of these obsolete controllers, but figured there was a better way to getting it running again. As the name suggests, it uses GRBL, a G-Code parser and CNC controller software package that was originally made to run on an 8-bit AVR microcontroller, but [Paul] designed the Super Gerbil to run on a 32 bit ARM platform. He also added Z-axis control to it, so it now sports more degrees of freedom than the original software.

By way of a proof of concept, once he was finished building the Super Gerbil he ordered a CNC machine from China with an obsolete controller and was able to get it running within a day. As an added bonus, he made everything open so there are no license fees or cloud storage requirements if you want to use his controller. [Paul] also has a Kickstarter page for this project as well. Hopefully controllers haven’t been the only thing stopping you from getting a CNC machine for your lab, though, but if they have you now have a great solution for a 3040 or 3020 CNC machine’s controller, or any other CNC machine you might want to have. Continue reading “Replace Legacy CNC PCs With A Gerbil”
Go Up A Creek Without A Paddle

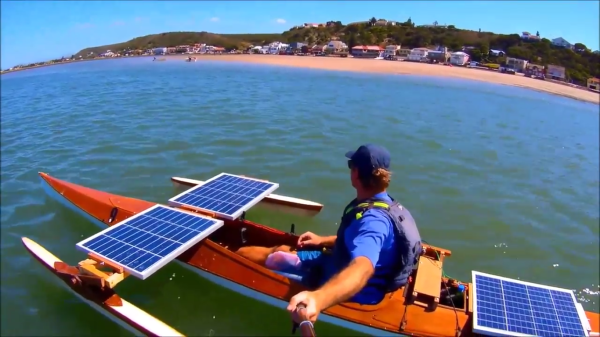
Kayaks are a some of the most versatile watercraft around. You can fish from them, go on backpacking trips, or just cruise around your local lake for a few hours. They’re inexpensive, lightweight, don’t require fuel, and typically don’t require a license or insurance to operate. They also make a great platform for a solar-powered boat like this one with only 150 watts of panels and a custom-built motor with parts from an RC airplane.

[William Frasier] built his solar-powered kayak using three solar panels, two mounted across the bow of the boat using pontoons to keep them from dipping into the water, and the other mounted aft. Separating the panels like this helps to prevent all three of them being shaded at once when passing under bridges. They’re all wired in parallel to a 12V custom-built motor which is an accomplishment in itself. It uses custom-turned parts from teak, a rot-resistant wood, is housed in an aluminum enclosure, and uses an RC airplane propeller for propulsion.

Without using the paddles and under full sun, the kayak can propel itself at about 4 knots (7 kmh) which is comparable to a kayak being propelled by a human with a paddle. With a battery, some of the shading problems could be eliminated, and adding an autopilot to it would make it almost 100% autonomous.

Continue reading “Go Up A Creek Without A Paddle”

Extreme Pi Overclocking With Mineral Oil

Liquid cooling is a popular way to get a bit of extra performance out of your computer. Usually this is done in desktops, where a special heat sink with copper tubing is glued to the CPU, and the copper tubes are plumbed to a radiator. If you want dive deeper into the world of liquid cooling, you can alternatively submerge your entire computer in a bath of mineral oil like [Timm] has done.

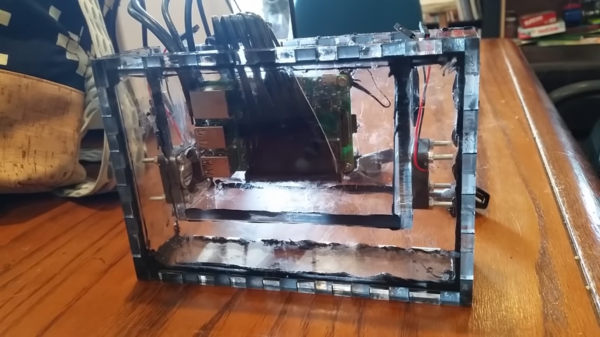
The computer in question here is a Raspberry Pi, and it’s being housed in a purpose-built laser cut acrylic case full of mineral oil. As a SoC, it’s easier to submerge the entire computer than it is to get a tiny liquid-cooled heat sink for the processor. While we’ve seen other builds like this before, [Timm] has taken a different approach to accessing the GPIO, USB, and other connectors through the oil bath. The ports are desoldered from the board and a purpose-built header is soldered on. From there, the wires can be routed out of the liquid and sealed off.

One other detail used here that  we haven’t seen in builds like this before was the practice of “rounding” the flat ribbon cable typically used for GPIO. Back in the days of IDE cables, it was common to cut the individual wires apart and re-bundle them into a cylindrical shape. Now that SATA is more popular this practice has been largely forgotten, but in this build [Timm] uses it to improve the mineral oil circulation and make the build easier to manage.

Continue reading “Extreme Pi Overclocking With Mineral Oil”

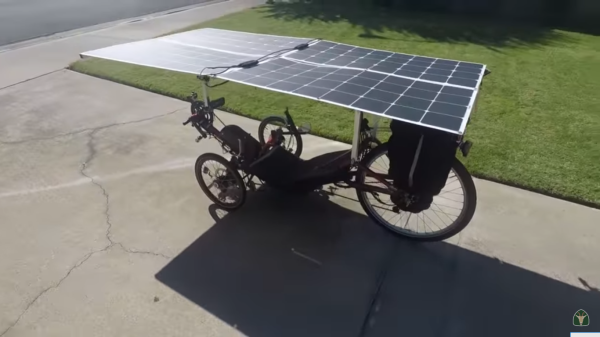
Pedal Far With A Solar Powered Tricycle

More and more electric bikes have been rolling out into the streets lately as people realize how inexpensive and easy they are to ride and use when compared to cars. They can also be pedaled like a normal bike, so it’s still possible to get some exercise with them too. Most have a range somewhere around 10-30 miles depending on battery size, weight, and aerodynamics, but with a few upgrades such as solar panels it’s possible to go much, much further on a charge.

[The Rambling Shepherd] had a tricycle (in the US, generally still considered a bicycle from a legal standpoint) that he had already converted to electric with a hub motor and battery, and was getting incredible range when using it to supplement his manual pedaling. He wanted to do better, though, and decided to add a few solar panels to his build. His first attempt didn’t fare so well as the 3D-printed mounts for the panel failed, but with a quick revision his second attempt survived a 50-mile trip. Even more impressive, he only had his battery half charged at the beginning of the journey but was still able to make it thanks to the added energy from the panels.

If you’re thinking that this looks familiar, we recently featured a tandem tricycle that was making a solar-powered trip from Europe to China with a similar design. It has the advantage of allowing the rider to pedal in the shade, and in a relatively comfortable riding position compared to a normal bike. Future planned upgrades include an MPPT charge controller to improve the efficiency of the panels.

Continue reading “Pedal Far With A Solar Powered Tricycle”

A Guide For Driving LED Matrices

Building an LED matrix is a fun project, but it can be a bit of a pain. Usually it starts with hand-soldering individual LEDs and resistors together, then hooking them up to rows and columns so they can be driven by a microcontroller of some sort. That’s a lot of tedious work, but you can order an LED matrix pre-built to save some time and headache. You’ll still need a driver though, and while building one yourself can be rewarding there are many pitfalls and trade-offs to consider when undertaking that project as well. Or, you can consider one of a number of drivers that [deshipu] has outlined in detail.

The hangups surrounding the driver board generally revolve around the issue of getting constant brightness from LEDs regardless of how many in the row or column are illuminated at one time. Since they are typically driven one row or column at a time, the more that are on the lower the brightness each LED will have. Driver boards take different approaches to solving this problem, which usually involve a combination of high-speed scanning of the matrix or using a constant-current source in order to eliminate the need for resistors. [deshipu] outlines four popular chips that achieve these purposes, and he highlights their pros and cons to help anyone looking to build something like this.

Most of these boards will get you to an 8×8 LED matrix with no problem, with a few going a few pixels higher in either direction. That might be enough for most of our needs, but for something larger you’ll need other solutions like the one found in this 64×32 LED matrix clock. There are also even more complicated drivers if you go into extra dimensions.

Photo credit: Komatta [Public domain], from Wikimedia Commons

I’m Sorry, Alexander, I’m Afraid I Can’t Do That

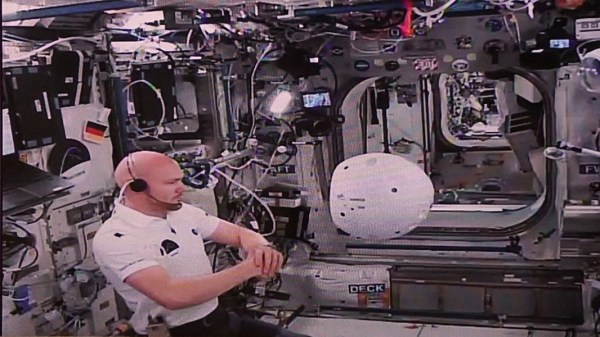
Getting people to space is extremely difficult, and while getting robots to space is still pretty challenging, it’s much easier. For that reason, robots and probes have been helping us explore the solar system for decades. Now, though, a robot assistant is on board the ISS to work with the astronauts, and rather than something impersonal like a robot arm, this one has a face, can navigate throughout the ship, and can respond to voice inputs.

The robot is known as CIMON, the Crew Interactive Mobile Companion. Built by Airbus, this interactive helper will fly with German astronaut Alexander Gerst to test the concept of robotic helpers such as this one. It is able to freely move about the cabin and can learn about the space it is in without being specifically programmed for it. It processes voice inputs similarly to a smart phone, but still processes requests on Earth via the IBM Watson AI. This means that it’s not exactly untethered, and future implementations of this technology might need to be more self-contained for missions outside of low Earth orbit.

While the designers have listened to the warnings of 2001 and not given it complete control of the space station, they also learned that it’s helpful to create an interactive robot that isn’t something as off-putting as a single creepy red-eye. This robot can display an interactive face on the screen, as well as use the same screen to show schematics, procedure steps, or anything else the astronauts need. If creepy design is more your style though, you can still have HAL watching you in your house.

Thanks to [Marian] for the tip!

Continue reading “I’m Sorry, Alexander, I’m Afraid I Can’t Do That”

Agilent LCR Meter Teardown

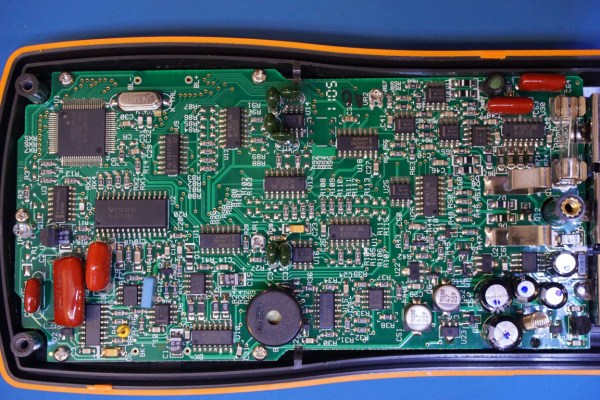
Since 1999, one of the more popular manufacturers of test equipment has been Agilent, the spun-off former instrument division of Hewlett-Packard. From simple multimeters to fully-equipped oscilloscopes, they have been covering every corner of this particular market. And, with the help of [Kerry Wong] and his teardown of an Agilent LCR meter, we can also see that they’ve been making consistent upgrades to their equipment as well.

The particular meter that [Kerry] took apart was an Agilent U1731B, a capable LCR (inductance, capacitance, resistance) meter. He had needed one for himself and noted that while they’re expensive when new, they can be found at a bargain used, but that means dealing with older versions of hardware. For example, his meter uses an 8-bit ADC while the more recent U1733 series uses a 24-bit ADC. The other quality of this meter that [Kerry] made special note of was how densely populated the circuit board is, presumably to save on the design of a VLSI circuit.

While we don’t claim to stump for Agilent in any way, it’s good to know that newer releases of their equipment actually have improved hardware and aren’t just rebadged or firmware-upgraded versions of old hardware with a bigger price tag attached. Also, there wasn’t really any goal that [Kerry] had in mind besides sheer curiosity and a willingness to dive deep into electronics details, as those familiar with his other projects know already.