Use Blueprint Process To Print On Fabric With Lasers

[Shih Wei Chieh] has built a laser cyanotype printer for fabrics. You know, for art!

How do you get an inkjet head on a shoe or a couch? Most printing processes require a flat surface to print. But hearkening back to the days when a blueprint was a blueprint, a mixture of an iron salt and an acid are mixed and applied to a surface an interesting reaction occurs when the surface is exposed to UV light. The chemicals react to form, of all things, prussian blue. After the reaction occurs simply washing away the remaining chemicals leaves a stable print behind.

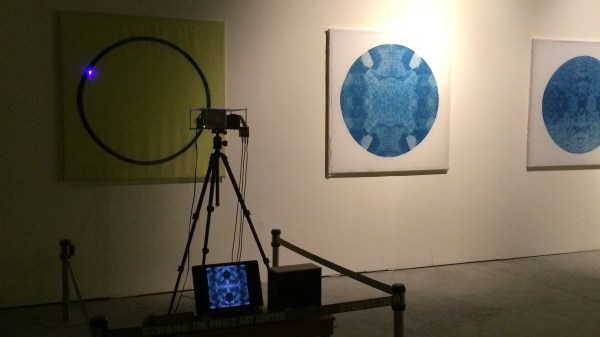
[Shih Wei Chieh] uses two galvanometers and a laser to cure the fabric. He uses a slightly newer process which reduces the exposure time required. This lets him print very large pictures, but also on uneven surfaces. As you can see in the video, viewable after the break, the effect is very pretty. There’s a new way to have the coolest pen plotter on the block.

Continue reading “Use Blueprint Process To Print On Fabric With Lasers”

A Nixie Radio Clock Fit For A Victorian Mad Scientist

[Ioszelos] built a nixie clock with a dizzying array of features.

Do you ever wish that you could log in to your clock from your phone and turn off your TV? We assume that [Ioszelos] did. The clock can also play MP3s and stream radio stations. It can record the indoor temperature, humidity, and barometric pressure. Did we mention it’s an FM radio too? We’re not sure, but we wouldn’t be surprised if there was a faucet hiding somewhere on the contraption.

A team effort shared between an ESP32 and Mega 2560 run the Rube Goldberg-like show. Custom boards were spun up to provide the control and voltages needed for the nixie tubes. The clock is constructed from machined plates and 3D printed files.

It all comes together in a steampunk reminiscent assembly. The glow from the RGB leds and nixie tubes combine to make an interesting visual effect. We’ve certainly never seen a clock quite like it before.

How To Design A Low Cost Probe-Oscilloscope

[Mark Omo] sends in his write up on the design of what should hopefully be a sub-$100 oscilloscope in a probe. 

Many problems in engineering can be solved simply by throwing money at the them. It’s really when you start to apply constraints that the real innovation happens. The Probe-Scope Team’s vision is of a USB oscilloscope with 60MHz bandwidth and 25Msps. The cool twist is that by adding another probe to a free USB port on your computer you’re essentially adding a channel. By the time you get to four you’re at the same price as a normal oscilloscope but with an arguably more flexible set-up.

The project is also open source. When compared to popular oscilloscopes such as a Rigol it has pretty comparable performance considering how many components each channel on a discount scope usually share due to clever switching circuitry.

The probe is based around an Analog Devices ADC whose data is handled by a tag team of a Lattice FPGA and a 32bit PIC micro controller. You can see all the code and design files on their github. Their write-up contains a very thorough explanation of the circuitry. We hope they keep the project momentum going!

A LED Cube Designed For Easy Assembly

LED cubes are mesmerizing and fun, but they’re usually a pain to build. Not so with [burkethos]’s cleanly designed cube. 

Many cubes are put together in an elaborate sculptural style. Traditionally the leads of the LEDs are artistically bent and then hours are spent laboring over the future rainbow Borg cube. This build is more reminiscent of a motherboard or back plane design. The LEDs are surface mount units re-flowed onto a rake shaped PCB. At the base of each “rake” there’s a right angle male header. This is then soldered to base board which creates a reliable mechanical bond.

There are some downsides to this approach. For example, the PCBs occlude the LEDs at some viewing angles. However, this can be mitigated with careful placement in the room, or in one variation, mounting the cube at a different orientation so the rakes are horizontal rather than vertical.

Regardless, we appreciate this new take on an old project and can definitely see it having a more universal appeal than the kits that require a couple weeks of afternoons to finish.

Say What You Will, A Fursuit Is A Lot Of Work.

One thing [Dr. Cockroach]’s build log shows is that a fursuit isn’t an easy thing to make.

Furries came out of early American comics and grew into the subculture the internet just can’t leave alone today. Many people take on an avatar of their furry self when participating in this subculture, and one of the prize achievements is to design, commission, or build a fur suit. What [Dr. Cockroach]’s build shows is why some of these suits can easily fetch 10,000USD. It really is a labor of love. It’s also brings up one of his goals in this project, to discover cheaper ways to construct these suits, so other people who share his hobby have a more financially accessible process to join in.

We were fascinated at the construction process. A base was built out of soft foam around a mock head. On this base more foam was layered and carved before the shape of his avatar, Marcus, started to take form. His wife found the testing process particularly humorous, but when he was happy with the arrangement and the movable jaw he began working on the pattern.

The pattern making process is very clever. He layers the foam base with masking tape and then peels it off. It’s easy to then cut the tape strategically until it lays flat. We can definitely see ourselves using this trick to do anything from sheet metal to duplicating plastic forms.

Then comes quite a lot of difficult stitching. We’d never thought about it before, but if you’re trying to simulate fur a lot of attention has to be paid tot he direction the fur lays; further increasing the difficulty.

Wherever your opinion lies, no hacker can turn down a detailed build log, and there are tricks to be learned anywhere if enough attention is paid.

ArrBot Is A Fast Way To Get Out Standing In A New Field Of Robotics

[Junglist] correctly points out that agricultural robotics is fast on its way to being the next big thing (TM) and presents his easy to build ArrBot platform so others can get hacking fast. 

The frame is built out of the same brackets and aluminum tubing used to add handrails to stairwells on buildings. Not only is this a fast way to do it, the set-up can be guaranteed to be sturdy since hand rails are often literally standing between life and death. The high ground clearance allows for all sorts of sensors and devices to be mounted while still being able to clear the plants below. 

For motion hub motors driven by an ODrive were re-purposed for the task. He explored turning the wheels as well, but it seems like  differential steer and casters works well for this set-up. ROS on an Nividia Jetson runs the show and deals with the various sensors such as a stereoscopic camera and IMU.

We’re excited to see what hacks people come up with as research in this area grows. (Tee-hee!) For example, [Junglist] wants to see the effect of simply running a UV light over a field rather than spraying with pesticides or fungicides would have.

An Open Assistive Robotic Arm To Help People Feed Themselves

Despite being otherwise capable, not everyone is able to feed themselves. [Julien]’s robot arm project aims to bring this crucial independence back to those people. Assistive devices in this space do exist, but as always they’re prohibitively expensive and the approval process is a nightmare. The development of the arm started by working closely with people who needed it at a local hospital. We note with approval, quite a few cardboard mock-ups to get the size and shape right before more formal work was done in CAD.

The robot arm only has to support a very light payload so its construction can be quite light. A frame of steel rods or plywood is all that’s required. We like how the motion is transferred from stepper motors to the joints of the arm by generously sized timing belts allowing the weight of the arm to remain towards the base. The team behind the project has gotten it to a point, but they’re hoping it will inspire community involvement as they move forward with it.

It’s worth noting, this is not the first assistive eating aid we’ve covered.