HobbyKing Cheetah: Building Running Robots From Hobby Motors

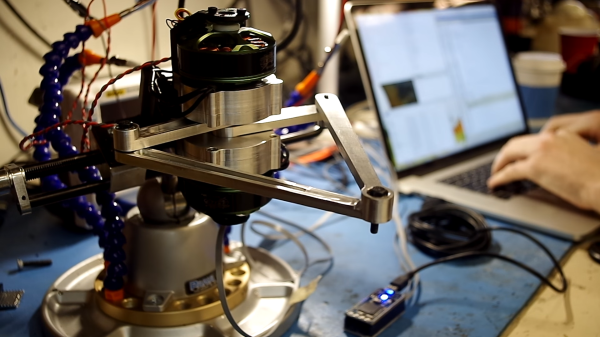
[Ben Katz] is building a running robot from hobby level brushless motors, all on his blog under the tag, “HobbyKing Cheetah.

One of the features of fancy modern industrial motor and controller sets is the ability for the motor to act as a mass-spring-damper. For example, let’s say you want a robot to hold an egg. You could have it move to the closed position, but tell the controller you only want to use so much force to do it. It will hold the egg as if there was a spring at its joint.

Another way you could use this is in the application of a robot leg. You tell the controller what kind of spring and shock absorber (damper) combination it is and it will behave as if those parts have been added to the mechanism. This is important if you want a mechanical leg to behave like a biological leg.

[Ben] had worked on a more formal project which used some very expensive geared motors to build a little running robot. It looks absolutely ridiculous, as you can see in the following video, but it gives an idea of where he’s going with this line of research. He wanted to see if he could replace all those giant geared motors with the cheap and ubiquitous high performance brushless DC motors for sale now. Especially given his experience with them.

So far he’s done a very impressive amount of work. He’s built a control board. He’s characterized different motors for the application.  He’s written a lot of cool software; he can even change the stiffness and damping settings on the fly. He has a single leg that can jump. It’s cool. He’s taking a hiatus from the project, but he’ll be right back at it soon. We’re excited for the updates!

A CNC You Could Pop-Rivet Together

You have to be careful with CNC; it’s a slippery slope. You start off one day just trying out a 3D printer, and it’s not six months before you’re elbow deep in a discarded Xerox looking for stepper motors and precision rods. This is evident from [Dan] and his brother’s angle aluminum CNC build.

Five or six years ago they teamed up to build one of those MDF CNC routers. It was okay, but really only cut foam. So they moved on to a Rostock 3D printer. This worked much better, and for a few years it sated them. However, recently, they just weren’t getting what they needed from it. The 3D printer had taught them a lot of new things, 3D modeling, the ins of running a CNC, and a whole slew of making skills. They decided to tackle the CNC again.

The new design is simple and cheap. The frame is angle aluminum held together with screws. The motion components are all 3D printed. The spindle is just an import rotary tool. It’s a simple design, and it should serve them well for light, low precision cuts. We suspect that it’s not the last machine the pair will build. You can see it in action in the video after the break.

Continue reading “A CNC You Could Pop-Rivet Together”

Build A Shapeoko The Hard Way

[Caleb Peters] looked at the Shapeoko 3 CNC kit, a kit designed to make building an entry level CNC router a possibility for anyone, a kit to take the guesswork out of the equation, a kit that removes all those difficult technical barriers. He looked at all of that ease and thought, “nah.” He wanted to learn! So he decided to build one the hard way. Like the early American Pioneers, he’d build his Shapeoko from scratch, suffering piously all the while.

His goal was to build an improved iteration of the Shapeoko 3, for less than the price of the kit. The first problem was the rails the gantry would run on. Inventables wasn’t going to sell him the rails, and he wasn’t sure if the delrin wheels used would be able to hold the weight of his heavier design. After some strife he determined that aluminum hard coat rails and steel wheels should last long enough, and if the aluminum wore away, the more expensive steel rails were a drop-in replacement.

Similar problems were overcome at each step. He couldn’t exactly copy the Shapeoko design. The Shapeoko’s steel pieces can only be made on a larger machine like a waterjet or industrial laser. He did have a knee mill and managed to cleverly avoid the need with some slight redesign. He kept at it, doing cool things like drilling a hole through the housing of a wood router, used as the spindle, and putting a hall-effect sensor just behind the commutator and brush assembly to get a spindle rpm reading.

Fortunately for us, he documented it all very well and filmed a nine part video series; the last of which you can see after the break.

Continue reading “Build A Shapeoko The Hard Way”

Mosaic Palette: Single Extruder Multi-Color And Multi-Material 3D Printing

Lots of solutions have been proposed and enacted for multi-color and multi-material 3D printing, from color mixing in the nozzle to scripts requiring manual filament change. A solution proposed fairly early on was to manually splice the filament together, making a custom spool. The printer would print as normal, but the filament would change color. This worked pretty well, but it was tedious and it wasn’t entirely possible to control where the color change happened on the model.

You’ll find some examples of the more successful manual splicing hacks in the pictures below. Scroll down a bit further to find our interview with Mosaic Manufacturing at Bay Area Maker Faire 2016. They have a new product that automates the filament splicing process with precision as the ultimate goal. It unlocks a single extruder printer to behave like a multi-extruder model without stopping and starting.

Mosaic pulled off a very difficult combination of two methods mentioned above. Their flagship product is a machine they’ve dubbed, “Palette”. It’s an automatic filament splicer. Up to four different filaments can feed into Palette, and it will splice them at determined intervals. This would be cool by itself, if only to save the tedium of splicing and winding a custom spool by hand.

The real killer app with Palette, however, is the software that runs alongside it. Palette can take the GCODE output of any properly prepared multi material file from any slicer, and then precisely combine and splice the filament. This can feed into any printer without modifying it, aside from sticking an encoder somewhere in the filament path. The results are indistinguishable from a dual, or quad extruder set-up.

Continue reading “Mosaic Palette: Single Extruder Multi-Color And Multi-Material 3D Printing”

[HomoFaciens] Shows Off With DIY Paper Printer

[HomoFaciens] is always making us feel silly about our purchases. Did we really need to buy a nice set of stepper motors for that automation project? Couldn’t we have just used some epoxy and a threaded rod to make an encoder? Did we need to spend hours reading through the documentation for an industrial inkjet head? Couldn’t we just have asked ourselves, “What would [HomoFaciens] do?” and then made a jailhouse tattoo gun attached to a broken printer carriage and some other household tech trash?

In his continuing work for his Hackaday prize entry, which we have covered before, his latest is a ink (…drop? ) printer. We think the goal is a Gingery book for CNC.  He begins to combine all his previous work into a complete assembly. The video, viewable after the break, starts by explaining the function of a salvaged printer carriage. A motor attached to a belt moves the carriage back and forth; the original linear encoder from the printer is used for positional feedback.

The base of the printer is a homemade y-carriage with another salvaged printer motor and encoder driving a threaded rod. The positional feedback for this axis is provided by a optical mouse gliding on a sheet of graph paper.  The printer nozzle is a cup of ink with a solenoid actuated needle in it. When the needle moves in a hole at the bottom, it dispenses ink.

As always, [HomoFaciens] makes something that is the very definition of a hack. Commenters will have to go elsewhere to leave their favorite debasement.

Continue reading “[HomoFaciens] Shows Off With DIY Paper Printer”

Prusa Shows Us The New I3 MK2 3D Printer And Where The Community Is Headed

Josef Prusa’s designs have always been trustworthy. He has a talent for scouring the body of work out there in the RepRap community, finding the most valuable innovations, and then blending them together along with some innovations of his own into something greater than the sum of its parts. So, it’s not hard to say, that once a feature shows up in one of his printers, it is the direction that printers are going. With the latest version of the often imitated Prusa i3 design, we can see what’s next.

Continue reading “Prusa Shows Us The New I3 MK2 3D Printer And Where The Community Is Headed”

Hacker’s Toolbox: The Handheld Screw Driver

The handheld screw driver is a wonderful tool. We’re often tempted to reach for its beefier replacement, the power drill/driver. But the manually operated screw driver has an extremely direct feedback mechanism; the only person to blame when the screw strips or is over-torqued is you. This is a near-perfect tool and when you pull the right screwdriver from the stone you will truly be the ruler of the fastener universe.

A Bit of Screw Driver History:

The kind of fun you can have with really cheap bits.

In order to buy a good set of screw drivers, it is important to understand the pros and cons of the geometry behind it. With a bit of understanding, it’s possible to look at a screw driver and tell if it was built to turn screws or if it was built to sell cheap.

Screw heads were initially all slotted. This isn’t 100 percent historically accurate, but when it comes to understanding why the set at the big box store contains the drivers it does, it helps. (There were a lot of square headed screws back in the day, we still use them, but not as much.)

Believe it or not the "Robertson" screw came out before the phillips. Robertson just hated money and didn't want to license his patents. So it's only now that they're in common use again.
Believe it or not the “Robertson” screw came out before the Phillips. Robertson just hated money and didn’t want to license his patents. So it’s only now that they’re in common use again.

Flat head screws could be made with a slitting saw, hack saw, or file. The flat-head screw, at the time, was the cheapest to make and had pretty good torque transfer capabilities. It also needed hand alignment, a careful operator, and would almost certainly strip out and destroy itself when used with a power tool.

These shortcomings along with the arrival of the industrial age brought along many inventions from necessity, the most popular being the Phillips screw head. There were a lot of simultaneous invention going on, and it’s not clear who the first to invent was, or who stole what from who. However, the Philips screw let people on assembly lines turn a screw by hand or with a power tool and succeed most of the time. It had some huge downsides, for example, it would cam out really easily. This was not an original design intent, but the Phillips company said, “to hell with it!” and marketed it as a feature to prevent over-torquing anyway.

The traditional flathead and the Phillips won over pretty much everyone everywhere. Globally, there were some variations on the concept. For example, the Japanese use JST standard or Posidriv screws instead of Philips. These do not cam out and let the user destroy a screw if they desire. Which might show a cultural difference in thinking. That aside, it means that most of the screws intended for a user to turn with a screw driver are going to be flat-headed or Philips regardless of how awful flat headed screws or Philips screws are.

Continue reading “Hacker’s Toolbox: The Handheld Screw Driver”