Learn The Secrets Of Matching Bottle Cap Threads To One Another

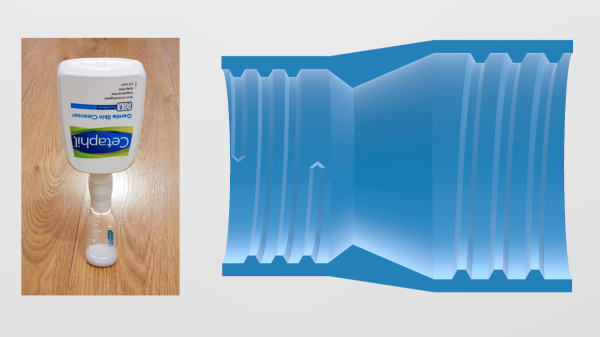
Do you want to design something to match existing threads on a bottle, or a cap? It turns out there’s an easier way than reaching tiredly for the calipers and channeling one’s inner reverse-engineer. Bottle cap threads — whose industry term is the neck finish — aren’t arbitrary things; they are highly standardized, and [Noupoi] researched it all so that you don’t have to! The Bottle Cap Thread Calculator takes a few key measurements and spits out everything needed to model exact matches. Need some guidance on how exactly to use the information the calculator spits out? There is a handy link to a Fusion360 tutorial on creating bottle threads (YouTube video) to demonstrate.

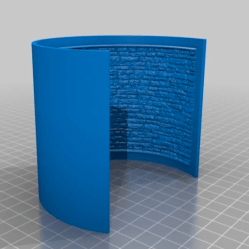
This all came from [Noupoi] wanting to model an adapter to transfer the contents of one bottle to another, smaller bottle. By identifying which thread was used on each bottle, the job of modeling a matching adapter was much easier. It turns out that the bottle necks were an SP 28-415 (larger) and a 24-415 (smaller), and with that information the adapter was far simpler to design. If you want to check the adapter out, it’s available on Thingiverse.

If truly reverse-engineering bottle threads is needed, here’s a method we covered that involves making a simple cast and working from that.

[via Reddit]

Art of 3D printer in the middle of printing a Hackaday Jolly Wrencher logo

3D Printering: Selling Prints, And Solving The Pickup Problem

After getting a 3D printer up and running, it’s not uncommon for an enterprising hacker to dabble in 3D printing to make a little money on the side. Offering local pickup of orders is a common startup choice since it’s simple and avoids shipping entirely. It’s virtually tailor-made to make a great bootstrapping experiment, but anyone who tries it sooner or later bumps up against a critical but simple-seeming problem: how to get finished prints into a customer’s hands in a sustainable way that is not a hassle for either the provider, or the customer?

It’s very easy to accept a 3D file and get paid online, but the part about actually getting the print into the customer’s hands does not have a one-size-fits-all solution. This is what I call The Pickup Problem, and left unsolved, it can become unsustainable. Let’s look at why local pickup doesn’t always measure up, then examine possible solutions.

The Problems with Local Pickup

Local pickup for delivery of print jobs is great because there is no mucking about with shipping supplies or carriers. Also, many 3D prints when starting out will be relatively low-value jobs that no one is interested in stacking shipping fees onto, anyway.

“Your order is complete. Come to this address to pick up your order.” It is straightforward and hits all the bases, so what’s the problem?

Continue reading “3D Printering: Selling Prints, And Solving The Pickup Problem”

Analog Noise Generator, Fighter Of Other Noises

A chaotic drone of meaningless sound to lull the human brain out of its usual drive to latch on to patterns can at times be a welcome thing. A nonsense background din — like an old television tuned to a dead channel — can help drown out distractions and other invading sounds when earplugs aren’t enough. As [mitxela] explains, this can be done with an MP3 file of white noise, and that is a solution that works perfectly well for most practical purposes. However he found himself wanting a more refined hardware noise generator with analog controls to fine tune the output, and so the Rumbler was born.

It’s a tight fit, but it does fit.

The Rumbler isn’t just a white noise generator. White noise has a flat spectrum, but the noise from the Rumbler is closer to Red or Brownian Noise. The different colors of noise have specific definitions, but the Rumbler’s output is really just white noise that has been put through some low pass filters to create an output closer to a nice background rumble that sounds pleasant, whereas white noise is more like flat static.

Why bother with doing this? Mainly because building things is fun, but there is also the idea that this is better at blocking out nuisance sounds from neighboring human activities. By the time distant music (or television, or talking, or shouting) has trickled through walls and into one’s eardrums, the higher frequencies have been much more strongly attenuated than the lower frequencies. This is why one can easily hear the bass from a nearby party’s music, but the lyrics don’t survive the trip through walls and windows nearly as well. The noise from the Rumbler is simply a better fit to those more durable lower frequencies.

[Mitxela]’s writeup has quite a few useful tips on analog design and prototyping, so give it a read even if you’re not planning to make your own analog noise box. Want to hear the Rumbler for yourself? There’s an embedded audio sample near the bottom of the page, so go check it out.

For a truly modern application of white noise, check out the cone of silence for snooping smart speakers.

New (mis)Use For Lithophanes: Miniature Diorama Backgrounds

What’s better than a well-lit photo of a 3D-printed miniature? A photo of the miniature in a mini diorama, of course. [OrionDeHunter] shows off a clever technique that has something in common with old-timey photo stages and painted backgrounds, and (mis)uses 3D-printed lithophanes to pull it off. What [OrionDeHunter] does is use a curved and painted lithophane as a stand-in for a background, and the results look great!

Lithophanes are intended to be illuminated from behind to show an image, with thin areas showing as lighter and thicker areas darker, but when it comes to high contrast patterned images like brick walls, the same things that make a good lithophane just happen to also make a pretty good 3D model in the normal sense. No 3D scanning or photogrammetry required.

Here is the basic process: instead of creating a 3D model of a brick wall from scratch, [OrionDeHunter] simply converted an image of a brick wall (or stairs) into a curved lithophane with an online tool. The STL model of the lithophane is then 3D printed, painted, and used as a swappable background. When macro shots of the miniatures are taken, the curved background looks just right and allows for some controlled lighting. It’s a neat trick, and well applied in this project. Some sample images demonstrating how it works are just under the break.

Lithophanes were originally made using marble or thin porcelain, but a modern spin has been put on the technique with 3D printing. Enterprising hackers have even discovered ways to add color, too.

DIY Filtered Positive Pressure Suit Shows Fine Workmanship

[Andrew]’s Air filtering unit & positive pressure supply might look like something off the set of Ghostbusters, but it’s an experiment in making a makeshift (but feasible) positive pressure suit. The idea is to provide an excess of filtered air to what is essentially an inflatable soft helmet. The wearer can breathe filtered air while the positive pressure means nothing else gets in. It’s definitely an involved build that uses some specific hardware he had on hand, but the workmanship is great and shows some thoughtful design elements.

The unit has three stacked filters that can be easily swapped. The first stage is medical mask material, intended to catch most large particles, which is supported by a honeycomb frame. The next filter is an off-the-shelf HEPA filter sealed with a gasket; these are available in a wide variety of sizes and shapes so [Andrew] selected one that was a good fit. The third and final stage is an activated carbon filter that, like the first stage, is supported by a honeycomb frame. The idea is that air that makes it through all three filters is safe (or at least safer) to breathe. There isn’t any need for the helmet part to be leakproof, because the positive pressure relative to the environment means nothing gets in.

Air is sucked through the filters and moved to the helmet by an HP BLc7000 server fan unit, which he had on hand but are also readily available on eBay. These fan units are capable of shoveling a surprising amount of air, if one doesn’t mind a surprising amount of noise in the process, so while stacked filter stages certainly impede airflow, the fan unit handles it easily. The BLc7000 isn’t a simple DC motor and requires a driver, so for reference [Andrew] has a short YouTube video of how the fan works and acts.

All the 3D models and design files are available online should anyone wish to take a closer look. It’s certainly a neat experiment in making a filtered positive pressure supply and head cover with materials that are fairly common. If [Andrew] ever wants to move to a whole-body suit, maybe repurpose an old Halloween costume into a serviceable positive pressure suit.

Watch Conway’s Game Of Life Flutter Across A Flip-Dot Display

Like many of us, [John Whittington] was saddened with the news that John Horton Conway passed away a little earlier this year, and in honor of his work, he added the Game of Life to a flip-dot display that he has been working on. The physicality of an electromechanical display seems particularly fitting for cellular automata.

Like what you see? If you’re curious about what makes it all tick, the display shown is an Alfa-Zeta XY5 28×14 but [John] is currently working on building them into a much larger 256 x 56 display. GitHub hosts the flip-dot simulator and driver software [John] is using, and the Game of Life functions are here.

If you’re new to the Game of Life and are not really sure what you’re looking at, [Elliot Williams] tells you all you need to know in his writeup celebrating its profound impact and lasting legacy. Watch the flip-dot display in action in the video embedded below.

Continue reading “Watch Conway’s Game Of Life Flutter Across A Flip-Dot Display”

Mini Library For Kids Gets Blinky Lights And Solar Upgrade

Reading is big in Québec, and [pepelepoisson]’s young children have access to a free mini library nook that had seen better days and was in dire need of maintenance and refurbishing. In the process of repairing and repainting the little outdoor book nook, he took the opportunity to install a few experimental upgrades (link in French, English translation here.)

The mini library pods are called Croque-Livres, part of a program of free little book nooks for children across Québec (the name is a bit tricky to translate into English, but think of it as “snack shack, but for books” because books are things to be happily devoured.)

After sanding and repairs and a few coats of new paint, the Croque-Livres was enhanced with a strip of WS2812B LEDs, rechargeable battery with solar panel, magnet and reed switch as door sensor, and a 3.3 V Arduino to drive it all. [pepelepoisson]’s GitHub repository for the project contains the code and CAD files for the 3D printed pieces.

The WS2812B LED strip technically requires 5 V, but as [pepelepoisson] found in his earlier project Stecchino, the LED strip works fine when driven directly from a 3.7 V lithium-polymer cell. It’s not until around 3 V that it starts to get unreliable, so a single 3.7 V cell powers everything nicely.

When the door is opened, the LED strip lights up with a brief animation, then displays the battery voltage as a bar graph. After that, the number of times the door as been opened is shown on the LED strip in binary. It’s highly visual, interactive, and there’s even a small cheat sheet explaining how binary works for anyone interested in translating the light pattern into a number. How well does it all hold up? So far so good, but it’s an experiment that doesn’t interfere at all with the operation of the little box, so it’s all good fun.