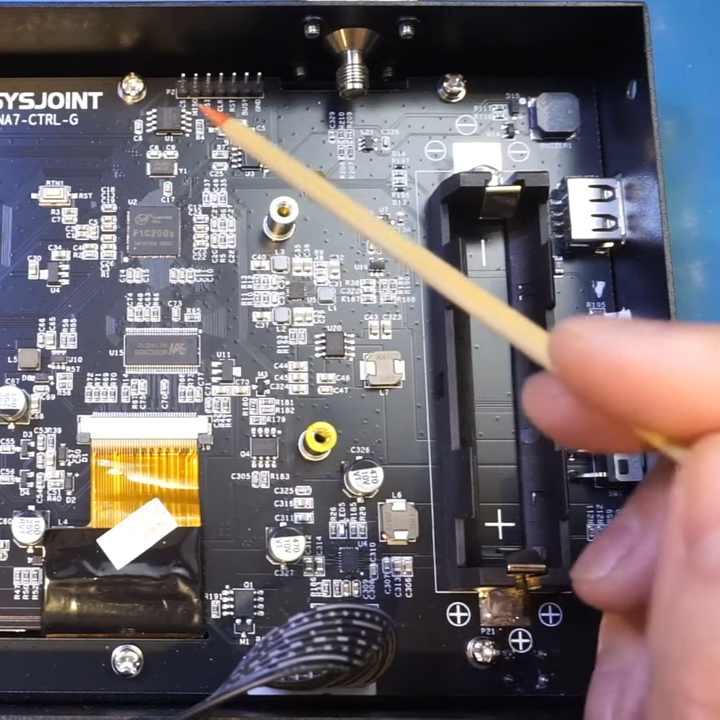
Hackaday Prize 2023: Tilting Mechanical Panels Make A Beautiful Display

Mechanical displays use a variety of different methods to represent data with physical objects, and [AIRPOCKET]’s Mechanical Display aims to be a platform anyone can use. Each “pixel” in this display is a panel of some kind, and different effects can be had by moving individual panels to different angles. Not only can images be represented, but the patterns of the movements themselves can be beautiful as well.

The panels are an important part of how the display presents, so the design makes them easy to change out.

These sorts of displays are fertile ground for artistic expression (one memorable implementation of this basic idea was the wooden mirror, which used varnished tiles of wood) but anyone looking to use the concept has usually been on their own when it comes to implementation.

The idea [AIRPOCKET] has is to make this kind of installation easier to implement. This method uses economical mini RC servos and 3D-printed pieces to create modular segments that can be assembled into whatever configuration one may need.

The material of the panels matters, too. Just below the page break, you can see a large unit with each “pixel” consisting of a mirrored square that reflects daylight. There’s also a video of an earlier prototype that uses some ridged two-color pieces to create a simple 4×4 three-level greyscale display.

There are a lot of possibilities if [AIRPOCKET] can make this sort of display more easily accessible, and that makes it a contender in the 2023 Hackaday Prize.

Continue reading “Hackaday Prize 2023: Tilting Mechanical Panels Make A Beautiful Display”

Brute Forcing A Mobile’s PIN Over USB With A $3 Board

Mobile PINs are a lot like passwords in that there are a number of very common ones, and [Mobile Hacker] has a clever proof of concept that uses a tiny microcontroller development board to emulate a keyboard to test the 20 most common unlock PINs on an Android device.

Trying the twenty most common PINs doesn’t take long.

The project is based on research analyzing the security of 4- and 6-digit smartphone PINs which found some striking similarities between user-chosen unlock codes. While the research is a few years old, user behavior in terms of PIN choice has probably not changed much.

The hardware is not much more than a Digispark board, a small ATtiny85-based board with built-in USB connector, and an adapter. In fact, it has a lot in common with the DIY Rubber Ducky except for being focused on doing a single job.

Once connected to a mobile device, it performs a form of keystroke injection attack, automatically sending keyboard events to input the most common PINs with a delay between each attempt. Assuming the device accepts, trying all twenty codes takes about six minutes.

Disabling OTG connections for a device is one way to prevent this kind of attack, and not configuring a common PIN like ‘1111’ or ‘1234’ is even better. You can see the brute forcing in action in the video, embedded below.

Continue reading “Brute Forcing A Mobile’s PIN Over USB With A $3 Board”

Pi Zero Runs DOOM Via Wireless Power

What’s better than a Raspberry Pi Zero running DOOM on a 3.5″ touchscreen? Running it over wireless power, of course!

[atomic14] has been interested in wireless power for a while, and while most of the hardware he’s tested over the years has been less than impressive, he demonstrates one that’s able to reliably deliver 5 V at about 1 A which is more than enough to boot a Raspberry Pi W2 into X and launch DOOM. But while that’s neat, he explains that wireless power isn’t quite yet an effortless solution.

The hardware can deliver 5 V at about 1 A wirelessly, which is plenty, but coil alignment is critical to efficiency.

For one thing, the hardware he’s using — similar to those used for mobile phone charging — need the receiver to be very close to the transmitter. In addition, they need to be aligned well or efficiency drops off sharply. For mobile phones this isn’t much of a problem, but it’s difficult to position a Raspberry Pi and display just so when one can’t see the coils. Misalignment means brownouts and other unreliable operation.

So while the wireless power is capable of running the Pi directly, [atomic14] attempts to put a small battery and charger circuit into the mix in order to make the whole thing both portable and more reliable. But because nothing is easy, he discovers that his charging board — which should be able to output as low as 4.5 V — isn’t able to be adjusted down any lower than 5.66 V. It turns out that a resistor marked 104 (which should be 100 kΩ) is actually measuring 57 kΩ, and the trim pot doesn’t go lower than 10 kΩ. The solution is a bit of component swapping, but we suppose it’s a reminder that sometimes with cheap parts, one pays in other ways.

You can see [atomic14]’s wireless power Raspberry Pi running the classic shooter in the video below. Wireless power may have its issues, but it’s certainly a lot less messy than running DOOM with a gigantic potato battery.

Continue reading “Pi Zero Runs DOOM Via Wireless Power”

SSH Can Handle Spaces In Command-line Arguments Strangely

One of the things ssh can do is execute a command on a remote server. Most of us expect it to work transparently when doing so, simply passing the command and its arguments on without any surprises in the process. But after 23 years of using OpenSSH on a nearly daily basis, [Martin Kjellstrand] got surprised.

It turns out that the usual rules around how things are parsed can have some troublesome edge cases when spaces are involved. [Martin] kicks off an example in the following way:

One would reasonably expect the commands figlet foobar bar\ baz and ssh localhost figlet foobar bar\ baz to be functionally equivalent, right? The former ultimately runs the command “figlet” with arguments “foobar” and “bar baz” on the local machine. The second does the same, except with ssh being involved in the middle. As mentioned, one would expect both commands to be functionally identical, but that’s not what happens. What happens is that ssh turns bar\ baz into two distinctly separate command-line arguments in the process of sending it for remote execution: “bar” and “baz”. The result is mystification as the command fails to run the way the user expects, if it runs at all.

What exactly is going on, here? [Martin] goes into considerable detail tracking down this odd behavior and how it happens, but he’s unable to ultimately explain why ssh does things this way. He suspects that it is the result of some design decision taken long ago. Or perhaps a bug that has, over time, been promoted to entrenched quirk.

Do you have any insights or knowledge about this behavior? If so, [Martin] wants to hear about it and so do we, so don’t keep it to yourself! Let us know in the comments, below.

These Fake Nixie Tubes Have A Bootup Screen

[IMSAI Guy] bought a fake Nixie clock, and luckily for all of us has filmed a very close look and demonstration. Using OLED displays as the fake Nixie elements might seem like cheating to some, the effect is really very well done.

Clock digits with bootup screens is something we didn’t know we liked until we saw it.

When it comes to Nixie elements, it’s hard to say which gets more attention and project time from hardware folks: original Nixie tube technology, or fake Nixie elements. Either way, their appeal is certainly undeniable.

Original Nixie tubes have shown up in modern remakes of alarm clocks, and modern semiconductors make satisfying a Nixie tube’s power requirements much easier with clever and compact Nixie drivers costing under $3 USD. This is also a good time to remind people that Nixie tubes don’t have to be digits. This audio spectrum visualizer, for example, uses IN-13 tubes which serve as elements of a bar graph.

Authentic Nixie elements require high voltages and are labor-intensive to manufacture to say the least, and as far as fake Nixie elements go, this one looks pretty good once it lights up. You can see it in action in the video, embedded below.

Continue reading “These Fake Nixie Tubes Have A Bootup Screen”

Behold A DIY VR Headset Its Creator Will “Never” Build Again

Unsatisfied with commercial VR headset options, [dragonskyrunner] did what any enterprising hacker would: gathered parts over time and ultimately made their own. Behold the Hades Widebody (HWD), a DIY PC VR headset that aims for a wide field of view and even manages to integrate some face and eye tracking. (Editor’s note: link went dead in 2025. You’ll find the Hades Widebody here. Thanks [DragonSkyRunner] for keeping us in the loop!)

The Fresnel elements hugging the primary lenses provide a way of extending the display into the wearer’s peripheral vision.

[dragonskyrunner] is — and we quote — “NEVER building one of these again.” The reason is easily relatable to anyone who has spent a lot of time and effort creating something special: it does the job it was created for, but it also has limitations and is a lot of work. If one were to do it all over again, there would be a host of improvements and changes to consider. But one won’t be doing it all over again any time soon because it’s done now.

The good news is that [dragonskyrunner] made an effort to document things, so there is at least a parts list and enough details for any suitably motivated hacker to replicate the work and perhaps even put their own spin on it.

The Hades Widebody has a dual-lens arrangement and wide displays that aim to provide a wider field of view than most setups allow. There’s a main lens in front of the user’s eyes and a cut Fresnel lens providing a sort of extension to the side. [dragonskyrunner] claims that while there is certainly not a seamless transition between the lens elements, it does a better job than an Ambilight at providing a sense of visuals extending into the wearer’s peripheral vision.

The DIY spirit of making a piece of hardware to suit one’s own needs is exactly the sort of thing that would fit into our 2023 Cyberdeck content, and while a headset by itself isn’t quite enough to qualify (devices must have some form of usable input and output), it just might get those creative juices flowing.

Enhance VR Immersion By Shoehorning An Ambilight Into A Headset

Everyone wants a wider field of view in their VR headsets, but that’s not an easy nut to crack. [Statonwest] shows there’s a way to get at least some of the immersion benefits with a bit of simple hardware thanks to the VR Ambilight.

Continue reading “Enhance VR Immersion By Shoehorning An Ambilight Into A Headset”