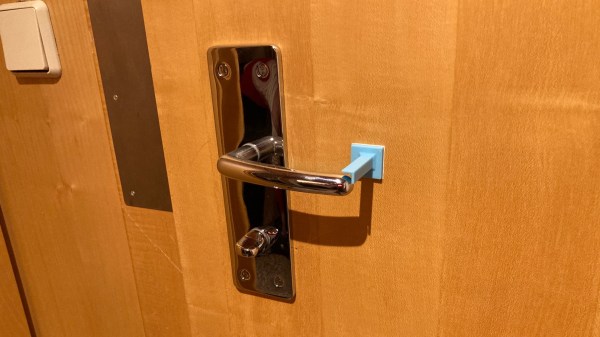
How To Solder To Aluminum, Easily

[Ted Yapo] shared a method of easily and conveniently soldering to aluminum, which depends on a little prep work to end up only slightly more complex than soldering to copper. A typical way to make a reliable electrical connection to aluminum is to use a screw and a wire, but [Ted] shows that it can also be done with the help of an abrasive and mineral oil.

Aluminum doesn’t solder well, and that’s because of the oxide layer that rapidly forms on the surface. [Ted]’s solution is to scour the aluminum with some mineral oil. The goal is to scrape away the oxide layer on the aluminum’s surface, while the mineral oil’s coating action prevents a new oxide layer from immediately re-forming.

After this prep, [Ted] uses a hot soldering iron and a blob of solder, heating it until it sticks. A fair bit of heat is usually needed, because aluminum is a great heat conductor and tends to be lot thicker than a typical copper ground plane. But once the aluminum is successfully tinned, just about anything can be soldered to it in a familiar way.

[Ted] does caution that mineral oil can ignite around 260 °C (500 °F), so a plan should be in place when using this method, just in case the small amount of oil catches fire.

This looks like a simple technique worth remembering, and it seems easier than soldering by chemically depositing copper onto aluminum.

Hands probing inside a case with tools

Hardware Hacking 101 Needs Matching Toolkit

One doesn’t always have the luxury of sipping tea comfortably while hacking a piece of hardware at a fully-equipped workbench, where every tool is within reach. To address this, [Zokol] shares an early look at a hardware hacking toolkit-in-progress, whose purpose is to make hacking sessions as productive as possible while keeping size and weight within reasonable limits. There isn’t a part list yet, but there are some good tips on creating your own.

A view of a wide variety of toolsTo put together an effective hardware hacking toolkit, one must carefully consider what kinds of tasks need to be performed, and in what order. Once a basic workflow is identified, one can put together a set of complementary hardware tools and resources to meet the expected needs. The goal is to have the tools to go as far as one can in a single session, and identify any specialized equipment that will be needed later. That way, follow-up sessions can be as effective as possible.

Since hardware hacking is all about inspecting (and possibly modifying the behavior of) electronic devices, [Zokol] observes that step one is always to begin with external interfaces. That means common cables and adapters should all be part of a hardware hacking toolkit, otherwise the session might end awfully early. The next step is to open the device, so common tools and ways to deal with things like adhesives are needed. After that, diagnostic tools like multimeters come into play, with tools becoming more specialized as investigation proceeds. It’s a very sensible way to approach the problem of what to bring (and not bring) in a hardware hacking toolkit, and we can’t wait to see what the final version looks like.

Hardware hacking sometimes involves hardware that can’t be opened without damaging it. The Google Stadia controller is one such piece of hardware, and [Zokol] addressed the problem of how to permanently disable the microphone by figuring out exactly where to drill a hole.

Row of white 3D printed shoes in different styles

CAD Up Some Shoes, But Don’t Start From Scratch

Nothing helps a project get off the ground better than a good set of resources, and that’s what led [DaveMakesStuff] to release his Digital Shoe Design Kit, which is a set of 3D models ready to customize into a basic running shoe.

This is exactly what is needed for people who are interested in designing a custom shoe, but perhaps not interested in modeling every element entirely from scratch. [DaveMakesStuff]’s resources allows one to mix outsoles, midsoles, uppers, and other basic shoe elements into a finished model, ready to be resized or even 3D printed if desired. The files are all in stl format, but resizing stl files is trivial, and more advanced editing is possible with mesh sculpting programs like Blender.

If the gears in your head are starting to turn and you are wondering whether it is feasible to 3D scan your feet for some experiments in DIY custom footwear, take a few minutes and read up on 3D scanning and what to expect from the process to hit the ground running.

Review: DevTerm Linux Handheld Has Retro-Future Vibe

It’s not every day that an open-source, portable Linux handheld computer gets announced, so I couldn’t resist placing an order for the DevTerm by ClockworkPi back when we first learned about the stylish little terminal, which includes a 1280 x 480 screen (double-wide VGA) and a modular little thermal printer.

Of course, the global semiconductor shortage combined with shipping slowdowns led to delays, but things did ultimately come together for the project. I’ve always been a sucker for small-format machines, especially ones that come as a well-designed kit, and that means I can tell you all about what it was like to put it together and turn it on. There’s a lot to look at, so let’s get started.

Continue reading “Review: DevTerm Linux Handheld Has Retro-Future Vibe”

How A Pentester Gets Root

Have you ever wanted to be a fly on the wall, watching a penetration tester attack a new machine — working their way through the layers of security, ultimately leveraging what they learned into a login?  What tools are used, what do they reveal, and how is the information applied? Well good news, because [Phani] has documented a step-by-step of every action taken to eventually obtain root access on a machine — amusingly named DevOops — which was set up specifically for testing.

[Phani] explains every command used (even the dead-end ones that reveal nothing useful in this particular case) and discusses the results in a way that is clear and concise. He starts from a basic port scan, eventually ending up with root privileges. On display is an overall process of obtaining general information.  From there, [Phani] methodically moves towards more and more specific elements. It’s a fantastic demonstration of privilege escalation in action, and an easy read as well.

For some, this will give a bit of added insight into what goes on behind the scenes in some of the stuff covered by our regular feature, This Week in Security.

Make Your Own Tabletop Game Organizers With Online Tool

There is a vibrant cottage industry built around selling accessories to improve the storage and organization of tabletop games, but the more DIY-minded will definitely appreciate [Steve Genoud]’s deckinabox tool, which can create either 3D-printable designs, or ones more suited to folded paper or cardstock. Making your own organizer can be as satisfying as it is economical, and [Steve]’s tool aims to make customization simple and easy.

The tool can also generate models for folded paper or cardstock.

The interface for customizing the 3D-printable token tray, for example, begins with a simple filleted receptacle which one can split into additional regions by adding horizontal or vertical separators. The default is to split a given region down the middle, but every dimension can of course be specified.  Things like filleting of edges (for easier token scooping) and other details are all handled automatically. A handy 3D view gives a live render of the design after every change.

[Steve] has a blog post that goes into some added detail about how the tool was made, and it makes heavy use of replicad, [Steve]’s own library for generating browser-based 3D models in code. Intrigued by the idea of generating 3D models programmatically, and want to use it to make your own models? Don’t forget to also check out OpenSCAD; chances are it’s both easier to use and more capable than one might think.

DIY Float Valve For Passive Hydroponics Leverages 3D Printing

[Billy] has a special interest in passive hydroponics (also known as the Kratky method), which is a way of growing plants in nutrient-rich water that does not circulate. As the plant grows and liquid level drops, only the tips of the roots remain submerged while more and more of the root surface is exposed to oxygen in a harmonious balance. However, “thirsty” plant types (tomatoes, for example) throw off this balance, and the system needs to be modified. To address this, [Billy] designed and printed a passive float valve system that takes care of topping up the reservoir only when needed, without using pumps or any other electrical equipment.

Commercial or industrial float valves are too big to use in his small tanks, which led [Billy] to test dozens of DIY designs. He used everything from plastic water bottles to pipe ends, but nothing quite measured up. With 3D printing, [Billy] was able to create a sealed, lightweight float that exactly matched the housing and tube locations.

A strip of silicone works as a sealing agent.

The way [Billy]’s float valve works is by using a hollow object as a kind of buoyant plug inside a housing. When the water level is high, the buoyant object rises up and presses a strip of silicone against an outlet, preventing water from flowing. If the water level is low, the buoyant plug drops and water is free to flow. With a reservoir of fresh nutrient-rich water placed above the grow tank, gravity takes care of pushing a fresh supply down a tube, so no active pump is needed. Combined with a passive float valve, the system pretty much runs itself.

Watch [Billy] give a tour of his system and valve design in the video embedded below. He’s got a lot of experience when it comes to working with projects involving liquids. Only someone as comfortable as he is would make his own DIY dishwasher.

Continue reading “DIY Float Valve For Passive Hydroponics Leverages 3D Printing”