Remember the chip shortage? We sure do, mainly because as far as we can tell, it’s still going on, at least judging by the fact that you can’t get a Raspberry Pi for love or money. But that must just be noise, because according to a report in the Straits Times, the chip shortage is not only over, it’s reversed course enough that there’s now a glut of semiconductors out there. The article claims that the root cause of this is slowing demand for products like smartphones, an industry that’s seeing wave after wave of orders to semiconductor manufacturers like TSMC canceled. Chips for PCs are apparently in abundance now too, as the spasm of panic buying machine for remote working during the pandemic winds down. Automakers are still feeling the pinch, though, so much so that Toyota is now shipping only one smart key with new cars, instead of the usual two. So there seems to be some way to go before balance is restored to the market, but whatever — just call us when Amazon no longer has to offer financing on an 8 GB Pi.
Author: Dan Maloney3373 Articles
The Seven-Segment Display That’s Also An Input Device
We’re used to seeing all manner of seven-segment displays, be they mechanical, electronic, or something in between. But what all these displays have in common is that they’re, you know, displays. Using them as inputs would just be crazy talk, right?
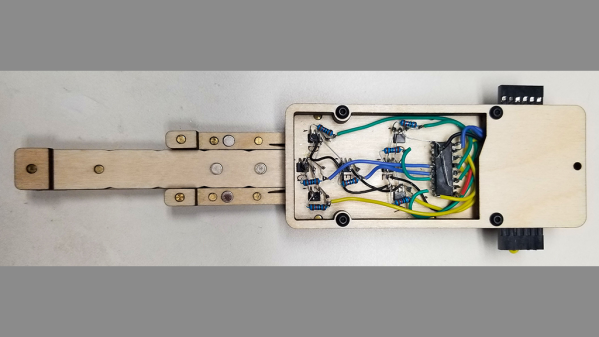
Perhaps, but we like where [Dave Ehnebuske] is going with “InSlide,” the seven-segment input device. The idea for this comes from the “DigiTag” display, which we covered back in October, and divides a standard seven-segment character into three vertical strips — two skinny ones for the outside vertical segments, and one wide strip holding the horizontal elements. By sliding these strips up and down relative to each other, the standard nine digits, plus a few other characters, can be composed.
[Dave]’s take on this theme started by building his display from laser-cut plywood pieces, which is a nice choice because of the good contrast between the white wood and the engraver segments. Next, he embedded rare earth magnets in the slides and installed seven Hall effect sensors in the frame. The sensors are connected to an Arduino Nano via a 74HC165 parallel-load shift register, which lets multiple modules be daisy-chained together. He also built an Arduino library to read the current state of the segments; it supports the full hexadecimal character set, or even duodecimal if you like.
[Dave] has shared the library, and it looks like you can get the build files for the mechanism from the original project. That’s good, because this looks ripe for hacking. It looks like it would be pretty easy to motorize a display like this by adding rack-and-pinion gearing and steppers — something like that could make an interesting clock.
Thin Client And Smartphone Step In For 3D Printer’s Raspberry Pi And Touchscreen
It’s no secret that Raspberry Pi’s are a little hard to come by these days. Unless you had the foresight to stock up before the supply dried up — and if you did, we want to talk to you — chances are good that you’ve got a fair number of projects that use the ubiquitous SBC on indefinite hold. And maybe that’s got you thinking about alternatives to the Pi.
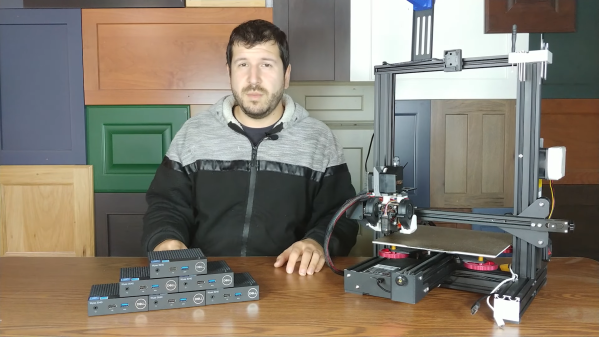
That’s apparently what was on [Crimson Repair]’s mind lately, the result being the discovery that an old thin client PC makes a dandy stand-in for a Raspberry Pi, at least in some cases. The video below is on the long side, true, But it’s chock full of command-by-command instructions for getting a Dell Wyse 3040, a thin client that can be found on the secondary market for $25 or so, up and running as a Klipper alternative for a 3D printer. These machines, which usually see use in point-of-sale applications and the like, sport a 1.4-GHz Intel Atom processor and a couple of gigs of RAM, and the form factor is just right for tucking into the base of an Ender 3.
Getting one up and running is a matter of getting a Debian image onto a USB key and configuring the thin client to boot from USB. After that it’s a simple matter of installing Klipper and wiring up a buck converter to power the machine. It’s not exactly rocket surgery, but why muddle through the process when someone has already been down the path ahead of you? And if you want to take it further, the second video below walks you through all the steps needed to add a touchscreen using an old Android phone. With a 3D printed bracket, the whole thing is a nicely complete printer control solution.
Continue reading “Thin Client And Smartphone Step In For 3D Printer’s Raspberry Pi And Touchscreen”
Walnut Case Sets This Custom Arduino-Powered RPN Calculator Apart From The Crowd
How many of us have an everyday tool that’s truly unique? Likely not many of us; take a look around your desk and turn out your pockets, but more often than not, what you’ll find is that everything you have is something that pretty much everyone else on the planet could have bought too. But not so if you’ve got this beautiful custom RPN calculator in a wooden case.
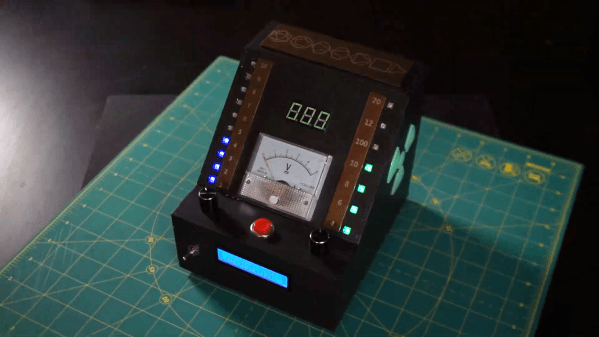
This one comes to us from [Shinsaku Hiura], who generally dazzles us with unique mechanical clocks and displays. This calculator solves a more practical problem — the dearth of RPN calculators on the market with the correct keyboard feel, specifically with the large keys and light touch he desired. Appropriately, the build started with a numeric keypad, which once liberated of its USB interface was reverse-engineered to figure out how the matrix was wired. Next up, a custom PCB to connect the keypad to an Arduino and a 20×4 LCD display was milled up, while a test case was designed and printed to check fitment. The final case was milled from a block of solid walnut and fitted with an acrylic window, for a sharp look with clean lines and pleasing colors.
As for the calculator itself, the demo below shows it going through its paces. The code is clever because it leverages the minimal number of keys available by hiding all the scientific and engineering functions behind a “secret silver key” that was once the equals key and obviously not needed in RPN. Hats off to [Shinsaku] for a handsome and unique addition to his desk.
Continue reading “Walnut Case Sets This Custom Arduino-Powered RPN Calculator Apart From The Crowd”
Roll The Radioactive Dice For Truly Random D&D Play
When you have a bunch of people gathered around a table for a “Dungeons & Dragons” session, you have to expect that things are not always going to go smoothly. After all, people who willingly create and immerse themselves in an alternate reality where one bad roll of the dice can lead to the virtual death of a character they’ve spent months or years with can be traumatic. And with that trauma comes the search for the guilty — it’s the dice! It’s always the dice!
Eliminating that excuse, or at least making it statistically implausible, is the idea behind this radioactively random dice roller. It comes to us from [Science Shack] and uses radioactive decay to generate truly random numbers, as opposed to the pseudorandom number generators baked into most microcontrollers. The design is based on [AlphaPhoenix]’s muon-powered RNG, but with a significant twist: rather than depending on background radiation, [Science Shack] brought the power of uranium to the party.
They obtained a sample of autunite, a weird-looking phosphate mineral that contains a decent amount of uranium, perfect for stimulating the Geiger counter built into the dice roller. Autunite also has the advantage of looking very cool under UV light, taking on a ghostly “fuel rod glow,” in the [Homer Simpson] sense. The decay-powered RNG at the heart of this build is used to simulate throws of every standard D&D die, from a D4 to a D100. The laser-cut hardboard case holds all the controls and displays, and also has some strategically placed openings to gaze upon its glowing guts.
We really like the design, but we have to quibble with the handling of the uranium ore; true, the specific activity of autunite is probably pretty low, but it seems like at least some gloves would have been in order.
Continue reading “Roll The Radioactive Dice For Truly Random D&D Play”
Simple Wi-Fi Cat Door Solves The Extra Critter Problem, And Nothing More
Anyone with an outdoor cat in their life knows their propensity for bringing home offerings, in the form of critters in various stages of the process of becoming ex-critters. And anyone with a hacker in their life knows that there’s a tendency to throw technology at this problem. But sometimes, the simplest solutions are the best.
Take this simple stepper-powered cat door lock. For [Jason Winfield], the essential problem with his outdoor cat’s late-night demands for reentry was having to manually unlock the cat door after a quick visual check that no midnight snacks were along for the ride. Such activity tends to make it hard to get back to sleep. One natural reaction to this would be to completely automate the process with machine learning to recognize the offering and deny entry; we’ve seen exactly that before, after all. But recognizing that the disruptive part was the getting up to check bit, [Jason] just whipped up a simple stepper-driven lock with an ESP8266 microcontroller. With a 3D-printed case and a battery pack, and a nearby Wi-Fi camera, the lock denies entry to the cat until he gets a look at it, at which point he simply hits the lock’s webpage to unlock the door. The video below would show the lock in action, except the cat buggered off once it got a whiff of the doings. Cat’s gonna cat.
What we appreciate about this project is its simplicity. It solves the problem with the minimum feature set, which is something we see too little of sometimes. It’s also got some nice ideas, like the non-captive bolt that can be removed to unlock the door if the battery dies. Smart thinking, [Jason], and sweet dreams.
Continue reading “Simple Wi-Fi Cat Door Solves The Extra Critter Problem, And Nothing More”
Laser Projector Relies On Steppers Rather Than Galvanometers
Laser light shows have always been real crowd-pleasers. There’s just something about the frenetic movement of a single point of intensely bright light making fluid animations that really captures the imagination. Large-scale laser shows require a lot of gear, of course, but that doesn’t mean you can’t get in on the fun yourself using something like this homebrew X-Y laser projector.
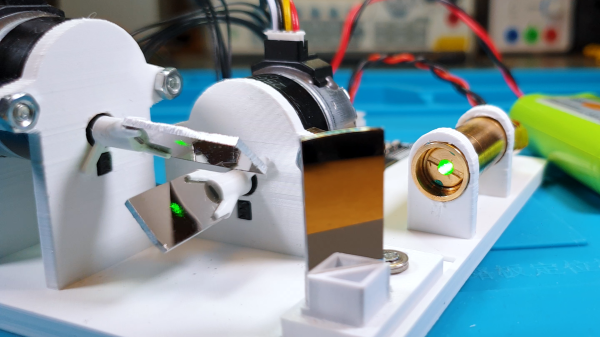
This is actually [Stanley]’s second pass at a stepper-based DIY projector; we featured his previous build back in 2016. This time around, he wanted to move beyond the “module mix-and-match” style of construction, so rather than use an Arduino and stepper shield, he rolled his own controller PCB to hold an ESP32 and a pair of STSPIN220 stepper drivers. The business end of the new version saw improvements, too — given that he was seeing unwanted softening of corners and curving of straight lines in the first projector’s images, he opted for smaller steppers holding smaller mirrors this time around. There’s also a new 3D printed chassis to hold everything, simplifying the build and keeping the two mirrors in better alignment.
The video below has the build details and some nice footage of the projector in action — it’s hard to go wrong with lasers and smoke. The performance seems pretty good, so the improvements seem to have paid off. And for those of you tapping out your “Should have used galvos” comments below, relax; [Stanley] says he’s thinking about ways to make his own galvanometers for the next version.
Continue reading “Laser Projector Relies On Steppers Rather Than Galvanometers”


