Thermal receipt printers are finding their way into all sorts of projects that are well beyond the point-of-sale environment that they normally inhabit. And while we applaud all the creative and artistic uses hackers have found for these little gems, this GitHub physical ticket printer has to be the best use for one yet.
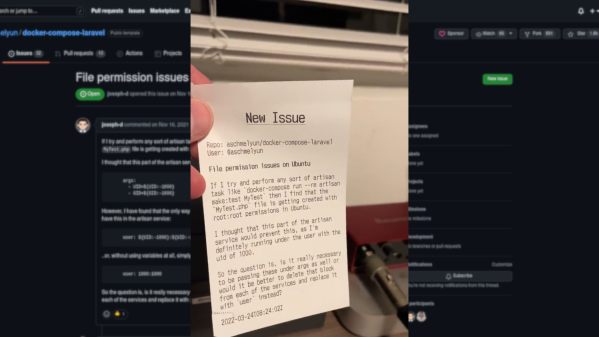
According to [Andrew Schmelyun], seeing a fast-food order pop up on a thermal printer was the inspiration for this build. Maintaining over one hundred GitHub repos as he does, it’s easy for the details of any one bug report or feature request to get lost in the swarm of sticky notes that [Andrew] previously used to keep track of his work. To make it happen, he teamed an Epson thermal printer up to a Raspberry Pi Zero W and worked out the details of sending data to the printer using PHP. Luckily, there’s a library for that — the beauty of GitHub.
With the “Hello, World!” bit out of the way, [Andrew] turned his attention to connecting to GitHub. He set up some webhooks on the GitHub side to send a POST request every time an issue is reported on one of his repos. The POSTs are sent via ngrok to a PHP web server running on the Pi, which formats the data and sends the text to the printer. There’s a short video in the tweet below.
Between the sound of the printer working and the actual dead-tree ticket, it’ll be hard for [Andrew] to miss issues now. We’ve seen thermal printers stuffed into cameras, used to send pictures to Grannie, and even watched them commit suicide slowly, but we say hats off to [Andrew] for his solid work ethic and a fun new way to put a receipt printer to use.
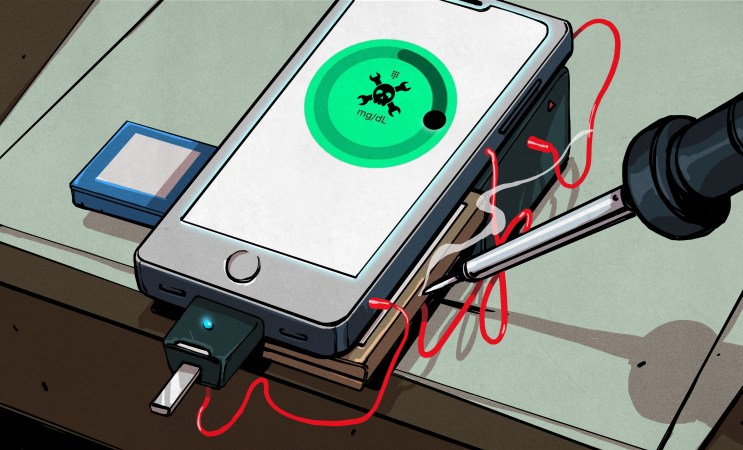
Join Hackaday Editor-in-Chief Elliot Williams and Staff Writer Dan Maloney for an audio tour of the week’s top stories and best hacks. We’ll look at squeezing the most out of a coin cell, taking the first steps towards DIY MEMS fabrication, and seeing if there’s any chance that an 80’s-vintage minicomputer might ride again. How small is too small when it comes to chip packages? We’ll find out, and discover the new spectator sport of microsoldering while we’re at it. Find out what’s involved in getting a real dead-tree book published, and watch a hacker take revenge on a proprietary memory format — and a continuous glucose monitor, too.
Back in grad school, we biology students were talking shop at lunch one day. We “lab rats” were talking about the tools of the trade, which for most of us included things like gel electrophoresis, restriction endonucleases, and polymerase chain reaction. Not to be left out, a fellow who studied fire ants chimed in that his main tool was a lawn chair, which he set up by a Dumpster in a convenience store parking lot to watch a fire ant colony. Such is the glamor of field biology.
Ants on the march. Tough luck for the crickets, though.
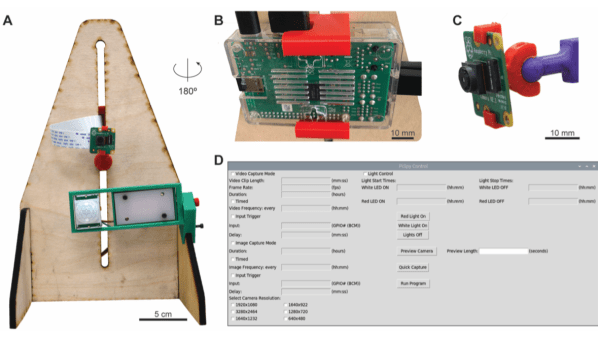
What our colleague [Mike] wouldn’t have given for something like PiSpy, the automated observation tool for organismal biology by [Greg Pask] of Middlebury College, et al. As discussed in the preprint abstract, an automated imaging platform can be key to accurate observations of some organisms, whose behavior might be influenced by the presence of a human observer, or even a grad student in a lawn chair. Plus, PiSpy offers all the usual benefits of automation — it doesn’t get tired, it doesn’t need to take bathroom breaks, and it can even work around the clock. PiSpy is based on commonly available components, like laser-cut plywood and a Raspberry Pi and camera, so it has the added advantage of being cheap and easy to produce — or at least it will be when the Pi supply picks back up again. PiSpy takes advantage of the Pi’s GPIO pins to enable triggering based on external events, or controlling peripherals like lights or servos.
While built for biological research, there are probably dozens of uses for something like PiSpy. It could be handy for monitoring mechanical testing setups, or perhaps for capturing UI changes during embedded device development. Or you could just use it to watch birds at a feeder. The source is all open-sourced, so whatever you make of PiSpy is up to you — even if it’s not for watching fire ants.
Here’s a little eye-opener for you: next time you’re taking a walk, cast your eyes to the ground for a bit and see how far you can go without spotting a carelessly discarded face mask. In our experience, it’s no more than a block or two, especially if you live near a school. Masks and other disposal artifacts of the COVID-19 pandemic have turned into a menace, and uncounted billions of the things will be clogging up landfills, waterways, and byways for decades to come.
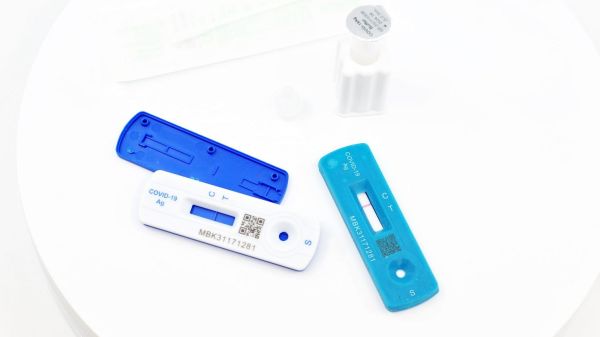
Unless they can be recycled into something useful, of course, like the plastic cases used for rapid antigen tests. This comes to us by way of [Ric Real] from the Design and Manufacturing Futures lab at the University of Bristol in the UK. If any of this sounds or looks familiar, refer back to October when the same team presented a method for turning old masks into 3D printer filament. The current work is an extension of that, but feeds the polypropylene pellets recovered from the old masks into a desktop injection molding machine.
The injection molding machine is fitted with 3D-printed molds for the shells of lateral flow devices (LFD) used for COVID-19 rapid antigen testing. The mold tooling was designed in Fusion 360 and printed on an Elegoo Mars MSLA printer using a high-strength, temperature-resistant resin. The molds stood up to the manual injection molding process pretty well, making good-quality parts in the familiar blue and white colors of the starting material. It’s obviously a proof of concept, but it’s good to see someone putting some thought into what we can do with the megatonnes of plastic waste generated by the pandemic response.
What does it take to make your own integrated circuits at home? It’s a question that relatively few intrepid hackers have tried to answer, and the answer is usually something along the lines of “a lot of second-hand equipment.” But it doesn’t all have to be cast-offs from a semiconductor fab, as [Zachary Tong] shows us with his homebrew direct laser lithography setup.
Most of us are familiar with masked photolithography thanks to the age-old process of making PCBs using photoresist — a copper-clad board is treated with a photopolymer, a mask containing the traces to be etched is applied, and the board is exposed to UV light, which selectively hardens the resist layer before etching. [Zach] explores a variation on that theme — maskless photolithography — as well as scaling it down considerably with this rig. An optical bench focuses and directs a UV laser into a galvanometer that was salvaged from an old laser printer. The galvo controls the position of the collimated laser beam very precisely before focusing it on a microscope that greatly narrows its field. The laser dances over the surface of a silicon wafer covered with photoresist, where it etches away the resist, making the silicon ready for etching and further processing.
Being made as it is from salvaged components, aluminum extrusion, and 3D-printed parts, [Zach]’s setup is far from optimal. But he was able to get some pretty impressive results, with features down to 7 microns. There’s plenty of room for optimization, of course, including better galvanometers and a less ad hoc optical setup, but we’re keen to see where this goes. [Zach] says one of his goals is homebrew microelectromechanical systems (MEMS), so we’re looking forward to that.
For all the convenience and indispensability of having access to the sum total of human knowledge in the palm of your hand, the actual process of acquiring and configuring a smartphone can be an incredibly frustrating experience. Standing in those endless queues at the cell phone store, jumping through the administrative hoops, and staring in sticker shock at a device that’s likely to end its life dunked in a toilet all contribute to the frustration.
But for my money, the real trouble starts once you get past all that stuff and start trying to set up the new phone just right. Sure, most phone manufacturers make it fairly easy to clone your old phone onto the new one, but there are always hiccups. And for something that gets as tightly integrated into the workflows of your daily life as cell phones do, that can be a real bummer. Especially when you find out that your shiny new phone can’t do something you absolutely depend on.
Well, that de-escalated quickly! It was less than a week ago that the city of Shenzhen, China was put on lockdown due to a resurgence of COVID-19 in the world’s electronics manufacturing epicenter. This obviously caused no small amount of alarm up and down the electronics supply chain, promising to once again upset manufacturers seeking everything from PCBs to components to complete electronic assemblies. But just a few days later, the Chinese government announced that the Shenzhen lockdown was over. At least partially, that is — factories and public transportation have been reopened in five of the city’s districts, with iPhone maker Foxconn, one of the bigger players in Shenzhen, given the green light to partially reopen. What does this mean for hobbyists’ ability to get cheap PCBs made quickly? That’s hard to say, at least at this point. Please feel free to share your experiences with any supply chain disruptions in the comments below.
Better news from a million miles away, as NASA announced that the James Webb Space Telescope finished the first part of its complex mirror alignment procedure. The process, which uses the complex actuators built into each of the 18 hexagonal mirror segments, slightly moves each mirror to align them all into one virtual optical surface. The result is not only the stunning “selfie” images we’ve been seeing, but also a beautiful picture of the star Webb has been focusing on as a target. The video below explains the process in some detail, along with sharing that the next step is to move the mirrors in and out, or “piston” them, so that the 18 separate wavefronts all align to send light to the instruments in perfect phase. Talk about precision!
Is a bog-standard Raspberry Pi just not tough enough for your application? Do you need to run DOOM on a platform that can take a few g of vibration and still keep working? Sick of your Pi-based weather station breaking own when it gets a little wet or too hot? Then you’ll want to take a look at the DuraCOR Pi, a ruggedized chassis containing a Pi CM4 that’s built for extreme environments. The machine is in a tiny IP67-rated case and built to MIL-STD specs with regard to vibration, temperature, humidity, and EMI conditions. This doesn’t really seem like something aimed at the hobbyist market — it’s marketed by Curtiss-Wright Defense Solutions, a defense contractor that traces its roots all the way back to a couple of bicycle mechanics from Ohio that learned how to fly. So this Pi is probably more like something you’d spec if you were building a UAV or something like that. Still, it’s cool to know such things are out there.
BrainLubeOnline has a fun collection of X-rays. With the exception of a mouse — the other kind — everything is either electronic or mechanical, which makes for really interesting pictures. Seeing the teeth on a gear or the threads on a screw, and seeing right through the object, shows the mechanical world in a whole new light — literally.
And finally, would you buy a car that prevents you from opening the hood? Most of us probably wouldn’t, but then again, most of us probably wouldn’t buy a Mercedes EQS 580 electric sedan. Sarah from Sarah -n- Tuned on YouTube somehow got a hold of one of these babies, which she aptly describes as a “German spaceship,” and took it for a test drive, including a “full beans” acceleration test. Just after that neck-snapping ride, at about the 7:20 mark in the video below, she asks the car’s built-in assistant to open the hood, a request the car refused by saying, “The hood may only be opened by a specialist workshop.” Sarah managed to get it open anyway, and it’s not a frunk — it’s home to one of the two motors that power the car, along with all kinds of other goodies.