A Stylish Raspberry Pi Camera

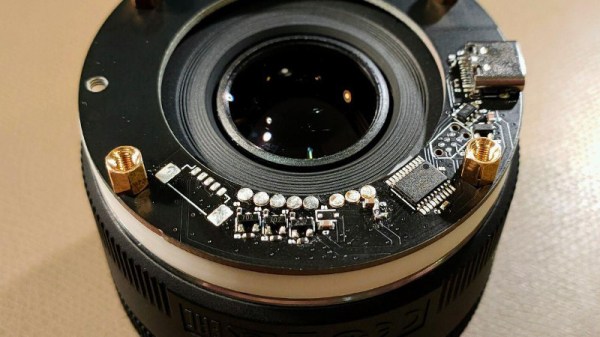
The Raspberry Pi HQ camera module is an exciting product that for the first time puts something close to a decent quality interchangeable lens camera into the hands of hardware hackers. It’s already attracted the attention of those who have a wish to explore the boundaries of camera form factors. Our latest entrant in this field comes courtesy of [BBまどーし], who has opted for a very good 3D-printed analog of a conventional compact camera.

On the front as you might expect is the module, concealed behind a smart plastic ring. Behind that is a battery compartment, concealing not the brace of 18650s or the bare LiPo pouch that you might expect, but a 10,400 mAH USB power bank. Behind that is something approaching a conventional Raspberry Pi case, designed to take a Hyperpixel screen. The battery might seem an unadventurous choice, but it serves to highlight just how much bang for your buck can now be found in compact power banks. It may not have a hacker aesthetic, but you can’t argue with its cost and simplicity.

The details are the interesting part of this design, for instance it has a standard accessory shoe printed into its top. There is also a shutter button, but they admit to not being a software wizard enough to get it working. Perhaps a quick look at this Pi Camera in a 1970s Merlin game would be in order.

There’s An Engineer In Germany I’d Like A Word With; Tale Of A Crumbling Volkswagen Lock

In common with quite a few in the hardware hacking community, I have a fondness for older vehicles. My “modern” ride is an older vehicle by today’s standards, a Volkswagen Polo 6N made in the late 1990s. It’s by my estimation a Good Car, having transported me reliably back and forth across the UK and Europe for several years.

Last week though, it let me down. Outside the church in a neighbouring village the driver’s door lock failed, leaving me with my igniton key stuck in the door, and a mildly embarrassing phone call to my dad to bring the Torx driver required to remove the assembly and release it. I am evidently not 1337 enough, I don’t carry a full set of Torx bits with me everywhere I go. The passenger side lock has never worked properly while I’ve had the car, and this is evidently my cue to sort it all out.

Continue reading “There’s An Engineer In Germany I’d Like A Word With; Tale Of A Crumbling Volkswagen Lock”

Grok The Z80 With This Simulator

Many of us will have at some point encountered a Z80 microprocessor, whether we’ve bare-metal programmed for it, or simply had a go at blasting some invaders on a game system using one. Like all the processors of its era, it’s got a relatively simple and accessible internal block diagram, so there’s a good chance that readers well even know how it works, too. But do any of know how it really works, down to the gate, transistor, and net level? [Goran] does, because he’s written a Z80 netlist simulator that allows the running of code alongside the examination of the chip and its signals. It’s not particularly fast, achieving a modest 2.3kHz clock speed when run of a fairly high-end PC, but we’re guessing readers needing to run Z80 code for anything other than learning would use the real thing anyway.

There’s a video of the software in operation which we’ve placed below the break, and we can see it will be a fascinating tool even to people who aren’t dedicated reverse engineers. To be able to bring up a logic analyzer view of the internals of a processor while it is in operation is truly astounding if you are used to it as a black box, and to have logic diagrams at your fingertips rather than puzzling out individual transistors really gives a window into what is going on.

This isn’t the only such simulator out there, in the past we’ve mentioned Visual6502, when we covered the Monster 6502.

Continue reading “Grok The Z80 With This Simulator”

3D Printer Revives Large Format Camera

With a quarter-century of more of consumer digital cameras behind us, it’s easy to forget that there was once another way to see your photos without waiting for them to be developed. Polaroid Land cameras and their special film could give the impatient photographer a print in about a minute, but sadly outside a single specialist producer, it is no longer a product that is generally available.  [The Amateur Engineer] sought an alternative for a large format camera, by adapting a back designed for Fuji Instax film instead.

Lomography, the retailer of fun plastic cameras, had produced an Instax back for one of their cameras, and to adapt it for a Tachihara large format camera required a custom 3D-printed frame. Being quite a large item it had to be printed in three pieces and stuck together with epoxy. Then a series of light leaks had to be chased down and closed up. The result is a working Instax back for the camera, which appears to deliver the photographic goods.

We’ve seen a few digital backs for larger cameras produced with scanners, but we rather like this linear CCD one.

This 68k Board Is About As Simple As It Gets

For those of us who remember the Motorola 68000 microprocessor, it’s likely that a sizeable quantity of those memories will come in the form of a cream or grey box with a Commodore, Atari, or Apple logo on it These machines were the affordable creative workstations of their day, and under the hood were a tour de force of custom silicon and clever hardware design. We might, therefore, be excused for an association between 68000 based computers and complexity, but in reality, they are as straightforward to interface as the rest of the crop of late-1970s silicon. We can see it in [Matt Sarnoff]’s 68k-nano, about as simple a 68000-based single-board computer as it’s possible to get.

But for all its simplicity, this board is no slouch. It packs a megabyte of RAM, 64k of ROM, a 16550 UART, and an IDE interface for a CompactFlash card. There is also provision for a real-time clock module, through an interesting bit-banged SPI interface from the 16550’s control lines. There appears also to be a 50-pin expansion header.

Software-wise there is a ROM monitor that provides test and housekeeping functions, and which loads an executable from the card plugged into the IDE interface if there is one. This feature makes the board especially interesting, as it opens up the possibility of running a μClinux or similar kernel for a more fully-featured operating system.

The 68k doesn’t receive the attention here that some of its 8-bit contemporaries do, but it still appears from time to time. We’ve certainly featured at least one other 68000-based SBC in the past.

Thanks [Anton] for the tip.

An HDMI Monitor From Your Phone

Digital video has proceeded to the point at which we have near-broadcast-quality HD production capabilities in the palm of our hand, and often for a surprisingly affordable price. One area in which the benefits haven’t quite made it to our wallets though is in the field of small HD monitors of the type you might place on top of a camera for filming. It’s a problem noted by [Neon Airship], who has come up with a solution allowing the use of an Android mobile phone as an HDMI monitor. Since many of us will now have a perfectly capable older phone gathering dust, it’s an attractive proposition with the potential to cost very little.

The secret isn’t the most elite of hacks in that it uses all off-the-shelf hardware, but sometimes that isn’t the only reason to be interested in a project such as this one. [Neon] is using an HDMI-to-USB capture card of the type that has recently become available from the usual sources for an astoundingly small sum. When paired with a suitable USB OTG cable, the adapter can be seen by the phone as just another webcam.

We see him try a few webcam viewer apps including one that rather worryingly demands a direct APK download, and the result is a very good quality HDMI monitor atop his camera that really didn’t break the bank. Sometimes the simplest of solutions deliver the most useful of results.

This is something of special interest to those of us who experiment with our own camera form factors.

Continue reading “An HDMI Monitor From Your Phone”

Tool Changing 3D Printers Shouldn’t Break The Bank

Close-up on the magnetic coupling

One of the Holy Grails of desktop 3D printing is the ability to print in multiple materials, for prints that mix colours or textures. There are printers with multi-way hot ends, add-ons that change your filament, or printers with tool changers, that swap hot ends as needed. [Amy] has taken the final route with her Hypercube, and her Doot Changer allows her to print in two materials with ease. Best of all, she tells us it only cost her $20 to make.

For those not familiar with Hypercube-style printers, they have a roughly cubic frame made using aluminium extrusion. On the rear upper rail are a couple of receptacles with metal locating pins onto which a hot-end unit can be slotted. The printer carriage has a magnetic coupling that can pick up or disengage a hot end from its receptacle at will, as can be seen in action in a short video clip.

All the parts can be found on Thingiverse, and there is a photo album with plenty of eye-candy should you wish to see more. Meanwhile as far as tool changers go, we’ve been there before in great depth.