The Miniware TS100 As A USB-C Soldering Iron

Many readers will be familiar with the Miniware TS100 soldering iron, a lightweight temperature-controlled iron that is giving significantly more expensive soldering tools a run for their money. There is another model in the range, the TS80, which though it uses different tips than its sibling has the main distinguishing feature of USB-C power rather than a DC barrel jack. A cadre of users still prefer the TS100 for this reason, as an iron that can run from almost any low voltage DC power source. Any except USB-C, that is, an omission that [thinkl33t] has rectified with a USB-C adapter for the older model.

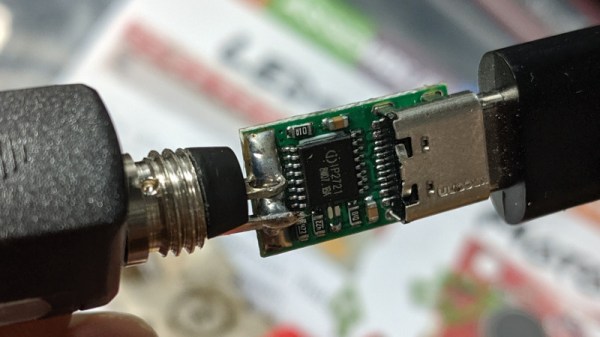
To achieve this, he’s used a readily-available ZYPDS USB-to-DC module and attached it to a barrel jack. For now, it’s simply held on by solder with a bit of heat-shrink over the top. [Thinkl33t] observes that this may not prove to be strong enough and he’ll eventually have to put it on a bit of cable. It’s a simple enough hack, but it serves as a quick introduction to these parts which perform the necessary USB-C magic to deliver a DC supply, as well as to highlight the relative scarcity of higher-power USB supplies.

At the moment there’s an inevitable move to USB-C All The Things, but it’s a trend that it seems many manufacturers of power sources have yet to catch up with. When a typical TS-80 owner finds their shiny new USB-C battery bank is, in reality, an older 5V USB bank with a USB-C connector fitted, it’s no wonder that their friends prefer the TS100. We hope that coming years will see a greater range of USB-C power options, but until then we like the versatility of the barrel jack on the TS100. Especially now that it can so readily be made to take USB-C power.

We reviewed the TS100 back in 2017, and two years of using it since then have not changed our opinion of it.

Thanks to the several tipsters including [thinkl33t]  himself who sent us this.

An Arduino Enhances This 7400 CPU

How quickly could you make an entire computer from 74 series logic, from scratch? [Richard Grafton had only 30 days until the UK’s Retro Computer Festival and set out to design and build his Cambridge-1 computer in that time. The result is a machine spread across several breadboards, with neatly placed wiring and unexpectedly an Arduino Micro sitting in the corner. Isn’t the little Italian board a cheat? Not so, he says, because instead of being part of the computer itself it serves as a program loader to make putting software onto the machine from a PC as easy as possible.

The machine itself is simple enough, a 4-bit design with 8-bit data and address busses. There are only 16 instructions, and the clock speed is a relatively pedestrian 40Hz. This does, however, allow the many blinkenlights to show the machine’s state in a more visible manner. There’s a video which we’ve placed below the break, and if you have further questions you might like to look at the GitHub repository.

We like the Cambridge-1, and we see no problem with the Arduino being part of it. It doesn’t take away from the 74-driven nature of the machine. Instead, it enhances the usefulness of the device by facilitating coding on it. We’ve had huge quantities of TTL computers here over the years so it’s difficult to pick one to send you towards, however you may want to consider the 7400 as the original in the series.

Continue reading “An Arduino Enhances This 7400 CPU”

Intelligent Control For That Cheap Diesel Heater

If you own a caravan or a boat, you’ll know that keeping it warm can present something of a struggle. Open-flame gas heaters carry a risk of carbon monoxide poisoning, while solid fuel stoves are heavy and require safe flues. The prospect of a diesel heater then is enticing, bringing as they use a safer fuel and allow for easy external exhaust. Unfortunately they’ve been something of an expensive option, but the arrival of cheap imported heaters in recent years has made them an attractive choice. [Ray Jones] has improved upon their sometimes basic control electronics with the Afterburner, an intelligent controller that packs both ESP32 and HC-05 modules to both enhance the feature set and the connectivity of the devices.

The full list of capabilities is somewhat exhaustive but has a few stand-outs such as the ability to connect 1-wire temperature sensors to the system. It’s not compatible with all the heaters on the market, but there is a comprehensive guide to those models with which it can work. Meanwhile, all the code and other resources are available on GitLab should you wish to try it for yourself.

Diesel is something of a dirty word in 2019, but maybe biodiesel will save devices like this one.

Thanks [Bob] for the tip!

Flux Gate Magnetometers Make A Special Current Probe

There are moments when current measurement is required on conductors that can’t be broken to insert a series resistor, nor encircled with a current transformer. These measurements require a completely non-invasive technique, and to satisfy that demand there are commercial magnetometer current probes. These probes are however not for the light of wallet, so [ensgoldmine] has created a much cheaper alternative.

The Texas Instruments GRV425 flux gate magnetometer integrated circuit on its TI evaluation module provides the  measuring element placed at the tip of a probe as close as possible to the conductor to be measured, with another GRV425 module at the head of the probe to measure ambient magnetic field for calibration purposes.  An Arduino Due measures and processes the readings, chosen due to its higher-resolution ADC than the more ubiquitous Arduino Uno.

The write-up is interesting even if you have no need for a current probe, because of its introduction to these sensing elements. Because it’s a rare first for Hackaday, we’ve never taken a close look at them before other than as an aside when talking about a scientific instrument on Mars.

British Cops Catch Shooter-Printing Villain

It’s a perennial of breathless British tabloid scare reporting that 3D printers will unleash a tide of weapons upon the streets. But perhaps it might actually be time for Brits lock up their children, because London’s Metropolitan Police have announced their first prosecution for 3D printing a handgun. The gun pictured appears to be a Repringer 5-shot .22 revolver, and was found by police during a drugs raid.

The UK has significantly restrictive firearms legislation and shooting incidents are extremely rare in the country, so while this might not raise any eyebrows on the other side of the Atlantic it’s an extremely unusual event for British police. It appears that the builder was not the type of libre firearms enthusiast who has made the news with similar work in the USA, so it has to be assumed that it was printed purely as a means to secure an illegal firearm however rough-and-ready or indeed dangerous it might be.

Stepping aside from the firearm aspect of the story, it should be of concern for any British 3D printer enthusiasts. As we’ve reported over the years with respect to drone incidents they can sometimes throw reason to the wind when faced with unfamiliar technology, indeed we’ve already seen them imagining RepRap parts to be for a firearm. We’d counsel all parties to keep sane heads, and hope that both the sentence for today’s criminal proves to be a suitable deterrent, and that no clueless fool decides to download and print another weapon for the hell of it. As always, we’ll bring you developments as they happen.

3D Print A Complete Wind Generator

For many of us our landscapes are dotted with wind turbines, the vast majority of which are horizontally aligned as if they were giant aircraft propellers. A much rarer sight is the vertical wind turbine, which remains a staple of the wind power experimenter. [Troy] and his brother have posted a video showing a small wind 3D printed vertical turbine, which unusually includes an alternator made from scratch as well as the rotor itself.

The machine adopts a Savonius rotor design with three scoops, which offers simplicity and high torque at a lower rotational speed than some of the alternatives. The scoops are assembled from a number of 3D-printed sections, and directly drive the generator which uses a large number of coils on a stator encircled by a rotor containing an array of magnets. A simple rectifier and three-terminal regulator produces a 5-volt output.

Sadly there was not enough wind to give it a decent test for the video, but they demonstrate it with a very large fan standing in. We like the alternator design but we’d be interested to see how the sectional rotors hold up in outdoor conditions, and perhaps that regulator could benefit from a switch-mode component. If you fancy a go he says he’ll release the files as open source if there’s enough interest. We’re interested [Troy], please do!

Many wind turbines have passed through these pages over the years, and for contrast here’s a horizontal 3D printed example.

Continue reading “3D Print A Complete Wind Generator”

That Game Cartridge Isn’t As Straightforward As You’d Think

Classic games consoles played their games from cartridges, plastic bricks that held a PCB with the game code on it ready to be run by the console hardware. You might therefore expect them to be an easy prospect for emulation, given that the code can be extracted from whatever ROM they contain. But as anyone with an interest in the subject will tell you, some cartridges included extra hardware to boost the capabilities of their games, and this makes the job of an emulator significantly more complex.

[Byuu] has penned an article exploring this topic across a variety of consoles, with in-depth analyses of special-case cartridges. We see the obvious examples such as the DSP coprocessors famously used on some SNES games, as well as Nintendo’s Super Game Boy that contained an entire Game Boy on a chip.

But perhaps more interesting are the edge-case cartridges which didn’t contain special hardware. Capcom’s Rockman X had a copy protection feature that sabotaged the game if it detected RAM at a frequently used save game address emulated by copiers. Unfortunately this could also be triggered accidentally, so every one of the first generation Rockman X cartridges had a manually attached bodge wire that a faithful emulator must replicate. There is also the case of the Sega Genesis F22 Interceptor, which contained an 8-bit ROM where most cartridges for this 68000-powered platform had a 16-bit part. Simple attempts to copy this cartridge result in the upper 8 bits having random values due to the floating data lines, which yet again an emulator must handle correctly.

It’s a subject with a variety as huge as the number of console developers and their games, and a field in which new quirks are constantly being unearthed. While most of us don’t spend our time peering into dusty cartridges, we’re grateful for this insight into that world.

We’ve visited the world of emulators a few times before, such as when we looked at combatting in-game lag.