As children, we all probably had our ideal career paths. As an adult do you still harbor a secret desire to be an astronaut, or to drive a railroad train? Or have holders of other jobs become the people you envy?
As a Hackaday writer it’s probably not too controversial to admit a sneaking envy for the writers of semiconductor application notes. True, often their work consists of dry demonstrations of conventional uses for the products in question, but every once in a while they produce something off the wall and outside the device’s intended use, so out of the ordinary that you envy them their access for experimentation to the resources of a large semiconductor company.
Take Texas Instruments’ Application Report SBAA203, from May 2013. “Stacking the REF50xx for High-Voltage References” (PDF). A laboratory specialising in accurate measurement of high voltages had the problem that the stacks of Zener or avalanche diodes they were using as voltage references lacked both precision and stability, so investigated the properties of the REF5010 10V precision voltage reference.

They found that by ignoring the device’s data sheet and directly connecting its output pin to its power pin, the REF5010 became equivalent to an ideal Zener diode. In this mode multiple references could be stacked in the same way as a real Zener diode, and very stable and high-precision voltage references could be created with very high voltages. They made a PCB with ten stacked REF5010s for a 100V reference, and then stacked ten of them for a 1000V reference. Leaving it for 24 hours to settle, they achieved a precision of +/- 2.5ppm, and after 3.5 months their average reading for the ten 1000V references they built was 1000.022V.
The 1000V reference would be impressive enough, but they weren’t finished. They built a series of boards holding 500 REF5010s for a 5KV reference, and stacked 20 of them to make a 100KV reference. These boards were mounted in a tower looking not unlike the Tesla coils we sometimes feature here. They note that it probably hits the record of simultaneous use of TI parts in a single device.
This may well be the first extremely high voltage precision reference to feature here at Hackaday, but we’ve certainly had our share of HV articles. Earlier this year we had a trio from [Steven Dufresne]: A conucopia of high voltage sources looking at ways to make your EHT, High voltage please, but don’t forget the current looking at selecting the right HV power supply for an application, and Wrangling high voltage looking at construction techniques.
Thanks [Nathan] for the tip.


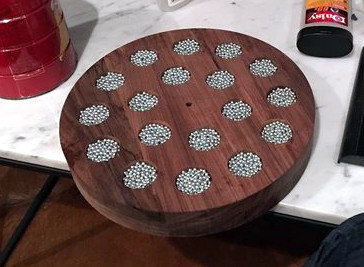 The platter is machined from a piece of rosewood, weighted and balanced with lead shot, and laminated between two sheets of brass. It sits on a bearing aided by a ring of opposing magnets, and is belt driven by a two-phase induction motor. The base of the turntable is cast as a single piece of concrete, the idea being that the extra weight will aid the damping of vibrations. The tonearm is machined from a piece of wood, and its pivot from brass. The tonearm bearing is a ballpoint pen, a surprising yet inspired choice .