If you build electronic circuits on a regular basis the chances are you will have used capacitors many times. They are a standard component along with the resistor whose values are lifted off the shelf without a second thought. We use them for power supply smoothing and decoupling, DC blocking, timing circuits, and many more applications.
Different capacitor applications. By Elcap (Own work) [CC0], via Wikimedia CommonsA capacitor though is not simply a blob with two wires emerging from it and a couple of parameters: working voltage and capacitance. There is a huge array of capacitor technologies and materials with different properties. And while almost any capacitor with the right value can do the job in most cases, you’ll find that knowing more about these different devices can help you make something that doesn’t just do the job, but does the best possible job. If you’ve ever had to chase a thermal stability problem or seek out the source of those extra dBs of noise for example you will appreciate this.
If you stand outside on a clear night, can you see the Milky Way? If you live too close to a conurbation the chances are all you’ll see are a few of the brighter stars, the full picture is only seen by those who live in isolated places. The problem is light pollution, scattered light from street lighting and other sources hiding the stars.
The view of the Milky Way is a good analogy for the state of the radio spectrum. If you turn on a radio receiver and tune to a spot between stations, you’ll find a huge amount more noise in areas of human habitation than you will if you do the same thing in the middle of the countryside. The RF noise emitted by a significant amount of cheaper modern electronics is blanketing the airwaves and is in danger of rendering some frequencies unusable.
Can these logos really be trusted? By Moppet65535 (Own work) [CC BY-SA 3.0], via Wikimedia CommonsIf you have ever designed a piece of electronics to comply with regulations for sale you might now point out that the requirements for RF interference imposed by codes from the FCC, CE mark etc. are very stringent, and therefore this should not be a significant problem. The unfortunate truth is though that a huge amount of equipment is finding its way into the hands of consumers which may bear an FCC logo or a CE mark but which has plainly had its bill-of-materials cost cut to the point at which its compliance with those rules is only notional. Next to the computer on which this is being written for example is a digital TV box from a well-known online retailer which has all the appropriate marks, but blankets tens of megahertz of spectrum with RF when it is in operation. It’s not faulty but badly designed, and if you pause to imagine hundreds or thousands of such devices across your city you may begin to see the scale of the problem.
We hope that quantifying the scale of the RF noise problem will result in some action to reduce its ill-effects. It is also to be hoped though that the response will not be an ever-tighter set of regulations but greater enforcement of those that already exist. It has become too easy to make, import, or sell equipment made with scant regard to RF emissions, and simply making the requirements tougher for those designers who make the effort to comply will not change anything.
This is the first time we’ve raised the problem of the ever-rising radio noise floor here at Hackaday. We have covered a possible solution though, if stray RF is really getting to you perhaps you’d like to move to the National Radio Quiet Zone.
The world of the subsoil is a fascinating place. Our whole ecosystem depends on its variety of fungus, bacteria and detritivore creatures that break down and decay dead matter and provide the nutrients to sustain plants that bring in the energy from the sun.
It’s easy enough to study what is happening beneath the surface, just reach for a trowel. But of course, that’s an imperfect technique, for it only gives a picture of a world you have destroyed, and then at best only a snapshot.
Fungal hypha growth in action
What if you could image underground, take pictures and video of the decay process and the creatures that are its engine? [Josh Williams] was curious how this could be achieved, so after early experiments with buried webcams proved unimpressive he created the Rhizotron. A flatbed scanner waterproofed for burial with plenty of silicone, and driven by a Raspberry Pi. The result was particularly successful, and though he has lost several scanners to water ingress he has collected some impressive imagery which he has posted on the project’s blog. Below the break we’ve included one of his videos taken with the scanner in a compost bucket, in which you can see decomposition aplenty, mating millipedes, spreading fungal hyphae and much more.
Just in case you imagine that those of us who write for Hackaday are among the elite of engineering talent who never put a foot wrong and whose benches see a succession of perfectly executed builds and amazing hacks, let me disabuse you of that notion with an ignominious failure of my own.
I was building an electronic kit, a few weeks ago. It’s a modular design with multiple cards on a backplane, though since in due course you’ll see a review of it here I’ll save you its details until that moment. In my several decades of electronic endeavours I have built many kits, so this one as a through-hole design on the standard 0.1″ pitch should have presented me with no issues at all. Sadly though it didn’t work out that way.
Things started to go wrong towards the end of the build, I noticed that the temperature regulator on my soldering iron had failed at some point during its construction. Most of it had thus been soldered at a worryingly high temperature, so I was faced with a lot of solder joints to go over and rework in case any of them had been rendered dry by the excessive heat.
In due course when I powered my completed kit up, nothing worked. It must have been the extra heat, I thought, so out came the desolder braid and yet again I reworked the whole kit. Still no joy. Firing up my oscilloscope I could see things happening on its clock and data lines so there was hope, but this wasn’t a kit that was responding to therapy. A long conversation with the (very patient) kit manufacturer left me having followed up a selection of avenues, all to no avail. By this time a couple of weeks of on-and-off diagnostics had come and gone, and I was getting desperate. Somehow I’d cooked this thing with my faulty iron, and there was no way to find the culprit.
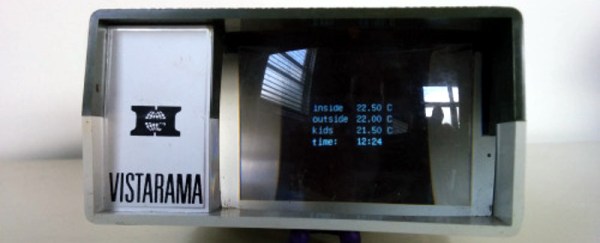
Sometimes when browsing the websites of our global hackspace community you notice a project that’s attractive not necessarily because of what it does or its technology but because of its presentation. So it is with the subject of this article, [Kris] needed a house temperature monitor and found a 1960s slide viewer made an excellent choice for its housing.
The monitor itself is a fairly straightforward Arduino build using a couple of DS18B20 1-wire temperature sensors and a real-time-clock module and displaying their readings on a small OLED screen. Its code can be found on this mailing list thread if you are interested. The display presented a problem as it needed to be reasonably large, yet fairly dim so it could be read at night without being bright enough to interrupt sleep.
A variety of projection techniques were tried, involving lenses from a projection clock, a magnifying glass, and a Google Cardboard clone. Sadly none of these lenses had the required focal length. Eventually the slide viewer was chosen because it was pointed out that the OLED screen was about the same size as a photographic slide.
Slide viewers are part of the familiar ephemera of the analog era that most people over 60 may still have taking up drawer space somewhere but may well be completely alien to anyone under about 30. They were a magnification system packaged up into a console usually styled to look something like a small portable TV of the day, and different models had built-in battery lights, or collected ambient light with a mirror. The screen was usually a large rectangular lens about 100mm(4″) diagonal.
[Kris]’s Vistarama slide viewer came via eBay. It’s not the smallest of viewers, other models folded their light paths with mirrors, however the extra space meant that the Arduino fit easily. The OLED was placed where the slide would go, and its display appeared at just the right magnification and brightness. Job done, and looking rather stylish!
Batteries wear out. If you are an electric vehicle enthusiast, it’s a certainty that at some time in your not-too-distant future there will be a point at which your vehicle’s batteries have reached the end of their lives and will need to be replaced. If you have bought a new electric vehicle the chances are that you will be signed up to a leasing deal with the manufacturer which will take care of this replacement, but if you have an older vehicle this is likely to be an expensive moment.
Fortunately there is a tempting solution. As an increasing number of electric vehicles from large manufacturers appear on our roads, a corresponding number of them have become available on the scrap market from accident damage. It is thus not impossible to secure a fairly new lithium-ion battery pack from a modern electric car, and for a significantly lower price than you would pay for new cells. As always though, there is a snag. Such packs are designed only for the cars they came with, and have proprietary connectors and protocols with which they communicate with their host vehicle. Fitting them to another car is thus not a task for the faint hearted.
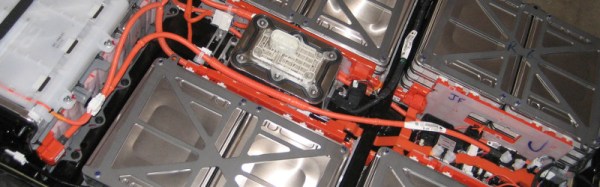
Hackaday reader [Wolf] has an electric truck, a Solectria E10. It has a set of elderly lead-acid batteries and would benefit hugely from an upgrade to lithium-ion. He secured a battery pack from a 2013 Nissan Leaf electric car, and he set about reverse engineering its battery management system (BMS). The Solectria will use a different battery configuration from the Leaf, so while he would like to use the Leaf’s BMS, he has had to reverse engineer its protocols so that he can replace its Nissan microcontroller with one of his own.
His description of the reverse engineering process is lengthy and detailed, and with its many photos and videos is well worth a read. He employs some clever techniques, such as making his own hardware simulation of a Li-ion cell so that he can supply the BMS known values that he can then sniff from the serial data stream.
If you take a head of romaine lettuce and eat all but the bottom 25mm/1inch, then place the cut-off stem in a bowl of water and leave it in the sun, something surprising happens. The lettuce slowly regrows. Give it a few nutrients and pay close attention to optimum growing conditions, and it regrows rather well.
This phenomenon caught the attention of [Evandromiami], who developed a home-made deep water culture hydroponic system to optimise his lettuce yield. The lettuce grows atop a plastic bucket of water under full spectrum grow lights, while an Intel Curie based Arduino 101 monitors and regulates light levels, humidity, temperature, water level, and pH. The system communicates with him via Bluetooth to allow him to tweak settings as well as to give him the data he needs should any intervention be required. All the electronics are neatly contained inside a mains power strip, and the entire hydroponic lettuce farm lives inside a closet.
He does admit that he’s still refining the system to the point at which it delivers significant yields of edible lettuce, but it shows promise and he’s also experimenting with tomatoes.


![Different capacitor applications. By Elcap (Own work) [CC0], via Wikimedia Commons](https://hackaday.com/wp-content/uploads/2016/06/capacitors-overlapping-applications.png)

![Can these logos really be trusted? By Moppet65535 (Own work) [CC BY-SA 3.0], via Wikimedia Commons](https://hackaday.com/wp-content/uploads/2016/06/fcc-ce-logos.jpg?w=400)




 This phenomenon caught the attention of [Evandromiami], who








