MIDI To CV/Gate The Easy Way

Let’s say you’ve got a modular synthesizer. You’re probably a pretty cool person. But all your cool laptop DJ friends keep showing off their MIDI-controlled hardware, and you’re getting jealous. Well, [little-scale] has the build for you.

The Teensy 3.6 is the current top-of-the-line Teensy from PJRC, and it’s [little-scale]’s weapon of choice here. With USB-MIDI and two 12-bit DACs on board, it’s made creating an interface between the worlds of analog and digital music into a remarkably simple job. Control voltages for pitch and velocity are pushed out over the analog pins, while pin 29 is used for gate signals.

It’s a testament to the amount of development that has gone into the Teensy platform that such projects can be built with virtually no off-board components. The build is a further step forward in simplicity from [little-scale]’s previous work, using a Teensy 2 with an offboard DAC to generate the output voltages.

Here at Hackaday, we’ve always been big fans of adding computer control to analog hardware. This CNC mod to a guitar pickup winding machine is a great example.

Simultaneous AP & Client On The Pi Zero W

The Raspberry Pi Zero W is a great platform for IoT projects, with a smattering of GPIO and onboard WiFi. However, security is an important consideration when it comes to the Internet of Things and it can be beneficial to keep your IoT devices on a separate network for safety’s sake. [Albert] wanted to do this all on board the Pi Zero W, and figured out how to get it acting as an access point and a client all at the same time.

[Albert] starts off with a fresh install of Raspbian Stretch, and sets the Pi up in OTG mode. This allows access to the Pi over a USB serial terminal. This is great for productivity when working on headless networking projects, as it can be frustrating trying to work with an SSH session that keeps dropping out when you change settings.

After creating a second named device (ap0) to go along with the one created automatically by the kernal (wlan0), DNSmasq is installed to act as a DHCP server for the AP. Hostapd is then installed to control the AP settings. Following this, like anything in Linux, a flurry of configuration files are edited to get everything humming along and starting up automatically after a reboot. For some reason, things don’t start up smoothly, so [Albert] has a cron job that fires 30 seconds after bootup and toggles the interfaces off and on again, and that’s done the trick.

It’s a useful hack, as it allows the Pi Zero to act as a hub for IoT devices, while also creating a bridge between them and the internet. Traffic can be managed to stop random internet users flicking your lights on and off and overspeeding your dishwasher.

We’ve seen the Pi Zero used for just about everything under the sun so far. If you’re just starting your own IoT build, perhaps you’d like to use the Pi Zero as a streaming camera?


Hackaday Prize Entry: Ebers – Diabetes Care, Step By Step

Diabetes is a disease that, among other things, has significant effects on the feet due to a combination of neuropathy, vascular issues, and other factors. You may have seen special diabetes socks with features like non-elasticated cuffs for better circulation and a lack of seams to prevent the formation of blisters. Taking care of  your feet is essential in diabetes to prevent injury and infection. Ebers is a project that seeks to help in just this area.

Ebers monitors plantar pressure, temperature, and humidity in the sole of the shoe. It then feeds this data back to a smartphone for analysis over Bluetooth. The brain of the project is an Arduino Pro Mini which is tasked with interfacing with the various sensors.

The project relies on 3D printed insoles which fit inside the shoe of the wearer. This is a particularly useful application of 3D printing, as it means the insole can be customised to fit the individual, rather than relying on a smaller selection of pre-sized forms. This has the additional benefit of allowing the insole to be designed to minimise pressure on the foot in the first place, further reducing the likelihood of injury and infection. The pressure sensing is actually built into the insole itself, and can measure pressure at several different areas of the foot.

Overall, it’s a project with huge potential health benefits for those with diabetes. We look forward to seeing where this project goes in future, and how it can bring improvements to the quality of life for people the world over.

8-Channel ADC For The Raspberry Pi

The Raspberry Pi is a powerful embedded computing platform. However, for all its Linux-based muscle, it lacks one thing that even the simplest 8-bit microcontrollers usually have – analog-to-digital conversion. There are a great many ways to rectify this shortcoming, and [Chris Burgess] has brought us another – with an 8-channel ADC for the Raspberry Pi.

For the ADC, [Chris] chose the MCP3008, for its low cost and availability. In this configuration it offers 10-bit resolution and a maximum sampling rate of 200 kilosamples per second. Adafruit has a great guide on working with the MCP3008, too. With such a useful resource to hand, [Chris] was able to spin up a PCB to interface the chip to the Raspberry Pi using SPI. [Chris] took care to try to make the board to the official HAT specifications. As far as the physical aspects go, the board is to spec, however [Chris] omitted the EEPROM required for auto-configuration purposes. That said, the pads are on the board if someone wants to take the initiative to install one.

It’s a tidy build that provides something sorely missing from the Raspberry Pi, for a reasonable cost. [Chris]’s goal was to build something that would enable the measurement of analog sensors for a robot project; we’d love to hear your ideas for potential uses in the comments!

Ask Hackaday: Security Questions And Questionable Securities

Your first school. Your mother’s maiden name. Your favorite color. These are the questions we’re so used to answering when we’ve forgotten a password and need to get back into an account. They’re not a password, yet in many cases have just as much power. Despite this, they’re often based on incredibly insecure information.

Sarah Palin’s Yahoo account is perhaps the best example of this. In September 2008, a Google search netted a birthdate, ZIP code, and where the politician met her spouse. This was enough to reset the account’s password and gain full access to the emails inside.

While we’re not all public figures with our life stories splashed across news articles online, these sort of questions aren’t exactly difficult to answer. Birthdays are celebrated across social media, and the average online quiz would net plenty of other answers. The problem is that these questions offer the same control over an account that a password does, but the answers are not guarded in the same way a password is.

For this reason, I have always used complete gibberish when filling in security questions. Whenever I did forget a password, I was generally lucky enough to solve the problem through a recovery e-mail. Recently, however, my good luck ran out. It was a Thursday evening, and I logged on to check my forex trading account. I realised I hadn’t updated my phone number, which had recently changed.

Upon clicking my way into the account settings, I quickly found that this detail could only be changed by a phone call. I grabbed my phone and dialed, answering the usual name and date of birth questions. I was all set to complete this simple administrative task! I was so excited.

“Thanks Lewin, I’ll just need you to answer your security question.”

“Oh no.”

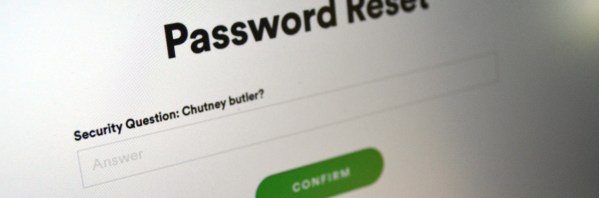
“The question is… Chutney butler?”

“Yes. Yes it is. Uh…”

“…would you like to guess?”

Needless to say, I didn’t get it.

I was beginning to sweat at this point. To their credit, the call center staffer was particularly helpful, highlighting a number of ways to recover access to the account. Mostly involving a stack of identification documents and a visit to the nearest office. If anything, it was a little reassuring that my account details required such effort to change. Perhaps the cellular carriers of the world could learn a thing or two.

In the end, I realised that I could change my security question with my regular password, and then change the phone number with the new security question. All’s well that ends well.

How do You Deal with Security Questions?

I want to continue taking a high-security approach to my security questions. But as this anecdote shows, you do occasionally need to use them. With that in mind, we’d love to hear your best practices for security questions on accounts that you care about.

Do you store your answers in a similar way to your passwords, using high entropy to best security? When you are forced to use preselected questions do you answer honestly or make up nonsensical answers (and how do you remember what you answered from one account to the next)? When given the option to choose your own questions, what is your simple trick that ensures it all makes sense to you at a later date?

We’d love to hear your best-practice solutions in the comments. While you ponder those questions, one mystery will remain, however — the answer to the question that nobody knows: Chutney butler?

Table-Top Self Driving With The Pi Zero

Self-driving technologies are a hot button topic right now, as major companies scramble to be the first to market with more capable autonomous vehicles. There’s a high barrier to entry at the top of the game, but that doesn’t mean you can’t tinker at home. [Richard Crowder] has been building a self-driving car at home with the Raspberry Pi Zero.

The self-driving model is trained by first learning from the human driver.

[Richard]’s project is based on the EOgma Neo machine learning library. Using a type of machine learning known as Sparse Predictive Hierarchies, or SPH, the algorithm is first trained with user input. [Richard] trained the model by driving it around a small track. The algorithm takes into account the steering and throttle inputs from the human driver and also monitors the feed from the Raspberry Pi camera. After training the model for a few laps, the car is then ready to drive itself.

Fundamentally, this is working on a much simpler level than a full-sized self-driving car. As the video indicates, the steering angle is predicted based on the grayscale pixel data from the camera feed. The track is very simple and the contrast of the walls to the driving surface makes it easier for the machine learning algorithm to figure out where it should be going. Watching the video feed reminds us of simple line-following robots of years past; this project achieves a similar effect in a completely different way. As it stands, it’s a great learning project on how to work with machine learning systems.

[Richard]’s write-up includes instructions on how to replicate the build, which is great if you’re just starting out with machine learning projects. What’s impressive is that this build achieves what it does with only the horsepower of the minute Raspberry Pi Zero, and putting it all in a package of just 102 grams. We’ve seen similar builds before that rely on much more horsepower – in processing and propulsion.

Mini-Banners For Small Occasions

Do you often find yourself needing to make small signs? Perhaps you’re trying to put a notice on the office fridge, but you’re just not in the mood for the usual Comic Sans-on-A4 staple today. A banner of some sort would do the trick, but… a small one, right? [Mike Ingle] has the answer – making mini-banners on old receipt printers.

[Mike] was a fan of Paint Shop in the 1980s, which among other things, enabled the printing of long banners on the popular dot matrix printers of the era. Realising that receipt printers have a similar ability to print on a long continuous strip of paper, he decided to see if it was possible to create small banners using the hardware.

The hack is simple – ImageMagick is used to generate a one-bit black & white bitmap that is then processed with some custom C code to generate something the printer can understand. It’s then a simple matter of hacking up the original RS-232 cable to fit a DB-9 (aka DE-9) connector, and spitting out the instructions over serial.

The mini-banners are cool, and we could imagine having some fun with such a project, using it to print out tweets or putting it into service as a stock ticker. It’s a great example of cleanly interfacing with existing hardware to create something outside of the original design intentions. Such printers are fertile ground for hacks – like this printer that can spit out the US Constitution in 6 seconds flat.