60,000 RPM Vacuum Powered Rotary Tool Was 3D Printed

vacuum-powered-rotary-tool

The whining of the turbines in the 3D printed pneumatic rotary tool might make your teeth hurt. When [Axodus] tipped us off about it he mentioned it sounded like a 747 taking off. But we hear a dentist’s drill when watching the demo video.

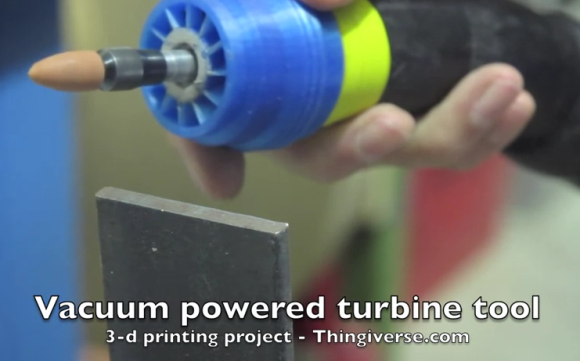
[Richard Macfarlane] published his design if you want to try building one for yourself. But you will need to do some machining in addition to printing the enclosure and the pair of turbines. The shaft of the tool needs to fit the bearings precisely. It accepts a center blue spacer with a red turbine on either side. This assembly is encapsulated in the two-part threaded blue body which has a flange to friction fit with the shop vacuum hose. The business end of the machined shaft was designed and threaded to accept the collet from a Dremel or similar rotary tool.

We wonder how much work it would be to re-engineer this to act as a PCB drill press?

Continue reading “60,000 RPM Vacuum Powered Rotary Tool Was 3D Printed”

Automated Programming And Testing Jig Built With Raspberry Pi

[Doug Jackson] makes word clocks, and he must be doing quite a bit of business. We say that because he put together a programming and test bed for the clock circuit boards.

This is a great example to follow if you’re doing any kind of volume assembly. The jig lets the populated PCB snap into place, making all the necessary electrical connections. This was made possible by a package of goods he picked up on eBay which included rubber spacers to separate the board from the acrylic mounting plate, pogo pins to make the electrical connections, and a spring-loaded board clamp seen to the left in this image.

The switch in the lower right connects power to the board and pulls a Raspberry Pi GPIO pin high. The Python script running on the RPi polls that pin, executing a bash script which programs the ATmega169 microcontroller using the GPIO version of AVRdude. We looked through his Python script and didn’t see code for testing the boards. But the image above shows a “Passed” message on the screen that isn’t in his script. We would wager he has another version that takes the hardware through a self test routine.

We first saw one of [Doug’s] word clocks back in 2009 and then again a few months later. The look of the clock is fantastic and it’s nice to see the project is still going strong.

Gesture Control Uses WiFi Doppler Shift

wifi-gesture-control

We’ve said it before: in the future simple interfaces will use nothing but your body. At least at first glance that’s the case with this WiFi-based gesture control system. If you have Internet at home you probably have a WiFi access point. That’s the first portion of the equation. The remainder is a way of measuring how the radio waves bounce off of your body. So far this is being done with Software-Define Radio (SDR) but researchers at University of Washington think it may be possible to build the technique into future WiFi devices.

The demo video shows this man waving his arm to adjust the volume of his home entertainment system. Intuition tells us that this would be impossible if your arm wasn’t the only thing in motion at the time. But that issue is quickly addressed. Multiple antennas can track multiple people at the same time. There is also consideration for false-positives. The system requires a moderately complex wake-up gesture sequence to prevent you from, say, accidentally turning on the stereo when you roll over in bed.

If you’re having trouble wraping your mind around this, consider this ultrasonic music player. The WiFi version does the same thing, but processing changes in the returning radio waves is much more complex.

Continue reading “Gesture Control Uses WiFi Doppler Shift”

A Binary Clock That Uses Bulbs

Based on his username, [Horatius.Steam], it’s not a surprise that he calls this project a “SteamPunk” style binary clock. But we think using neon  glow lamps in this binary clock is more of mid-century modern proposition. Either way, the finished look is sure to make it a conversation piece for your home.

He doesn’t give all that much information on the bulbs themselves. They seem to be neon glow lamps along the lines of a Nixie tubes. It sounds like they just need mains power (based on the image annotations for the relay board). The high voltage is switched by that collection of solid state relays. The controller board includes a DCF radio whose antennae is seen just below the controller. This picks up an atomic clock signal from Frankfurt, Germany. We think it’s a nice touch that he included a mechanical relay to simulate a ticking sound. That and the bulbs themselves can be turned off using the two switches in the base of the clock.

This seems like a good time to direct your attention to an artistic take on a Nixie clock.


Hackaday Links: Sunday, June 9th, 2013

hackaday-links-chain

This week we saw an interesting animated motorcycle tail light over on Reddit. But there wasn’t really enough background to get its own feature.

The NeuroKnitting project captures brainwaves by weaving them into a scarf.

On Semiconductor is showing off an 8x8x8 LED cube which they claim as 12,000 LEDs. We can’t figure out where all those LEDs are used in the design, but maybe you can. Here’s one that we know has 4096 LEDs in its matrix.

[Jeff] used hard drive platters as the disc section of his original Enterprise desk model.

Play around with an SNES controller and Arduino by following [Damon’s] guide.

Hackaday Alum [Jeremy Cook] posted an update of his laser graffiti project. His earlier effort used camera tricks to capture the image but this time around he’s exciting phosphorescent glow material to make a persistent display visible to the human eye.

This server hides in plain sight after being wrapped in a hard cover book binding. Hopefully this won’t cause heat dissipation problems.

[Trumpkin] built his own Nixie tube wristwatch which we think has the potential to be as neat as the one [Woz] wears.


Super-cap Powered Blinky Jewelry Charged By The Sun Or USB

blinky-jewelry-solar-supercap

We don’t see ourselves wearing these pendants around, but we still enjoyed taking a look at the design. These are just two from a wide range of offerings meant to be worn around and recharged by the sun. But a cloudy day won’t ruing the fun; they can be topped off via USB as well. Parts lists and schematics are included in the assembly Instructables for both the Owl and the Heart.

[Marty] and [Robin], a brother and sister developement/design team, were showing them off at the Sector67 hackerspace in Madison, WI. The single integrated circuit used in both is an OpAmp responsible for managing the blinking. The heart board has a calculator-style solar cell which charges that 0.5F supercap. The Owl has just a 0.022F coin-type capacitor and features a different style of solar harvester. The six components around the cap are each individual solar cells. [Marty] told us that they pump out a ton of juice in direct sunlight, outperforming the calculator-style cell. The opposite is true indoors. But as we’ve seen before, indoor solar harvesting is a tough game.

Need even more bling around your neck? Check out these LED matrix pendants.

Echolocation Pinpoints Where A Gunshot Came From

echolocating-gunshots

[Kripthor] suspected that hunters were getting too near his house. When thinking of a way to quantify this belief he set out to build a triangulation system based on the sound of gunshots. The theory behind it is acoustic location, which is a specialized type echolocation.

The most common example of echolocation is in Bats, who emit ultrasonic noise and listen for its return (echo) to judge the location of objects. [Kripthor] doesn’t need to generate the sound himself, he just needs to pick it up at different points. The time difference from the three samples can be used to triangulate coordinates as seen in the image above.

He first tried using a PC sound card to collect the samples. The stereo input only provides two channels so he tinkered around with a 555-based multiplexing circuit to sample from three. The circuit noise created was just too great so he transitioned to using an Arduino. The ADC samples from each microphone via an NPN transistor which is used as a simple amplifier.

This brings to mind a homebrew sonar hack from way back.