Automated Turntable Photography

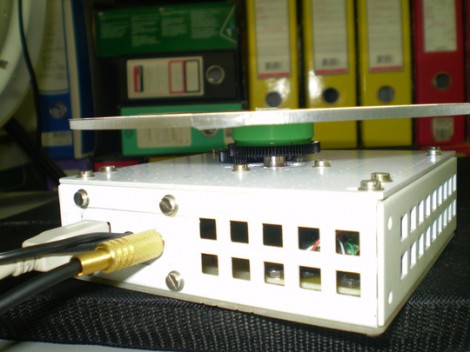
[Muris] has a friend who is selling items on the internet. This friend wanted a simple way to make rotating images of the products and asked him to help. The result of his labors is this base unit that drives the turn table and controls the camera.

The first iteration of the turntable was powered by the stepper motor from a floppy drive. A disc was mounted directly on the motor spindle, but the results were a bit poor. This is because the motor had a fairly low resolution of 200 steps per rotation. That doesn’t allow for smooth animation, and there was a lot of vibration in the system. An upgrade to the geared system you see above included swapping out that motor for one from an old scanner. Now it achieves 1200 steps per rotation and the vibration is gone.

The connectors seen in the base are USB, incoming power, and shutter control. [Muris] wrote a program to control the PIC 16F628A inside the base. The program sends commands via USB and has parameters for number of frames per rotation, direction of rotation, and the like. Set it up as desired, place the product on the turntable, and hit start. Unfortunately there’s no video of this in action because [Muris] gave it to his friend as soon as it was finished. We guess the fact that he didn’t get it back means it’s working great.

If you don’t mind some rough edges and exposed wiring you can throw a system of your own together pretty quickly.

Experimenting With 8-bit Graphics

[Vinod] has done a lot of work with microcontrollers, but this is his first try at displaying graphics using composite video. He had a small PAL television on hand, and an ATmega32 which just needs a stable clock source and a few resistors to get things going.

There are a lot of other hacks around that use composite video out with microcontrollers. But this is a ground-up approach which will help you understand the concepts behind these graphics. [Vinod] started by calculating the possible resolution. He needs to hold a frame buffer in memory, and since his chip has just 2 kilobytes of SRAM this will be the limiting factor. He settled on a display area of 128 by 64 pixels. This divides evenly by 8 so he’s not wasting any bits, and it totals 1k, leaving half of the SRAM for use in calculating the shapes which populate the buffer. An interrupt service routine runs ever 64 microseconds to feed data for each line of the display.

With the scanning in place, he moved on to fill the frame buffer. Two functions are used, one which sets a pixel the other clears a pixel. He compares these to using a pencil and an eraser. By calling these functions from his main program he is able to draw lines, boxes, and circles. A bit of creative looping and he’ll have animations as well, but that’s a concept for a different post.

Separating A Working Scanner From Its Broken Printer

The laser printer portion of this all-in-one machine gave up the ghost and [Entropia] couldn’t get it working again. But the scanner was still functioning so he decided to separate the scanner from its dead printer module.

The model in question is a Samsung SCX-4200. The design is actually perfect for separation because the scanner sits on top of the out feed tray of the printer. It can even be lifted to allow more room for printed pages to pile up. All he has to do is separate the hinged connector and reroute the flat cables. But the real question in [Entropia’s] mind was whether or not the control board would work without the laser printer components connected to it.

He carefully disassembled the unit, spilling toner here and there which is left over from a catastrophic knock-off toner cartridge incident. A quick test showed him that although the drivers complain that the paper tray is open, the scanner does still work. He glued the controller board seen on the left to the bottom of the scanner enclosure, and added some felt feet. Now his scanner is closer to the size you’d expect. And on the plus side he gained a geared stepper motor, laser scanning unit, exhaust fan, and a couple of solenoids to use in future projects.

Advanced Compass/accelerometer Library For Arduino

We don’t have much personal experience with DOF hardware, but this Arduino library which reads and compensates for three-axis magnetometer and accelerometer data looks very impressive. It should work for existing hardware, but there’s also a demo design using a Honeywell HMC5883L compass and a Freescale MMA8453Q accelerometer which you can build yourself. Unfortunately these come in QFN packages (like most cheap accelerometers these days) so you may need to be creative when soldering.

What’s so special about this library? Watch the video after the break (use 720p in fullscreen to get the full effect) and you’ll see three different scatter plots of the output data. The image above is a capture of the third example, which is using the hard iron offset and accelerometer compensation. That is to say, metal on and around the board is accounted for, as well as the physical orientation of the device. Even if you have no prior experience with this type of hardware it’s easy to see the usefulness of this kind of software compensation.

Continue reading “Advanced Compass/accelerometer Library For Arduino”

Veronica Gets VRAM And Its Own Boot Logo

[Quinn Dunki] just reported in on the latest iteration in her computer project which is called Veronica. This time she added RAM to increase the VGA performance of her build. Like just about every other part of the project, [Quinn] knew what she wanted to do, but had to overcome a lot of issues along the way.

The goal is to implement a 256×240 display with 8-bit color depth. [Quinn] says this is on par with game console technology from the 1980’s. The problem is that the 10MHz AVR controller can’t really keep up with the scan rate of this size of display. The answer is to add RAM which stores all of the color data, the microcontroller will simply advance the address pointer on the memory chips to match the sync rate of the VGA output.

After hooking up her hardware design she gets a screen full of uninitialized pixel data. But moving from there to the final product seen above was quite frustrating. It turns out that noise on the breadboard was most of the problem, further compounded by entire breadboard row which wasn’t contacting the wires to make the temporary connections. A bit of jockeying for position and by Jove, she’s got a boot screen.

That breadboard sure has become crowded since her first VGA experiments.

Water Strider Robot Does It With Lego Parts

This Lego watercraft uses drinking bottles as pontoons arranged in a pattern that make it look very much like a Water Strider, the insects that dance on the surface of a lake.

After the break you can see a video of the rig gracefully navigating a local pond, along with a raft of ducks. It’s quiet enough not to startle them, which is nice. We don’t get a good look at the propulsion system, but [Vimal Patel] calls the floats “hockey bottles” in his Flickr comments. They appear to be Lego themed and we’re wondering if they are some type of packaging for a small set that doubles as a sports drinking bottle once the pieces are removed? The rig includes a camera which provides a great persepcive very near the water level.

This isn’t his only floating creation. He’s got a second rig that was used to film some of the footage of this one.

Continue reading “Water Strider Robot Does It With Lego Parts”

PS3 IR Dongle Tamed For Use With A Linux Box

So a man walks into a Radio Shack and the clerk says “Why the long face?”. No, that’s not it. [Ms3fgx] walks into a Radio Shack and says “holy crap, that PS3 IR dongle is only two bucks”. He’s been looking for an IR remote receiver to use with a Linux machine and decided to bend this PS3 dongle to his will. It’s a lot less expensive that the parts to build the simplest IR receivers like this FTDI cable version, or a microcontroller based receiver.

He plugged it in and was delighted to find that it enumerates. The kernel has PlayStation 3 controller support built-in and has no problem picking up this device. When he uses ‘cat’ to display the incoming data all he gets is repetitive garbage. This is because the dongle only supports Sony remote control codes. But after a bit of universal remote setup, he’s got unique commands for each button. The last piece of the puzzle is to map the controller commands to keyboard keys. This is done with the QJoyPad package, but there are a myriad of ways to remap these buttons so go with what you know.