8087's -5V bias charge pump circuit

How The 8087 Coprocessor Got Its Bias

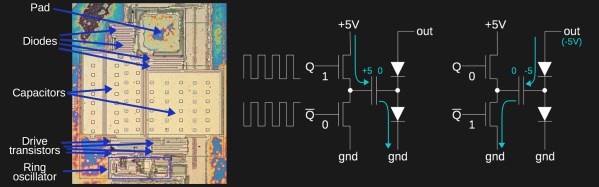
Most of us have been there. You build a device but realize you need two or more voltages. You could hook up multiple power supplies but that can be inconvenient and just not elegant. Alternatively, you can do something in the device itself to create the extra voltages starting with just one. When [Ken Shirriff] decapped an 8087 coprocessor to begin exploring it, he found it had that very problem. It needed: +5 V, a ground, and an additional -5 V.

His exploration starts with a smoking gun. After decapping the chip and counting out all the bond wires going to the various pads, he saw there was one too many. It wasn’t hard to see that the extra wire went to the chip’s substrate itself. This was for providing a negative bias to the substrate, something done in some high-performance chips to get increased speed, a more predictable transistor threshold voltage, and to reduce leakage current. Examining where the bond wire went to in the circuitry he found the two charge pump circuits shown in the banner image. Those worked in alternating fashion to supply a -5 V bias to the substrate, or rather around -3 V when you take into account voltage drops. Of course, he also explains the circuits and dives in deeper, including showing how the oscillations are provided to make the charge pumps work.

If this is anything like [Ken’s] previous explorations, it’ll be the first of a series of posts exploring the 8087. At least that’s what we hope given how he’d previously delighted us with a reverse engineering of the 76477 sound effects chip used in Space Invaders and then went deeper to talk about integrated injection logic (I2L) as used in parts of the chip.

UNINAMI walk cycle

Theo Jansen Invents A Faster, Simpler, Wind-Powered Strandbeest

[Theo Jansen] has come up with an intriguing wind-powered strandbeest which races along the beach with surprising speed and grace. According to [Jansen], it “doesn’t have hinging joints like the classical strandbeests, so they don’t get sand in their joints and you don’t have to lubricate them.” It’s called UMINAMI, which appropriately means “ocean wave” in Japanese.

There are only videos of it in action to go on so far, but a lot can be gleaned from them. To make it easier to keep track of just a single leg, we’ve slowed things down and reddened one of them in the banner animation. Those legs seem to be providing a push but the forward motion is more likely supplied by the sails. The second video below shows it being pulled along by the type of strandbeest we’re all more used to seeing.

What follows is an analysis and best guess about how it works. Or you can just enjoy its graceful undulations in the videos below.

Continue reading “Theo Jansen Invents A Faster, Simpler, Wind-Powered Strandbeest”

Convert printer to WiFi scanner

Converting A 3-in-1 Printer Into A WiFi Scanner, Just Because

[Zaprodk] had trash-picked a defunct HP Envy 450 AIO, a 3-in-1 printer, scanner, and copier. Normally there usually isn’t much use for these unless you’re willing to hunt down the cartridges which it used, so your next step is to dismantle it for parts. That’s what he was going to do but then decided to see if he could remove as much as possible while leaving just the scanner.

Converted WiFi scanner boards

He ran into trouble after he’d “fixed” the lid-open sensor and unplugged pretty much everything. He was getting too many error messages on the LCD panel to reconfigure the WiFi. Luckily he could connect it to his computer using USB and do the configuration from there. One dubious mod involved turning an “unflipped” flexible flat cable into a “flipped” one by doing a little cutting, scraping and gluing. Check out his write-up for the full hack.

Interested in more dumpster hardware recovery? Check out how [Adil Malik] rescued a scope with some reverse engineering and an FPGA. And then there’s how [Matt] turned a dumpster-found WiFi router into a 3D printing server.

Project Orion: Detonating Nuclear Bombs For Thrust

Rockets with nuclear bombs for propulsion sounds like a Wile E. Coyote cartoon, but it has been seriously considered as an option for the space program. Chemical rockets combust a fuel with an oxidizer within themselves and exhaust the result out the back, causing the rocket to move in the opposite direction. What if instead, you used the higher energy density of nuclear fission by detonating nuclear bombs?

Detonating the bombs within a combustion chamber would destroy the vehicle so instead you’d do so from outside and behind. Each bomb would include a little propellant which would be thrown as plasma against the back of the vehicle, giving it a brief, but powerful push.

That’s just what a group of top physicists and engineers at General Atomic worked on between 1958 and 1965 under the name, Project Orion. They came close to doing nuclear testing a few times and did have success with smaller tests, exploding a series of chemical bombs which pushed a 270-pound craft up 185 feet as you’ll see below.

Continue reading “Project Orion: Detonating Nuclear Bombs For Thrust”

Solar powered soap bubble blaster

Hacking A Solar Bubble Blaster With Grandkids

[Fmilburn] was having fun with his grandkids, playing around with a small Radio Shack solar panel, some supercapacitors and a Zener diode when the kids eventually moved on to blowing bubbles with their grandmother. To regain their interest he got an inexpensive battery powered, soap Bubble Blaster and converted it to run on the solar panel and supercapacitors instead.

Supercapacitor power soap bubble blaster voltage
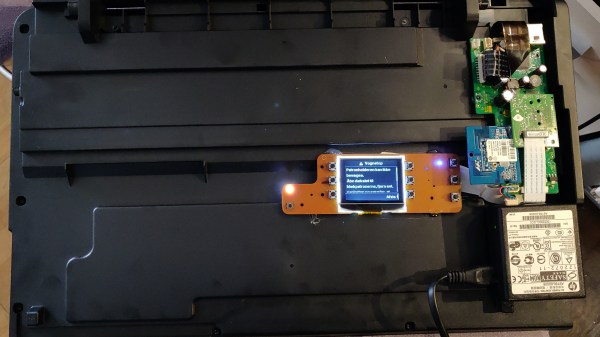
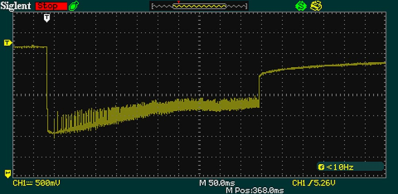
His write-up is a pretty fun read, walking through his process, including an oscilloscope measurement showing how the capacitors’ voltage drops from 5.26 V to 3.5 V when the trigger is pressed, and interestingly, slowly recovers until it’s released a second later, when it then rises back to 4.5 V. He’s even included how he worked out of the panel’s maximum power point (MPP), which is what he was doing when the kids were first lured away to blow soap bubbles. But we’re sure Hackaday readers aren’t as easily distracted.

The resulting Solar Powered Bubble Blaster works quite well. At a starting voltage of 5.23 V, it runs for 15 seconds and then takes only a minute to recharge. Charged batteries would have had a longer runtime but take longer to recharge, an important point when trying to keep kids interested. See it in action in the video below.

Want to instead fill your neighborhood with soap bubbles? Check out this 14,000 BPM (Bubbles Per Minute) 3D printed soap bubble machine. Or maybe something more relaxed is your speed.

Continue reading “Hacking A Solar Bubble Blaster With Grandkids”

Vintage Silverstone Bluetooth speaker

Vintage Silvertone Cabinet Gets Bluetooth Treatment

This Bluetooth speaker is full of delightful surprises. The outer shell is an antique radio cabinet, but its practically empty interior is a combination of Dead Bug circuitry and modern BT receiver.

[PJ Allen] found the BT receiver on Groupon and decided to whip up amplifier and threshold detector circuits using only parts he already had in order to make this vintage-looking Bluetooth speaker. The cabinet is from a Silvertone Model 1955 circa 1936. Don’t worry, no antiques were harmed in the making of this hack, the cabinet was empty when he bought it.

LM4871 based amplifiers

The amplifiers, one per speaker, began life as a circuit from TI’s LM4871  datasheet. Some of the departures came about because he didn’t have the exact component values, even paralleling capacitors to get in the right range. The finished board is a delightful mix of “Dead Bug” and quasi-Manhattan style construction, “quasi” because he carved up the ground plane instead of laying pads on top of it.

Look at the front of the cabinet and you’ll see a rectangular display. Watch the video below and you’ll see that it throbs in time to the music. To do that he came up with a threshold detector circuit which started out based on a circuit from a  Sharp/Optonica cassette tape deck, but to which he made improvements.

Not all cabinets come empty though. Check out this post by our own [Gregory L. Charvat] about restoring these wonderful old radios.

Continue reading “Vintage Silvertone Cabinet Gets Bluetooth Treatment”

Using a Tile as a car tracker

Turning A Tile Into A Car Tracker

A Tile is a small Bluetooth device which you can put on your keychain, for example, so that you can find your keys using an app on your phone. Each Tile’s battery life expectancy is one year and after that year you’re expected to trade it in at a discount for a new one. Right away your hacker senses are tingling and you know what’s coming.

Hacked tile with buck converter

[Luis Rodriguez] had switched to Samsung SmartThings and had accumulated box of these Tiles with dead batteries. So he decided a fun project would be to put a Tile in his wife’s car to track it. Given that it’s using Bluetooth, the range isn’t great for car tracking, but the Tile’s app can network with other user’s apps to widen the search area.

Since the Tile’s battery was dead, he cracked it open and soldered wires to its power terminals. He then found a handy 12 volt source in the car and added a DC to DC buck converter to step the voltage down to the Tile’s 3 volts. Finding a home for the hacked tracker was no problem for [Luis]. He was already using an ODB-II dongle for a dash cam so he tapped into the 12 V rail on that.

You’ll be surprised what you can find by hacking these small tracking devices. Here’s an example of hacking of a fitness tracker with all sorts of goodies inside.

Our thanks to [Maave] for tipping us off about this hack.