Building a gasometer

Building A Gasometer To Store Wood Gas And Other Bio-Fuels

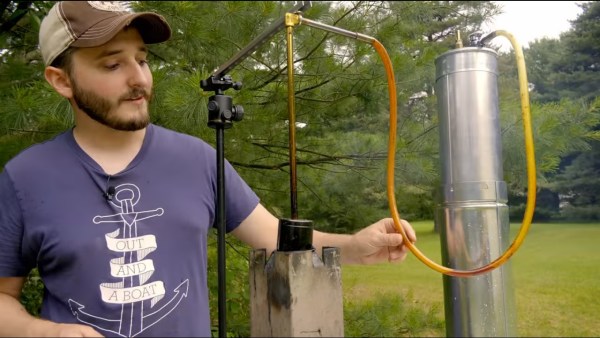
Old solutions are often so elegant and effective that they keep coming back. The gasometer, or gas holder, is one such example. Now [NightHawkInLight] has built one for storing the wood gas he’s been experimenting with, and it’s pretty neat to watch it rise and fall as he first adds gas and then burns it off. The mechanism couldn’t be simpler.

How a gasometer works

For those who, like us, are hearing about this low tech for the first time, gasometers are a means of safely storing gas stemming from the 1700s when gas was king and electricity was little more than a gentleman scientist’s pursuit. In its simplest form, it consists of a container of water with another container filled with gas sitting upside down in the water. Gas pressure is controlled by the weight of the gas-filled container and the water provides a seal, preventing the gas from escaping. Adding gas simply raises the gas-filled container, and removing or using gas lowers it. Simple, safe, and elegant.

We’ll leave the details of how he made his gasometer to the video below, but suffice it to say that his use of a double-walled gas pipe originally intended as a furnace chimney just adds more elegance to this whole hack.

[NightHawkInLight’s] cool projects have graced the pages of Hackaday before. For example, in the area of gas alone there’s his propane-powered plasma rifle, his transparent hybrid rocket engine, and his thermic lance which was hot enough to melt rocks.

Continue reading “Building A Gasometer To Store Wood Gas And Other Bio-Fuels”

Cheetah 3 Is Learning To Move Blindly Before Learning To See

Stand up right now and walk around for a minute. We’re pretty sure you didn’t see everywhere you stepped nor did you plan each step meticulously according to visual input. So why should robots do the same? Wouldn’t your robot be more versatile if it could use its vision to plan a path, but leave most of the walking to the legs with the help of various sensors and knowledge of joint positions?

That’s the approach [Sangbae Kim] and a team of researchers at MIT are taking with their Cheetah 3. They’ve given it cameras but aren’t using them yet. Instead, they’re making sure it can move around blind first. So far they have it walking, running, jumping and even going up stairs cluttered with loose blocks and rolls of tape.

Cheetah 3 jumping 30 inches onto a desk
Jumping 30 inches onto a desk

Two algorithms are at the heart of its being able to move around blind.

The first is a contact detection algorithm which decides if the legs should transition between a swing or a step based on knowledge of the joint positions and data from gyroscopes and accelerometers. If it tilted unexpectedly due to stepping on a loose block then this is the algorithm which decides what the legs should do.

The second is a model-predictive algorithm. This predicts what force a leg should apply once the decision has been made to take a step. It does this by calculating the multiplicative positions of the robot’s body and legs a half second into the future. These calculations are done 20 times a second. They’re what help it handle situations such as when someone shoves it or tugs it on a leash. The calculations enabled it to regain its balance or continue in the direction it was headed.

There are a number of other awesome features of this quadruped robot which we haven’t seen in others such as Boston Dynamics’ SpotMini like invertible knee joints and walking on three legs. Check out those features and more in the video below.

Of course, SpotMini has a whole set of neat features of its own. Let’s just say that while they look very similar, they’re on two different evolutionary paths. And the Cheetah certainly has evolved since we last looked at it a few years ago.

Continue reading “Cheetah 3 Is Learning To Move Blindly Before Learning To See”

Vintage eight transistor stereo amplifier

Eight Transistor Stereo Amplifier From The Days Of Yore

Reading an article about the first transistorized Hi-Fi amplifier, [Netzener] got the itch to make one. But what to use for the starting point? Enter an old Radio Shack P-Box stereo amplifier kit. After a few modernizations and tweaks, the result is an 8-transistor stereo amplifier that’s aesthetically pleasing, sounds great, and is fully documented.

The Radio Shack kit used germanium transistors, but with their high leakage current and low thermal conductivity, he decided to convert it to work with silicon transistors. He also made some improvements to the push-pull bias circuit and limited the high-frequency response. As for the finished product, in true [Netzener] style, he assembled it all to look like the original completed Radio Shack amplifier. He even wrote up a manual which you’d think, as we did at first, was the original one, giving that old, comfortable feeling of reading quality Radio Shack documentation.

Check out the video below where he uses a 9 V battery and half a watt per channel to fill a room with clear, stereo sound.

This isn’t the first Radio Shack kit that [Netzener] has adapted. Check out his single tube radio and classic neon “Goofy Light” box.

Continue reading “Eight Transistor Stereo Amplifier From The Days Of Yore”

Chinese ZKZM-500 laser assault rifle

Chinese Laser AK-47: Myth Or Reality?


Chinese company ZKZM Laser has produced the ZKZM-500 laser assault rifle which people are calling the Chinese AK-47 because of its similar size, weighing in at three kilos (6.6 lbs). Claims of its capabilities, however, are being disputed.

The South China Morning Post writes that the company claims the laser to:

  • be powered by a rechargeable lithium battery back,
  • have a range of 800 meters (0.5 miles),
  • have a beam that is invisible to the eye,
  • be able to fire 1000 “shots”, each no longer than two seconds,
  • be able to burn human flesh if held in place long enough,
  • be able to set fire to clothes and hair, and
  • be able to set fire to banners from a distance.

Burning things with lasers is nothing new but the disputes are mostly based around such a small laser being effective at an 800 meter range. To be fair, while the 800 meter range claim is everywhere, the Post writes that the company brochure says the range is 500 meters (0.3 miles), still quite a long distance.

[styropyro], a YouTuber with a lot of experience with lasers has done an analysis, starting by deducing a wavelength of around 2000 nanometers. He finds that at 800 meters the beam would have dispersed to a diameter of 26 cm (10 inches) and produce 53 W over that area. (EDIT: The 53 W is how much sunlight would produce for that area. In the video he carries the calculations further to work out the minimum power needed, ignoring losses, to light the cotton on fire, 645 W.) For 500 meters, using the same formula we calculate that the dispersion would be a diameter of 16 cm (6 inches) with 500 W spread over that area, which would get uncomfortable very fast, think of half a square meter of sunlight focused down to a circle of that diameter. (EDIT: Again, this it 500 W for sunlight, the laser produces more.) His video doesn’t include enough detail for us to replicate the remainder of the calculations so we’ll just have to go with the 800 meter claim. See the video below for his full analysis. If anyone else has any experience that’ll either support or dispute the claims then please share it with us in the comments.

After all the disputes against their claim, the Chinese company did produce a video firing the laser from a shorter distance. Check it out on this page by the post.

While waiting to see how much truth there is to the Chinese company’s claims we can sit back and enjoy [styropyro’s] home-brew high power ruby laser, both his build and him doing some serious damage with it.

Oh, and don’t try this at home. It’s probably in violation of the Geneva Convention on Certain Conventional Weapons in addition to common sense.

Continue reading “Chinese Laser AK-47: Myth Or Reality?”

3D printed syringe static mixer

This 3D Printed Syringe Static Mixer Does It All

One trick for getting the bubbles out of freshly mixed 2-part epoxy, aka degassing, is to go over it gently with the flame from a propane torch. But both the mixing and degassing take time. [Gianteye] came up with a 3D printed dual-syringe static mixing system which speeds up the process. He used it with silicone to get the difficult steps out of the way quickly for his hands-on soft robotics class, allowing the students to focus more on the matter at hand. But we figure most readers might use it for epoxy.

Mixing tube interior

If you’ve bought those 2-part epoxy syringes available in stores before then you’ll know that they usually come with two syringes, each filled with one of the two parts to be mixed. Depressing the syringes causes each part to come out of its own tube. It’s then your job to mix them together and degas the result.

[Gianteye’s] system consists of 3D printed parts and two syringes.  Models for the 3D printing are available on his Thingiverse page and the syringes can be found online. Some of the 3D printed parts help you first fill and degas the syringes. You then attach a 3D printed mixing tube to the ends of the syringes. This tube serves two purposes. When the syringe’s plungers are depressed, both parts of the material are forced through the tube and extruded out. But on their way through, both parts pass through eight helices which form 180° turns and mix the parts together. Out comes the portioned, mixed and degassed material which can go straight into a mold or to wherever you need it.

The mixing tube was designed for one-time use but [Gianteye] discovered during an evaluation that it can be reused if you pull out any cured material and purge it. The evaluation involved silicone though. With hardened epoxy, you’ll probably have to use a new tube each time.

Check out the full details of his system in the video below, including both assembly and usage.

If you’re looking for a metallic look for something without wanting to cast metal than have a look at our own [Gerrit Coetzee’s] article about cold casting wherein he makes some very nice looking parts.

Continue reading “This 3D Printed Syringe Static Mixer Does It All”

Smart pill with stomach acid _battery

This Smart Pill Uses A Stomach Acid Battery

[Curt White] is working on a smart pill whose copper-zinc battery will use his own stomach acid as the electrolyte. It’s not that unusual of an idea, MIT tested a similar approach in a pig. It’s also better than using lithium ion batteries, something we covered in this PSA.

Smartpill circuit diagram

His starting point is a small, hacked activity tracker with its Nordic nRF51822 ARM Cortex-M0 and Bluetooth LE SoC. Most everything else is removed. The battery electrodes are sewn onto a plastic mesh cut to the activity tracker’s dimensions. Three coin type super capacitors and a boost converter sit between the battery and the SoC.

He uses the Bluetooth LE for communication, sort of. BLE devices constantly transmit information about themselves and it’s this which you see when scanning for available devices. Included in that transmission is a UUID (Universally Unique Identifier) and a name (e.g. “smartpillxyz”). He has the pill transmit data by putting it in that name. This saves power by minimizing the time which the pill’s Bluetooth radio is turned on. The smartphone app extracts the data from these transmissions without ever connecting.

His goal is to monitor the voltage and the maximum current. This will tell him if his stomach acid battery works and what can be powered by it. First tests will use regurgitated gastric fluid and then later he’ll swallow the pill himself. As he puts it, why not, “people swallow and pass all kinds of weird stuff without a problem.” Thay may sound cavalier but judging by his hackaday.io page, he’s doing his homework.

Colorchord steampunk dead bug device

Electronic ColorChord Turns Color Into Sound

[Dr. Cockroach] has delighted us again with another of his circuits on cardboard. He calls it steampunk inspired, and while we guess we can see what he’s getting at, it’s more like a sweet example of artful dead bug construction. He calls it the ColorChord. Point its photo cells at a color and it’ll play a tone or a combination of tones specific to that color.

Three 555-centric boards use thumbtacks as connection points which he solders to, the same technique he used for his cardboard computer. They provide simple tones for red, green, and blue and a mix for any other color. However, he found that the tones weren’t distinguishable enough for similar colors like a bright sun yellow and a reddish yellow. So he ended up pulsing them using master oscillator, master-slave flip-flop, and sequencer circuits, all done dead bug style.

We’re not sure how practical it is but the various pulsed tones remind us of the B space movies of the 1950s and 60s. And as for the look of it, well it’s just plain fun to look at. Hear and see it for yourself in the video below.

And if you want to see some dead bug circuitry as high art then check out this awesome LED ring, this sculptural nixie clock, and perhaps the most wondrous of all, The Clock.

Continue reading “Electronic ColorChord Turns Color Into Sound”