DIY Large Format Book Press Puts On The Pressure

For those in the audience who aren’t well versed in wrangling dead trees, a large press with a lot of clamping pressure can be used for binding books or printing. It can even be used to squeeze the water out of homemade paper. It’s an important tool for anyone looking to make or repair books, but they also tend to be fairly expensive. Which is why [Paul] decided to make his own.

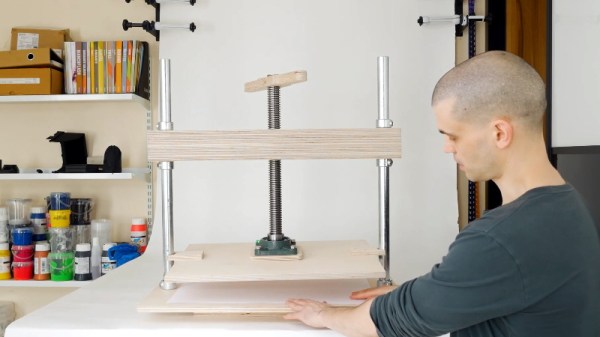
Despite the preconceived notions you might have about the type of guy who binds his own books, it seems like [Paul] is a rather modern fellow. He actually designed the press in CAD and made many of the parts for it on his CNC router. That’s not strictly required, though we do think cutting out the hole for the monstrous lead screw nut would be a bit tricky if you had to do it by hand. But beyond that, the design is pretty straightforward and the video after the break provides a very clear step-by-step guide on how to build your own.

In the past we’ve seen how a similar, if much smaller, book press can be used to make bound books of all those PDFs littering your computer. These sort of projects are getting more rare in an increasingly paperless world, but we always like to see people keeping the old ways alive. If the revolution comes and we end up needing to publish Hackaday on hand-pressed paper, we’ll know who to call.

Continue reading “DIY Large Format Book Press Puts On The Pressure”

Expanding, And Eventually Replacing, The International Space Station

Aboard the International Space Station (ISS), humanity has managed to maintain an uninterrupted foothold in low Earth orbit for just shy of 20 years. There are people reading these words who have had the ISS orbiting overhead for their entire lives, the first generation born into a truly spacefaring civilization.

But as the saying goes, what goes up must eventually come down. The ISS is at too low of an altitude to remain in orbit indefinitely, and core modules of the structure are already operating years beyond their original design lifetimes. As difficult a decision as it might be for the countries involved, in the not too distant future the $150 billion orbiting outpost will have to be abandoned.

Naturally there’s some debate as to how far off that day is. NASA officially plans to support the Station until at least 2024, and an extension to 2028 or 2030 is considered very likely. Political tensions have made it difficult to get a similar commitment out of the Russian space agency, Roscosmos, but its expected they’ll continue crewing and maintaining their segment as long as NASA does the same. Afterwards, it’s possible Roscosmos will attempt to salvage some of their modules from the ISS so they can be used on a future station.

This close to retirement, any new ISS modules would need to be designed and launched on an exceptionally short timescale. With NASA’s efforts and budget currently focused on the Moon and beyond, the agency has recently turned to private industry for proposals on how they can get the most out of the time that’s left. Unfortunately several of the companies that were in the running to develop commercial Station modules have since backed out, but there’s at least one partner that still seems intent on following through: Axiom.

With management made up of former astronauts and space professionals, including NASA’s former ISS Manager Michael Suffredini and Administrator Charles Bolden, the company boasts a better than average understanding of what it takes to succeed in low Earth orbit. About a month ago, this operational experience helped secure Axiom’s selection by NASA to develop a new habitable module for the US side of the Station by 2024.

While the agreement technically only covers a single module, Axiom hasn’t been shy about their plans going forward. Once that first module is installed and operational, they plan on getting NASA approval to launch several new modules branching off of it. Ultimately, they hope that their “wing” of the International Space Station can be detached and become its own independent commercial station by the end of the decade.

Continue reading “Expanding, And Eventually Replacing, The International Space Station”

A Honeycomb Patching Robot Powered By Arduino

No, it’s not the kind of honeycomb you’re probably thinking of. We’re talking about the lightweight panels commonly used in aerospace applications. Apparently they’re rather prone to dents and other damage during handling, so Boeing teamed up with students from the California State University to come up with a way to automate the time-consuming repair process.

The resulting machine, which you can see in action after the break, is a phenomenal piece of engineering. But more than that, it’s an impressive use of off-the-shelf components. The only thing more fascinating than seeing this robotic machine perform its artful repairs is counting how many of its core components you’ve got laying around the shop.

Built from aluminum extrusion, powered by an Arduino Due, and spinning a Dewalt cut-off tool that looks like it was just picked it up from Home Depot, you could easily source most of the hardware yourself. Assuming you needed to automatically repair aerospace-grade honeycomb panels, anyway.

At the heart of this project is a rotating “turret” that holds all the tools required for the repair. After the turret is homed and the condition of all the cutting tools is verified, a hole is drilled into the top of the damaged cell. A small tool is then carefully angled into the hole (a little trick that is mechanical poetry in motion) to deburr the hole, and a vacuum is used to suck out any of the filings created by the previous operations. Finally a nozzle is moved into position and the void is filled with expanding foam.

Boeing says it takes up to four hours for a human to perform this same repair. Frankly, that seems a little crazy to us. But then again if we were the ones tasked with repairing a structural panel for a communications satellite or aircraft worth hundreds of millions of dollars, we’d probably take our time too. The video is obviously sped up so it’s hard to say exactly how long this automated process takes, but it doesn’t seem like it could be much more than a few minutes from start to finish.

Continue reading “A Honeycomb Patching Robot Powered By Arduino”

Multi-Band Receiver On A Chip Controlled By Arduino

The Silicon Labs Si4735 is a single-chip solution for receiving AM, FM, and shortwave radio. With a bit of hacking, it even supports single sideband (SSB). All you’ve got to do is provide it with a suitable control interface, which [Ricardo Lima Caratti] has done with his recent project.

Using an Arduino Pro Mini, a handful of buttons, and a standard TFT display, [Ricardo] has put together a serviceable little receiver with a fairly impressive user interface. We especially like the horizontal bars indicating the signal to noise ratio and received signal strength. The next evolution would be to put this whole rig into some kind of enclosure, but for now he seems content to control the action with a handful of unlabeled buttons on a piece of perfboard.

Of course, the presentation of this receiver isn’t really the point; it’s more of a proof of concept. You see, [Ricardo] is the person who’s actually developed the library that allows you to control the Si4735 from your microcontroller of choice over I2C. He’s currently tested it with several members of the official (and not so official) Arduino family, as well as the ESP32.

The documentation [Ricardo] has put together for his MIT licensed Arduino Si4735 library is nothing short of phenomenal. Seriously, if all open source projects were documented even half as well as this one is, we’d all be a few notches closer to world peace. Even if you aren’t terribly interested in adding shortwave radio reception to your next project, you’ve got to browse his documentation just to see where the high water mark is.

We actually first heard about this library a few days ago when we covered another receiver using the Si4735 and [Ricardo] popped into the comments to share some of the work he’d been doing to push the state-of-the-art forward for this promising chip.

Continue reading “Multi-Band Receiver On A Chip Controlled By Arduino”

ESP32 Rover With PCB Chassis Is Ready To Roll

The microcontrollers are cheap, the sensors are cheap, even the motors are cheap. So why are all the good wheeled robotics platforms so expensive? [Dimitris Platis] wanted to develop an affordable platform for experimenting with rovers, but the cheap plastic chassis he was using gave him all sorts of problems. So he did what any good hacker would do, and built a better version himself.

Interestingly, [Dimitris] decided to go with a chassis made from two PCB panels. The motors, mounted to small angled brackets, bolt directly to the lower PCB. These aren’t your standard $2 DC cans either. Each JGB37-520 gearhead motor comes complete with an encoder that allows your software to determine speed, distance, and direction. The upper PCB connects to the lower with several rows of pin headers, and plays host to whatever electronics payload you might be experimenting with at the time.

For the controller, [Dimitris] says the ESP32 is hard to beat by pretty much any metric you want to use. With integrated wireless and considerable computational power, there’s plenty of options for controlling your little rover either remotely or autonomously. But he also says that every effort has been made to ensure that you could switch out the microcontroller with something else should you want to spin up a customized version.

The whole idea reminds us a bit of quadcopters we’ve seen in the past, where the PCB wasn’t just being used structurally as a place to bolt the motors and hardware to, but actually contained functional traces and components that reduced how much wiring you needed to do. Naturally, this means that any damage to the chassis might cripple the electronics, but presumably, that’s what the big foam bumpers are there for.

[Dimitris] designed this project for educational use, so he assumes you’ll want to build 10 or 12 of these for your whole classroom. In those quantities, he says each bot will cost around $60. If you wanted to reduce the price a bit more, he says swapping the motors would be your best bet as they’re the single most expensive component of the design. That said, $60 for a quality open source rover platform sounds pretty fair to us.

Still too much? You could check out one of the 3D printable rover designs we’ve covered over the years. Or see if you can get lucky and pick up a cheap robot from the clearance rack and hack it.

A Minimal ESP8266 Digital Picture Frame

Over the last few years, the price of a good digital picture frame has dropped to the point that we don’t often see DIY versions anymore. As much as we might hate to admit it, it’s hard to justify building something yourself when the economies of scale have made it so you can buy the final product for less than the cost of the parts themselves. But of course, there are always fringe cases where building it might be the only way to get what you need.

Granted we’re not sure that [Tony Liu] actually needs a 1.8-inch digital picture frame, but we’re sure somebody out there does. The ST7735R display used in this project is a real TFT, so the color and refresh rate is pretty good; but with a resolution of just 128×160, we’d recommend keeping your expectations low in regards to visual fidelity.

What’s really interesting about this project is how low the part count is. All you need is the ST7735R display and the ESP8266 itself (or the development board of your choice, naturally). Even the 3D printed frame is technically optional. The display is driven by SPI, so with the power added in, that’s only eight wires that need to be soldered between the two devices. If you’re looking for an easy way to add a photo slideshow to a small device, say a conference badge, this is about as easy as it gets.

But where are the images coming from? You might think SPIFFS, but in this case [Tony] has converted the images to bitmaps and is loading them into the Arduino Sketch as a header file with PROGMEM. Helpfully, he provides the link for the tool he uses to convert the images into an array the graphics library can understand. This makes adding new images slightly time consuming, but we imagine if you have the need for something like this, it’s probably only showing a pretty specific set of images anyway.

If you’re looking for something bigger, or maybe just an excuse to put that dusty Raspberry Pi to use, you might be interested in one of the more substantial builds we’ve seen over the years.

Continue reading “A Minimal ESP8266 Digital Picture Frame”

DIY Monochrome LCD Hack Doesn’t Go As Planned

Manufacturers of low-cost 3D printers that use the masked stereolithography (MSLA) process are able to build their machines so cheaply because they’re using repurposed smartphone or tablet LCD panels to mask off the UV backlight. Considering the quality you get out of even the entry-level MSLA resin printers, we certainly aren’t complaining about this bit of thrift. But as [Jan Mrázek] explains in a recent blog post, there’s certainly room for improvement.

The problem is that those repurposed LCD panels are, as you’d expect, color displays. After all, even the bottom of the barrel mobile devices moved away from monochrome displays decades ago. But in this case, that’s not what you really want. Since the printer operates on a single wavelength of light, the color filters inside the LCD are actually absorbing light that could otherwise be curing the resin. So an MSLA printer with a monochrome screen would use less energy and print faster. There’s only one problem: it’s not very easy to find high-resolution monochrome displays in the year 2020.

So [Jan] decided to see if he could take a replacement screen intended for his Elegoo Mars MSLA printer and convert it from color to monochrome by disassembling it and manually removing the color filters. If this sounds a bit crazy, that’s because it is. Turns out taking apart an LCD, modifying its internal layout, and putting it all back together in working order is just as difficult as you’d think.

But it was still worth a try. [Jan] pulls the display apart, removes the liquid crystals, scrapes off the color filters, and then puts it all back together again. His first attempt got him a monochrome display that actually worked, but with debris trapped inside the screen, the image was too poor to be useful. He tried again, this time trying harder to keep foreign material out of the crystals. But when he got it back together a second time, he found it no longer functioned. He thinks it’s possible that his attempt to clean up the inside of the display was too aggressive, but really there are so many things that could go wrong here it’s hard to pin down just one.

Long story short, manually creating monochrome displays for low-cost MSLA printers might not be a viable option. Until a better solution comes along, you might be interested in seeing some slightly less invasive ways of improving your resin print quality.