A Slightly Bent ESP8266 Sensor Platform

The ability to get professionally manufactured PCBs, at least small ones, for dirt cheap has had a huge impact on the sort of projects we see around these parts. It’s getting to the point where experimenting with PCB enclosures is not only a way to make your next project stand out, but an economical choice.

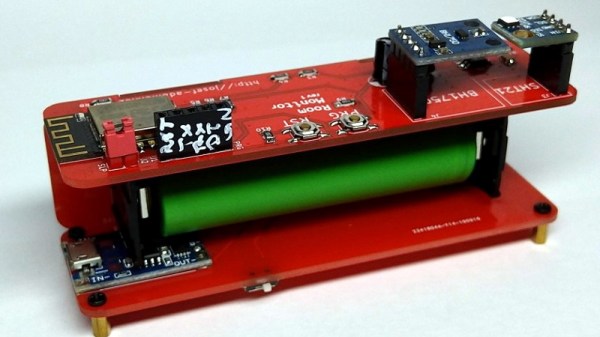
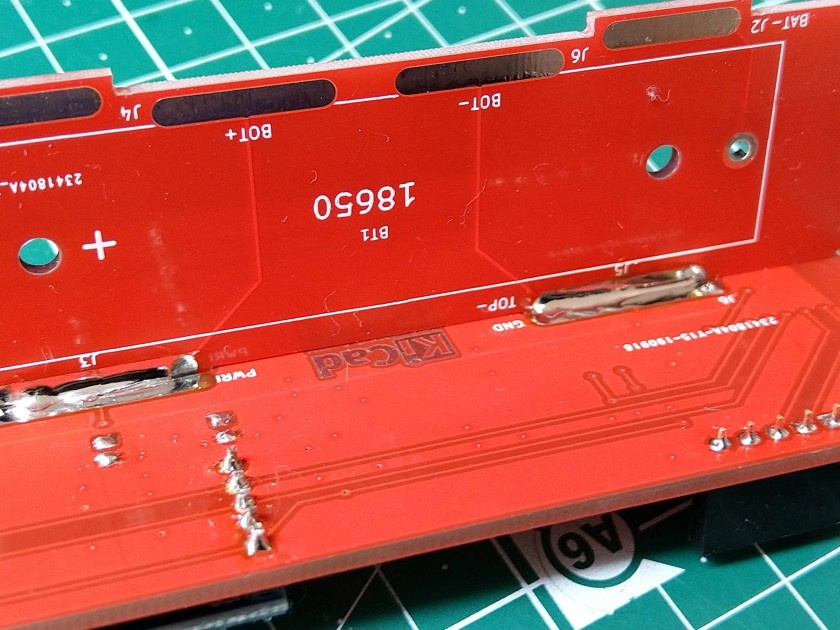
Which is how this ESP8266 sensor gadget from [Josef Adamčík] got its unique “folded over” look. The top panel is where the microcontroller and headers for various sensors live, the bottom panel is home to the TP4056 USB charging module, and the center panel provides mechanical support as well as holds the single 18650 cell. Rather than close the whole thing up with a fourth panel, he decided to leave it open so the battery can easily be removed. Plus, of course, it looks cooler this way.

Could [Josef] have fit all his electronics on a single 100 x 100 PCB and then put the whole thing into a 3D printed enclosure? Well, sure. But that’s been done to death at this point, and besides, he was looking for an excuse to get more comfortable doing PCB design. We think it also makes for a considerably more visual appealing final product than simply taking the “normal” way out.

Currently [Josef] has an SHT21 humidity/temperature sensor and a BH1750 light sensor slotted into the headers on the top side of the device, but they could just as easily be swapped out with something else if you wanted to do something a bit more exciting. We notice that homebrew air quality monitors are becoming increasingly popular.

Building bespoke enclosures from PCBs is a fantastic trick that frankly we’d love to see more of. It’s somewhat of an artform in itself, but if you’re willing to put the effort in to do it right the results can be truly phenomenal.

A Replica From WarGames, But Not The One You Think

Remember the WOPR from WarGames? The fictional supercomputer that went toe-to-toe with Matthew Broderick and his acoustic coupler was like a love letter to the blinkenlight mainframes of yesteryear, and every hacker of a certain age has secretly yearned for their own scaled down model of it. Well…that’s not what this project is.

The [Unexpected Maker] is as much a WarGames fan as any of us, but he was more interested in recreating the red alphanumeric displays that ticked along as the WOPR was trying to brute force missile launch codes. These displays, complete with their thoroughly 1980s “computer” sound effects, were used to ratchet up the tension by showing how close the supercomputer was to kicking off World War III.

The display as it appeared in the film.

Of course, most us don’t have a missile silo to install his recreated display in. So when it’s not running through one of the randomized launch code decoding sequences, the display doubles as an NTP synchronized clock. With the retro fourteen segment LEDs glowing behind the smoked acrylic front panel, we think the clock itself is pretty slick even without the movie references.

Beyond the aforementioned LEDs, [Unexpected Maker] is using a ESP32 development board of his own design called the TinyPICO. An associated audio “Shield” with an integrated buzzer provides the appropriate bleeps and bloops as the display goes through the motions. Everything is held inside of an understated 3D printed enclosure that would look great on the wall or a desk.

Once you’ve got your launch code busting LED clock going in the corner, and your illuimated DEFCON display mounted on the wall, you’ll be well on the way to completing the WarGames playset we’ve been dreaming of since 1983. The only way to lose is to not play the game! (Or something like that…)

Continue reading “A Replica From WarGames, But Not The One You Think”

Retro PowerBook Gets A Mac Mini Transplant

Around these parts, seeing a classic laptop or desktop computer get revived with the Raspberry Pi is fairly common. While we’re not ones to turn down a well-executed Pi infusion, we know they can be controversial at times. There’s an impression that such projects are low-effort, and that the combination of old and new tech gains little in the way of usability due to the usability quirks of the Pi itself.

But we think even the most critical in the audience will agree that this build by [Tylinol], which sees the internals of a circa 1993 PowerBook 165c get replaced with that of a 2014 Mac Mini, is something else entirely. For one thing, there’s no question that packing a modern (relatively) desktop computer motherboard into a laptop’s body takes a lot more planning and effort than hot gluing the comparatively tiny Pi into the same space. Plus as an added bonus, anyone who counts themselves among the Cult of Mac will be happy to see the vintage machine retain its Cupertino pedigree.

So how do you get a Mac Mini inside of a PowerBook? Very carefully. As explained by [Tylinol], the inside of the PowerBook’s case was coated in graphite and conductive enough to be a problem. So after the original hardware was removed, a layer of tape was added to insulate it; though we imagine a suitably thick spray-on coating could be used as well if you don’t have that kind of patience.

Once the case was gutted and insulated, [Tylinol] added new stand-offs to mount the Mac Mini motherboard and hard drive. For anyone wondering, the 2014 model was used because the shape of the board almost perfectly fits around the trackball PCB. A board from a newer Mac could be used, but it would likely mean using an external mouse.

Which would have been a problem for [Tylinol], because one of the main goals of this build was to get the original input working. That meant adapting the Apple Desktop Bus (ADB) devices to USB, which turns out to be something of a Dark Art. But with the help of some contemporary information about the long-forgotten protocol and a Teensy 3.5, both devices are now picked up as standard USB HID.

But of course, that’s just scratching the surface. [Tylinol] also had to figure out how to swap the original display out for a modern panel, and then get the whole thing running on internal battery power. Even if you’re not particularly interested in retro Apple hardware, this is really a phenomenal build that deserves a thorough read-through.

For those of you who don’t mind getting a Pi in a PowerBook, we recently saw a recreation of Lord Nikon’s laptop from Hackers that went that route.

A Luggable Computer For The Raspberry Pi Era

Today, computers are separated into basically two categories: desktops and laptops. But back in the early 1980s, when this ideological line in the sand was still a bit blurry, consumer’s had a third choice. Known as “portable computers” at the time, and often lovingly referred to as luggables by modern collectors, these machines were technically small enough to take with you on a plane or in the car.

Improvements in miniaturization ultimately made the portable computer obsolete, but that doesn’t mean some people still don’t want one. [Dave Estes] has been working on his own modern take on idea that he calls Reviiser, and so far it looks like it checks off all the boxes. With the addition of a rather hefty battery pack, it even manages to be more practical than the vintage beasts that inspired it.

In the video after the break, [Dave] walks us through some of the highlights of his luggable build, such as the fold-down mechanical keyboard, gloriously clunky mechanical power switches, and the integrated touch screen. We also really like the side-mounted touch pad, which actually looks perfectly usable given the largely keyboard driven software environment [Dave] has going on the internal Raspberry Pi 4. With a removable 30,000 mAh battery pack slotted into the back of the machine, he’ll have plenty of juice for his faux-retro adventures.

[Dave] mentions that eventually he’s looking to add support for “cartridges” which will allow the user to easily slot in new hardware that connects to the Pi’s GPIO pins. This would allow for a lot of interesting expansion possibilities, and fits in perfectly with the Reviiser’s vintage aesthetic. It would also go a long way towards justifying the considerable bulk of the machine; perhaps even ushering in a revival of sorts for the luggable computer thanks to hardware hackers who want a mobile workstation with all the bells and whistles.

Right now there isn’t a lot of detail on how you can build your own Reviiser, but [Dave] says more info will be added to his site soon. In the meantime, you can check out some of the similar projects we’ve seen recently to get some inspiration for your own Luggable Pi.

Continue reading “A Luggable Computer For The Raspberry Pi Era”

Hiking Pole Turned Lightweight Yagi Antenna

Among amateur radio enthusiasts, there’s a subset of users who climb mountainous areas to use their gear from elevated positions. Anyone looking to take part in what’s known as Summits on the Air (SOTA) will obviously want to keep their equipment as light and small as possible. For [Stuart Thomas], that meant a collapsible yagi antenna he could easily pack away.

But one day he wondered why he was carrying around a separate antenna boom when his aluminum hiking pole would make a perfectly good substitute. All he had to do was figure out a way to mount the elements to the pole in a way that could be easily assembled in the field. He initially tried to use the sort of insulated electrical clamps used to hold down conduit, but he found they weren’t quite what he was after.

[Stuart] eventually ended up designing and 3D printing his own element mounts that use an M3 bolt to tightly clamp onto the hiking pole, preventing them from twisting while still being very lightweight and easy to adjust. To further reduce the packed size of the antenna, he cut each element in half with a pipe cutter and flared the ends slightly so he could reassemble them on location with inserts.

Even if you aren’t the type of person who owns hiking poles, let alone climbs mountains for fun, there’s still plenty of interesting applications for a lightweight yagi antenna. We’ve seen custom yagis built out of carbon fiber before and of course cobbling one together out of PVC and tape measures is a classic hack, but we think the solution [Stuart] has come up with strikes a nice balance between the extremes.

Continue reading “Hiking Pole Turned Lightweight Yagi Antenna”

Mini Space Station Keeps Tabs On The Real One

Over the years, we’ve seen a number of projects that can blink an LED or otherwise notify you when the International Space Station is overhead. It’s a neat trick that brings space a little closer to home, but not exactly a groundbreaking achievement in 2020. That said, we think this version built by [Lance] deserves some special recognition for the unbearably adorable miniature ISS he designed it around.

Especially once you realize that its tiny little solar panels are actually functional. Well, more or less. [Lance] says conditions have to be pretty ideal for the panels to actually charge up the internal battery, so there’s the option to top things off with a USB cable if need be. To try and reduce power consumption as much as possible, he uses some pretty aggressive power saving tricks which are interesting in their own right.

As the ISS silently passes over your head several times per day, the notifier can’t spend too much time sleeping on the job. The Particle Photon needs to wake up regularly to pull down the time of the next pass given the current geographical position, then go back to sleep until right before showtime. When the Station is nearby, it blinks an Adafruit Smart NeoPixel positioned under a small 3D printed model of the Earth, and finally goes back to sleep until the process starts over.

If you’re looking for something a little less complicated, this two dimensional representation of the Space Station might be more your speed. Then again, an even more complicated take on the idea using lasers sounds pretty good too.

Making Custom 3D Printed Slide Switches

For a little over a year now we’ve been covering the incredible replicas [Mike Gardi] has been building of educational “computers” from the very dawn of the digital age. These fascinating toys, many of which are now extremely rare, are recreated using 3D printing and other modern techniques for a whole new generation to enjoy and learn from.

He’s picked up a trick or two building these replicas, such as this method for creating bespoke slide switches with a 3D printer. Not only does this idea allow you to control a custom number of devices, but as evidenced in the video after the break, the printed slider sounds absolutely phenomenal in action. Precisely the sort of “clunk” you want on your front panel.

Of course, [Mike] doesn’t expect anyone to create this exact switch. He’s designed it as part of his Working Digital Computer (WDC-1) project that he’s documenting on Hackaday.io, so it has a rather specific set of design parameters. But with the steps he outlines in the write-up, you should have no problem adapting the concept to fit your specific needs.

So how does it work? One half of the switch is a track is printed with indents for both reed switches and 6 x 3 mm disc magnets. The other is a small shuttle that itself has spaces for two of the same magnets. When it slides over the reed switches they’re activated by the magnet on one side, while the magnet on the other side will be attracted to the one embedded into the track. This not only gives the switch detents that you can feel and hear while moving it, but keeps the shuttle from sliding off the intended reed switch.

If you like this, you’ll absolutely love his mostly 3D printed binary encoder that we featured recently. With his track record, we’re excited to follow the WDC-1 project as it develops, and thrilled that [Mike] has brought it to Hackaday.io.

Continue reading “Making Custom 3D Printed Slide Switches”