A Tiny IDE For Your ATtiny

When writing code for the ATtiny family of microcontrollers such as a the ATtiny85 or ATtiny10, people usually use one of two methods: they either add support for the chip in the Arduino IDE, or they crack open their text editor of choice and do everything manually. Plus of course there are the stragglers out there using Eclipse. But [Wayne Holder] thinks there’s a better way.

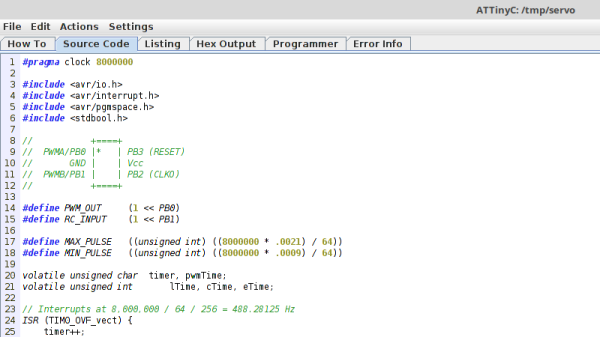
The project started out as a simple way for [Wayne] to program the ATtiny10 in C under Mac OS, but has since evolved into an open source, cross-platform integrated development environment (IDE) for programming a wide range of ATtiny chips in C, C++, or Assembly. Not only does it integrate the source code editor and programmer, but it even bundles in documentation for common variants of the chips including block diagrams and pinouts; making it a true one-stop-shop for ATtiny hacking.

His IDE runs under Java, including OpenJDK, and [Wayne] provides a stable pre-built executable for those who don’t want to clone the whole GitHub repository. He’s included the GNU/AVR toolchains, though notes that testing so far has been limited to Mac OS, and he’s interested in feedback from Windows and Linux users. Assembly is done either with GNU AVR-AS, or an assembler of his own design, though the latter is currently limited to the ATTiny10.

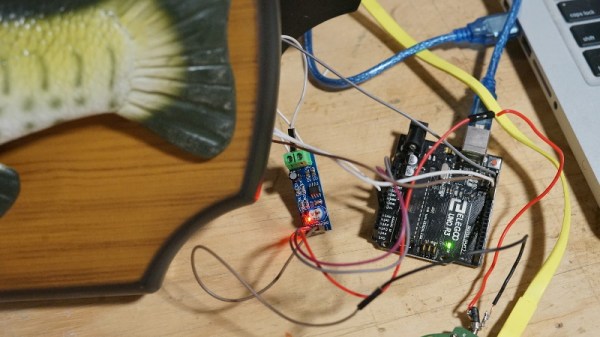
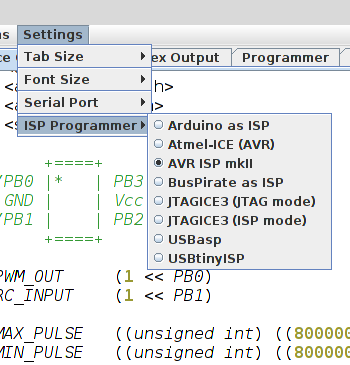
To actually get the code onto the chip, the IDE supports using the Arduino as a programmer as well as dedicated hardware like the BusPirate or the USBasp. If you go the Arduino route, [Wayne] has even come up with a little adapter board which he’s made available through OSH Park to help wrangle the diminutive chips.

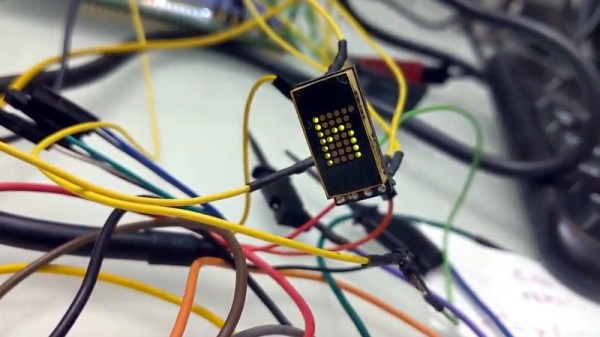
The ATtiny10 might have something of a learning curve, but in exchange this family of tiny microcontrollers offers an incredible amount of capability. When you’re working with what’s essentially a programmable grain of rice, the only limit is your own creativity.

A Crash Course In 3D Printed Venturi Pumps

Venturi pumps, commonly referred to as aspirators, are a fantastic way of moving around things which you might not want spinning around inside of a pump, and one of the easiest ways to create a vacuum. According to his research, [Tuval Ben Dosa] believed such a device would be a good way to move corrosive gasses which would normally eat up a blower fan; all he had to do was figure out how to 3D print one to his specifications.

Put simply: if you take a “T” shaped pipe and pass a fluid (such as air or water) through the straight section, a vacuum will be created on the shorter side due to the Venturi effect. As long as you don’t mind the substance you wish to pump getting mixed into your working fluid, it’s a simple way to bring something “along for the ride” as the fluid makes its way through the pipe.

[Tuval] needed a way to remove the chlorine gasses produced by his PCB etching station, and an aspirator seemed like the perfect solution. He just needed to pump clean air through a Venturi, which would suck up the chlorine gas on the way through, and ultimately carry it outside. But he soon found that while a pump based on the Venturi effect is simple conceptually, getting it to work in the real world is a bit trickier. Especially when you’re dealing with something like 3D printing, which brings in its own unique challenges.

He tried modeling a few designs he found online in 3D and printing them out, but none of them worked as expected. The most common problem was simply that no vacuum was being generated, air was freely moving out of both sides. While [Tuval] doesn’t claim to have any great knowledge of fluid dynamics, he reasoned that the issue was due to the fact that most Venturi pumps seem designed to move water rather than air. So he designed a new version of the pump which had a more pronounced nozzle on the inlet surrounded by a cavity in which the gases could mix.

His modified design worked, and now anyone with a 3D printer can run off their own Venturi device for quickly and easily giving potentially harmful fumes or gases the boot. If this is one of those things you’d feel more comfortable buying than building, don’t worry, we’ve previously covered using a low-cost aspirator as a vacuum source in the home lab.

The Blackest Black, Now In Handy Pocket Size

If you thought “carbon nanotubes” were just some near-future unobtainium used in space elevators, don’t worry, you certainly aren’t alone. In reality, while the technology still has a way to go, carbon nanotube production has already exceeded several thousand tons per year and there are products you can buy today that are using this decidedly futuristic wonder material. Now there’s even one you can put in your pocket.

Created by [Simon], a designer in the UK, this small carbon nanotube array is described as “A simulated black hole” because the surface absorbs 99.9% of the visible light that hits it. Protected by a clear acrylic case, the sample of the material makes a circle that’s so black it gives the impression you’re looking into deep space. Unfortunately, no time-dilating gravitational forces are included at any of level of support in the ongoing Kickstarter campaign; but considering it was 100% funded in just a few hours, it seems like most people are OK with the trade-off.

[Simon] is well aware of the ongoing war between different methods of creating the “Blackest Black”, and he thinks he’s put his money (and by extension, his backer’s) money on the winner. Singularity is using a similar technology to the exclusively-licensed Vantablack, rather than a super-dark paint like “Black 3.0”. In fact he’s so confident that Singularity will appear darker than Black 3.0 that he mentions a head-to-head comparison is currently in the works.

If there’s a downside to the carbon nanotube array used in Singularity, it’s that you can’t actually touch it. [Simon] warns that while the acrylic case is only held together with magnets and can be opened for more careful inspection, actually touching the surface is absolutely not recommended. He says that even dust getting on the material is going to adversely effect its ability to absorb light, so you should really keep it buttoned up as much as possible.

While the Singularity looks like an interesting way to experience near perfect blackness, the concept itself is far from a novelty. A material that can absorb essentially all the light that hits it has important scientific, military, and of course artistic applications; so figuring out how to pull it off has become a pretty big deal.

State Of The Art Big Mouth Alexa Bass

Hackers seem intent on making sure the world doesn’t forget that, for a brief shining moment, everyone thought Big Mouth Billy Bass was a pretty neat idea. Every so often we see a project that takes this classic piece of home decor and manages to shoehorn in some new features or capabilities, and with the rise of voice controlled home automation products from the likes of Amazon and Google, they’ve found a new ingredient du jour when preparing stuffed bass.

[Ben Eagan] has recently completed his entry into the Pantheon of animatronic fish projects, and while we’ll stop short of saying the world needed another Alexa-enabled fish on the wall, we’ve got to admit that he’s done a slick job of it. Rather than trying to convince Billy’s original electronics to play nice with others, he decided to just rip it all out and start from scratch. The end result is arguably one of the most capable Billy Bass updates we’ve come across, if you’re willing to consider flapping around on the wall an actual capability in the first place.

The build process is well detailed in the write-up, and [Ben] provides many pictures so the reader can easily follow along with the modification. The short version of the story is that he cuts out the original control board and wires the three motors up to an Arduino Motor Driver Shield, and when combined with the appropriate code, this gives him full control over Billy’s mouth and body movements. This saved him the trouble of figuring out how to interface with the original electronics, which is probably for the better since they looked rather crusty anyway.

From there, he just needed to give the fish something to get excited about. [Ben] decided to connect the 3.5 mm audio jack of an second generation Echo Dot to one of the analog pins of the Arduino, and wrote some code that can tell him if Amazon’s illuminated hockey puck is currently yammering on about something or not. He even added a LM386 audio amplifier module in there to help drive Billy’s original speaker, since that will now be the audio output of the Dot.

A decade ago we saw Billy reading out Tweets, and last year we presented a different take on adding an Alexa “brain” to everyone’s favorite battery powered fish. What will Billy be up to in 2029? We’re almost too scared to think about it. Continue reading “State Of The Art Big Mouth Alexa Bass”

Cheap Power Over Ethernet For The ESP32

While most projects we see with the ESP32 make use of its considerable wireless capabilities, the chip can be connected to the wired network easily enough should you have the desire to do so. [Steve] liked the idea of putting his ESP32s on the wired network, but found the need for a secondary power connection burdensome. So he took it upon himself to modify some cheap Power Over Ethernet (PoE) hardware and create a single-cable solution (Google Translate).

[Steve] bought a PoE module intended for security cameras and ran a close eye over the board to figure out what kind of hardware it was using to generate the nominal 12 V output. He identified an MP2494 step-down converter, and with the datasheet in hand found how the output voltage is configured by changing the values of resistors in the circuit. Swapping out the stock 21.5 kΩ resistor for a 57.1 kΩ one changed the output of the converter to the 5 V necessary for his electronics.

But of course that was only half of the problem solved; he still had to connect the Ethernet side of the PoE device to the Waveshare LAN8720 board that’s providing Ethernet for the ESP32. So he removed the RJ45 jack from the LAN8720 completely, and wired that directly to the connector on the PoE board. Helpfully, the PoE board had all the pins labeled on the bottom side so this wasn’t nearly as tricky to figure out as you might expect (if only it was always that easy).

We’ve previously covered the Waveshare LAN8720 board for anyone who’s interested in the ins and outs of getting their ESP32 talking Ethernet. If you’re wondering how you can put PoE to work for you, our very own [Jonathan Bennett] has been showing off his home Raspberry Pi infrastructure which makes extensive use of the new PoE hat.

Modernizing A Soviet-era LED Matrix

Used in everything from calculators to military hardware, the 3LS363A is an interesting piece of vintage hardware. With a resolution of 5 x 7 (plus a decimal point), the Soviet-made displays contain no electronics and are simply an array of 36 green LEDs. It’s not hard to drive one of them in a pinch, but [Dmitry Grinberg] thought this classic device deserved a bit better than the minimum.

He’s developed a small board that sits behind the 3LS363A and allows you to control it over I2C for a much more modern experience when working with these vintage displays. Powered by the ATtiny406, his adapter board makes it easy to chain the modules together and even handles niceties like flipping the displayed image to account for different mounting positions. While most of us probably won’t have the chance to play around with these relatively rare displays, there’s still plenty of useful information here if you’re thinking of creating your own I2C gadgets.

In his write-up, [Dmitry] explains his rationale behind the design and some of the quirks of working with the display. For example he explains how he gave each column of the display its own FET, but to save space on the board ended up running the single decimal point (technically its own column) directly off of a spare GPIO pin. Relying on the low duty cycle, he even left current limiting resistors off the design. The end result is a tiny board that keeps the same footprint of the 3LS363A itself.

[Dmitry] went all out with developing the firmware for his new “smart” 3LS363A displays, and has written up documentation for the different commands he has implemented. From re-configuring the I2C address to updating the firmware, he’s made sure no stone was left unturned for this project. We’re not ones to shy away from a quick and dirty code, but it’s always nice to see when somebody has really put some thought into the software side of a project.

We’ve seen our fair share of oddball Soviet displays here at Hackaday, utilizing everything from heavy duty incandescent bulbs to remarkably tiny “intelligent” LEDs. While it’s unlikely any of them will dethrone the nixie as king of the retro display devices, it’s always interesting to see unusual hardware being used in the wild.

Operation Backfire: Witness To The Rocket Age

As the prospects for Germany during the Second World War began to look increasingly grim, the Nazi war machine largely pinned their hopes on a number of high-tech “superweapons” they had in development. Ranging from upgraded versions of their already devastatingly effective U-Boats to tanks large enough to rival small ships, the projects ran the gamut from practical to fanciful. After the fall of Berlin there was a mad scramble by the Allied forces to get into what was left of Germany’s secretive development facilities, with each country hoping to recover as much of this revolutionary technology for themselves as possible.

V-2 launch during Operation Backfire

One of the most coveted prizes was the Aggregat 4 (A4) rocket. Better known to the Allies as the V-2, it was the world’s first liquid fueled guided ballistic missile and the first man-made object to reach space. Most of this technology, and a large number of the engineers who designed it, ended up in the hands of the United States as part of Operation Paperclip. This influx of practical rocketry experience helped kick start the US space program, and its influence could be seen all the way up to the Apollo program. The Soviet Union also captured V-2 hardware and production facilities, which subsequently influenced the design of their early rocket designs as well. In many ways, the V-2 rocket was the spark that started the Space Race between the two countries.

With the United States and Soviet Union taking the majority of V-2 hardware and personnel, little was left for the British. Accordingly their program, known as Operation Backfire, ended up being much smaller in scope. Rather than trying to bring V-2 hardware back to Britain, they decided to learn as much as they could about it in Germany from the men who used it in combat. This study of the rocket and the soldiers who operated it remains the most detailed account of how the weapon functioned, and provides a fascinating look at the incredible effort Germany was willing to expend for just one of their “superweapons”.

In addition to a five volume written report on the V-2 rocket, the British Army Kinematograph Service produced “The German A.4 Rocket”, a 40 minute film which shows how a V-2 was assembled, transported, and ultimately launched. Though they are operating under the direction of the British government, the German soldiers appear in the film wearing their own uniforms, which gives the documentary a surreal feeling. It could easily be mistaken for actual wartime footage, but these rockets weren’t aimed at London. They were being fired to serve as a historical record of the birth of modern rocketry.

Continue reading “Operation Backfire: Witness To The Rocket Age”