Fail Of The Week: Careful Case Mod Is All For Naught

Today’s entry comes to us from [Robert Tomsons], who was kind enough to document this crushing tale of woe so that we might all learn what true heartbreak is. If you’ve ever toiled away at getting that perfect surface finish with body filler, this one is going to hurt. In fact, you might just want to hit that “Back” button and head to safety now. There’s probably a pleasant story about some 3D printed thing being used with a Raspberry Pi of some sort that you can read instead.

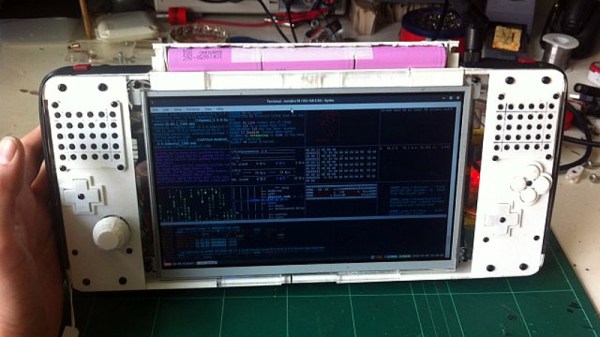
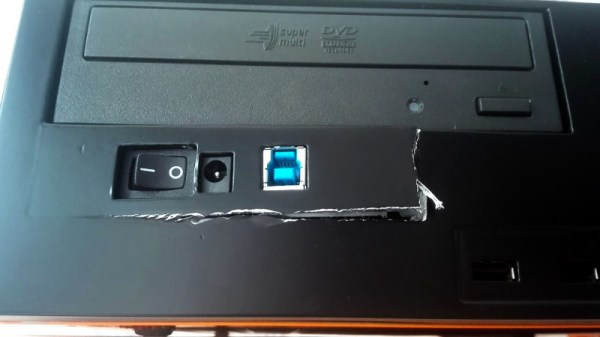
For those of you brave enough to continue on, today we’ll be looking at what [Robert] thought would be a simple enough project. Seeing the board from a USB 3.0 external hard drive kicking around his parts bin, he had a rather unusual idea. Wanting to add an extra drive to his computer, but liking the idea of being able to independently control its power, he decided to integrate the external drive into machine’s front panel. This would not only allow him to power off the secondary drive when not in use, but it meant he could just plug his laptop into the front panel if he wanted to pull files off of it.

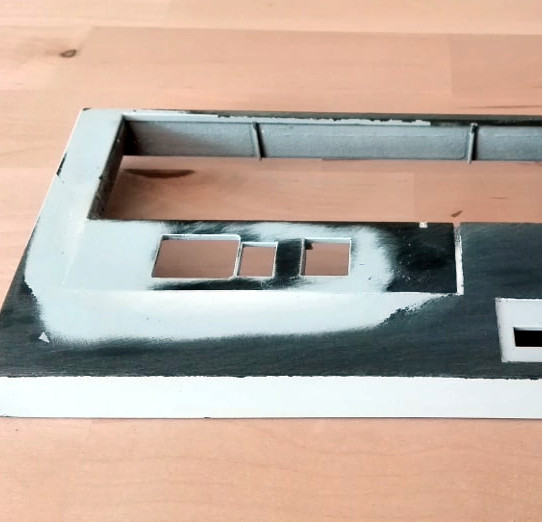
All [Robert] needed to do was make it look nice. He carefully squared off the edges of the external drive’s back panel to roughly the size of the computer’s 3.5 inch drive bay opening. He then glued the piece in place, and began the arduous task of using body filler to smooth everything out. It’s a dance that many a Hackaday reader will know all too well: filler, sand, primer, sand, filler, sand, primer, sand, so on and so on. In the end, the final result looked perfect; you’d never have thought the front panel wasn’t stock.

It should have been so easy. Just snap the case back together and be done with it. But when [Robert] finally got the machine buttoned back up and looked at the front, well, it’s safe to say his day couldn’t get much worse. Maybe the glue was not up to the task. Perhaps it was how excited he was to get the case put back together; a momentary loss of muscular coordination. A few extra foot-pounds of energy per second, per second. Who can say?

[Robert] says he’ll return to the project, but for now he needs a break. We agree. Interestingly, he mentions in his post that his body filler work was inspired by [Eric Strebel], a name that is well known around these parts. Considering how good it looked before it exploded, we’ll consider that high praise.

Hacked LCD Shutter Glasses See The Light

It’s always a little sad to see a big consumer technology fail. But of course, the upside for us hacker types is that the resulting fire sale is often an excellent source for hardware that might otherwise be difficult to come by. The most recent arrival to the Island of Unwanted Consumer Tech is 3D TV. There was a brief period of time when the TV manufacturers had nearly convinced people that sitting in their living room wearing big dorky electronic glasses was a workable solution, but in the end we know how it really turned out.

Those same dorky glasses are now available for a fraction of their original price, and are ripe for hacking. [Kevin Koster] has been playing around with them, and he’s recently came up with a circuit that offers the wearer a unique view of the world. Any reflective surface will look as though it is radiating rainbows, which he admits doesn’t show up as well in still images, but looks cool enough that he thought it was worth putting the board into production in case anyone else wants in on the refraction action.

To explain how it works, we need to take a couple of steps back and look at the mechanics of the LCD panels used in these type of glasses. At the risk of oversimplification, one could say that LCDs are sort of like capacitors: when charged the crystals align themselves in such a way that the polarization of the light passing through is changed. Combined with an external polarization filter, this has the end result of turning the panel opaque. To put the crystals back in their original arrangement, and let the light pass through again, the LCD panel is shorted out in the same way you might discharge a capacitor.

What [Kevin] found was that if he slowly discharged the LCD panel rather than shorting it out completely, it would gradually fade out instead of immediately becoming transparent. His theory is that this partial polarization is what causes the rainbow effect, as the light that’s passing through to the wearers eyes is in a “twisted” state.

[Kevin] has provided all of the information necessary to build your own “Rainbow Adapter”, but you can also purchase a kit or assembled board from Tindie. If you’re looking for other projects to make use of those 3D glasses collecting dust, how about turning them into automatic sunglasses or having a go at curing your lazy eye.

You Can Now Buy A Practical Gauss Gun

Occasionally we come across a piece of information which reminds us that, while flying cars are still nowhere to be found, we’re definitely living in the future. Usually it’s about some new application of artificial intelligence, or maybe another success in the rapidly developing field of private spaceflight. But sometimes it’s when you look at a website and say to yourself: “Oh cool, they have 1.5kW electromagnetic accelerators in stock.”

Arcflash Labs, a partnership between [David Wirth] and [Jason Murray], have put their EMG-01A Gauss gun up for sale for anyone who’s brave enough and willing to put down $1,000 USD on what’s essentially a high-tech BB gun. The creators claim it obtains an efficiency of 6.5% out of its RC-style 6S LiPo battery pack, which allows it to fire over 100 rounds before needing to be recharged. Firing 4.6g steel projectiles at a rather leisurely 45 m/s, this futuristic weapon would be more of a match for tin cans than invading alien forces, but at least you’ll be blasting those cans from a position of supreme technical superiority.

The EMG-01A builds on the work of the team’s previous experiments, such as the semi-automatic railgun we covered last year. They’ve made the device much smaller and lighter than their previous guns, as well as worked on making them safer and more reliable. That said, the page for the EMG-01A has a number of warnings and caveats that you won’t see on the back of a Red Ryder BB gun box; it’s certainly not a toy, and anyone who takes ownership of one needs to be respectful of the responsibility they’re taking on.

Speaking of which, who can actually buy one of these things? The Arcflash Labs site makes it clear they will only ship to the United States, and further gives a list of states and cities were they can’t send a completed gun. Essentially they are following the same laws and guidelines used for shipping air guns within the US, as they believe that’s a fair classification for their electromagnetic guns. Whether or not the ATF feels the same way is unclear, and it should be interesting to see what kind of legal response there may be if Arcflash Labs starts moving enough units.

If you’d like to wage warfare on your recyclables without spending quite so much cash, you can always build your own for less. Or nearly nothing, if you want to go the full MacGyver route.

Continue reading “You Can Now Buy A Practical Gauss Gun”

Old Laptop? Mobile X86 Game System!

Between smartphones and tablets, computing is becoming increasingly mobile in nature. It used to be that everyone had a desktop computer, then laptops became the norm, and now many people don’t have anything beyond their mobile device. Unless you’re the kind of person who actually needs the power and versatility offered by a “real” computer, mobile devices are simply a more convenient option to browse the web and consume content.

But what if your needs are somewhere in the middle? You want an x86 computer and full operating system, but you also want something that’s more mobile than a tablet? If you’re like [mnt], you take an old Atom laptop that’s on its last legs and rebuild it as the Hacktop.

[mnt] describes the Hacktop as an “Emergency Gaming/Hacking Station”, and says he uses it everywhere he goes. Inspired by his Nintendo DSi, gaming controls are front-and-center on the Hacktop and he uses the machine to play everything from Half-Life to classic emulators.

But the Hacktop is capable of more than just playing Amiga games. The hand-soldered QWERTZ keyboard can be used with his thumbs, and the D-Pad doubles as the cursor keys. There’s a laptop touch pad on the back of the case, and the ten-inch LCD display is a touch screen as well. Definitely no shortage of input devices on this thing. It’s also packing some interesting special features, such as integrated RTL-SDR and LIRC hardware for mobile exploration and experimentation. [mnt] says the nine-cell battery should keep it alive and kicking for twelve hours or so, but it of course depends on what kind of stuff he gets into while out and about.

Hackers have been building their own mobile devices for a long time, and we’re always struck by the creative approaches individuals take compared to the rather cookie-cutter world of mobile consumer technology.

ERRF 18: Slice Engineering Shows Off The Mosquito

With few exceptions, it seemed like every 3D printer at the first inaugural East Coast RepRap Festival (ERRF) was using a hotend built by E3D. There’s nothing inherently wrong with that; E3D makes solid open source products, and they deserve all the success they can get. But that being said, competition drives innovation, so we’re particularly interested anytime we see a new hotend that isn’t just an E3D V6 clone.

The Mosquito from Slice Enginerring is definitely no E3D clone. In fact, it doesn’t look much like any 3D printer hotend you’ve ever seen before. Tiny and spindly, the look of the hotend certainly invokes its namesake. But despite its fragile appearance, this hotend can ramp up to a monstrous 500 C, making it effectively a bolt-on upgrade for your existing machine that will allow you to print in exotic materials such as PEEK.

We spent a little time talking with Slice Engineering co-founder [Dan], and while there’s probably not much risk it’s going to dethrone E3D as the RepRap community’s favorite hotend, it might be worth considering if you’re thinking of putting together a high-performance printer.

Continue reading “ERRF 18: Slice Engineering Shows Off The Mosquito”

3D Printed Arduino Bot Is Limbo Master

As if we didn’t have enough to worry about in regards to the coming robot uprising, [Ali Aslam] of Potent Printables has recently wrapped up work on a 3D printed robot that can flatten itself down to the point it can fit under doors and other tight spaces. Based on research done at UC Berkeley, this robot is built entirely from printed parts and off the shelf hardware, so anyone can have their own little slice of Skynet.

On display at East Coast RepRap Festival

The key to the design are the folding “wings” which allow the robot to raise and lower itself on command. This not only helps it navigate tight spaces, but also gives it considerable all-terrain capability when it’s riding high. Rather than wheels or tracks, the design uses six rotors which look more like propellers than something you’d expect to find on a ground vehicle. These rotors work at the extreme angles necessary when the robot has lowered itself, and allow it to “step” over obstructions when they’re vertical.

For the electronics, things are about what you’d expect. An Arduino Pro Mini combined with tiny Pololu motor controllers is enough to get the bot rolling, and a Flysky FS-X6B receiver is onboard so the whole thing can be operated with a standard RC transmitter. The design could easily be adapted for WiFi or Bluetooth control if you’d rather not use RC gear for whatever reason.

Want to build your own? All of the STL files, as well as a complete Bill of Materials, are available on the Thingiverse page. [Ali] even has a series of videos on YouTube videos walking through the design and construction of the bot to help you along. Outside of the electronics, you’ll need a handful of screws and rods to complement the 50+ printed parts. Better start warming up the printer now.

As an interesting aside, we got a chance to see this little critter first hand at the recent East Coast RepRap Festival in Maryland, along with a number of other engineering marvels.

Continue reading “3D Printed Arduino Bot Is Limbo Master”

Build Your Own Portable Arduino Soldering Iron

At this point you’ve almost certainly seen one of these low-cost portable soldering irons, perhaps best exemplified by the TS100, a pocket-sized temperature controlled iron that can be had for as little as $50 USD from the usual overseas suppliers. Whether or not you’re personally a fan of the portable irons compared to a soldering station, the fact remains that these small irons are becoming increasingly popular with hackers and makers that are operating on a budget or in a small workspace.

Believing that imitation is the most sincere form of flattery, [Electronoobs] has come up with a DIY portable soldering iron that the adventurous hacker can build themselves. Powered by an ATMega328p pulled out of an Arduino Nano, if offers the same software customization options of the TS100 but at a considerably lower price. Depending on where you source your components, you should be able to build one of these irons for as little as $15.

The iron features a custom PCB and MAX6675 thermocouple amplifier to measure tip temperature. A basic user interface is provided by two tactile buttons on the PCB as well as an 128×32 I2C OLED display. In a future version, [Electronoobs] says he will look into adding some kind of sensor to detect when the iron is actually being used and put it to sleep when inactive.

The tip is sourced from a cheap soldering station replacement iron, and according to [Electronoobs], is probably the weakest element of the entire build. He’s looking into using replacement TS100 tips, but says he’ll need to redesign his electronics to make it compatible. The case is a simple 3D printed affair, which looks solid enough, but seems likely to be streamlined in later versions.

We’ve seen a number of attempts at DIY soldering irons over the years, but we have to say, this one is probably the most professional we’ve ever seen. It will be interesting to see how future revisions improve on this already strong initial showing.

Continue reading “Build Your Own Portable Arduino Soldering Iron”