PCB Tesla Coil Is Perfect Desk Toy

A Tesla coil easily makes it to the top spot on our list of “Mad Scientist” equipment we want for the lab, second only to maybe a Jacob’s Ladder. Even then, it’s kind of unfair advantage because you know people only want a Jacob’s Ladder for that awesome sound it makes. Sound effects not withstanding, it’s Tesla coil all the way, no question.

Unfortunately, winding your own Tesla coil is kind of a hassle. Even on relatively small builds, you’ll generally need to setup some kind of winding jig just to do the secondary coil, which can be a project in itself. So when [Daniel Eindhoven] sent his no-wind Tesla coil into the tip line, it immediately got our attention.

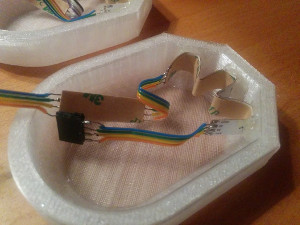
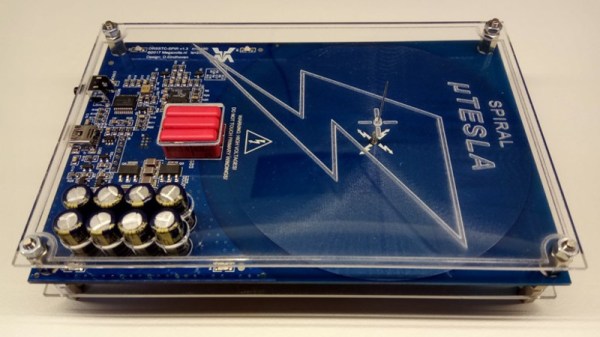
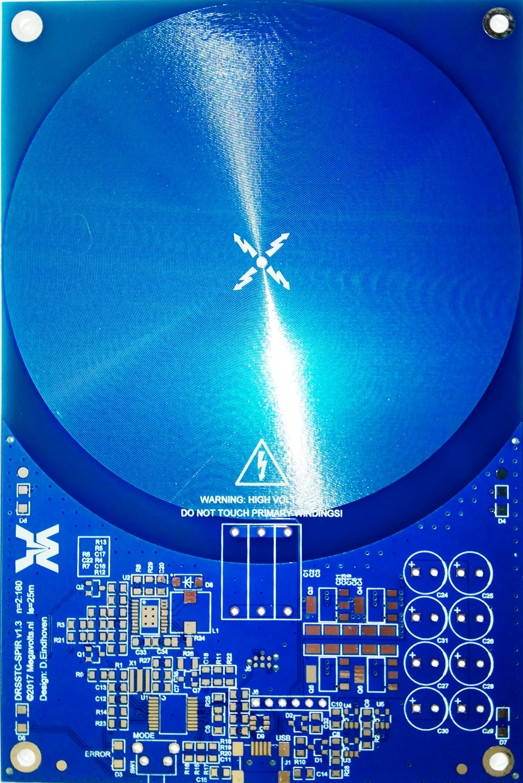
The genius in his design is that the coils are actually etched into the PCB, completely taking the human effort out of the equation. Made up of 6 mil traces with 6 mil separation, the PCB coil manages to pack a 25 meter long, 160 turn coil into an incredibly compact package. As you might expect, such a tiny Tesla coil isn’t exactly going to be a powerhouse, and in fact [Daniel] has managed to get the entirely thing running on the 500 mA output of your standard USB 2.0 port.

In such a low-power setup, [Daniel] was also able to replace the traditional spark gap pulse generator with a PIC18F14K50 microcontroller, further simplifying the design. An advantage of using a microcontroller for the pulse generator is that it’s very easy to adjust the coil’s operating frequency, allowing for neat tricks like making the coil “sing” by bringing its frequency into the audible range.

For those looking to build their own version, [Daniel] has put the PCB schematic and firmware available for download on his site. He also mentions that, in collaboration with Elektor magazine, he will be producing a kit in the near future. Definitely something we’ll be keeping an eye out for.

Incidentally, this isn’t the first time [Daniel] has demonstrated his mastery of high voltage. He scared impressed us all the way back in 2010 with his 11,344 Joule capacitor bank, perfect for that laptop-destroying rail gun you’ve been meaning to build.

Continue reading “PCB Tesla Coil Is Perfect Desk Toy”

Neural Network Really Ties The Room Together

If there’s one thing that Hollywood knows about hackers, it’s that they absolutely love data visualizations. Sometimes it’s projected on a big wall (Hackers, WarGames), other times it’s gibberish until the plot says otherwise (Sneakers, The Matrix). But no matter what, it has to look cool. No hacker worth his or her salt can possibly work unless they’ve got an evolving Venn diagram or spectral waterfall running somewhere in the background.

Inspired by Hollywood portrayals, specifically one featured in Avengers: Age of Ultron, [Zack Akil] decided it was time to secure his place in the pantheon of hacker wall visualizations. But not content to just show meaningless nonsense on his wall, he set out to create something that was at least showing actual data.

[Zack] created a neural network to work through multi-label classification data in Python using the scikit-learn machine learning suite. The code takes the values from the neutral network training algorithm and converts them to RGB colors by way of an Arduino. Each “node” in the neutral network is 3D printed in translucent filament, and fitted with an RGB LED module. These modules are then connected to each other via side-glow fiber optic tubes, so that the colors within the tubes are mixed depending on the colors of the nodes they are attached to. This allows for a very organic “growing” effect, as colors move through the network node-by-node.

In the end this particular visualization doesn’t really mean anything; the data it’s working on only exists for the purposes of the visualization itself. But [Zack] succeeded in creating a practical visualization of machine learning, and if you’re the kind of person who needs to keep tabs on learning algorithms, some variation of this design may be just what you’re looking for.

If AI isn’t your thing but you still want a wall of RGB LEDs, maybe you can use this phased array antenna visualizer instead. If you’re really hip, maybe you’ll go the analog route and put a big gauge on the wall.

Continue reading “Neural Network Really Ties The Room Together”

Raspberry Pi Media Streamer Is Combat Ready

We are truly living in the golden age of media streaming. From the Roku to the Chromecast, there is no shortage of cheap devices to fling your audio and video anywhere you please. Some services and devices may try to get you locked in a bit more than we’d like (Amazon, we’re looking at you), but on the whole if you’ve got media files on your network that you want to enjoy throughout the whole house, there’s a product out there to get it done.

But why buy an easy to use and polished commercial product when you can hack together your own for twice the price and labor over it for hours? While you’re at it, why not build the whole thing into a surplus ammo can? This the line of logic that brought [Zwaffel] to his latest project, and it makes perfect sense to us.

It should come as no surprise that a military ammo can has quite a bit more space inside than is strictly required for the Raspberry Pi 3 [Zwaffel] based his project on. But it does make for a very comfortable wiring arrangement, and offers plenty of breathing room for the monstrous 60 watt power supply he has pumping into his HiFiBerry AMP+ and speakers.

On the software side the Pi is running Max2Play, a Linux distro designed specifically for streaming audio and video remotely. [Zwaffel] says that with this setup he is able to listen to music on his Squeezebox server as well as watch movies via Kodi.

While none are quite as battle-hardened as this, we have seen several other Raspberry Pi Squeezebox clients over the years if you’re looking for more inspiration.

Restoring A Tonka Truck With Science

The yellow Tonka Truck. Instantly recognizable by any child of decades past, that big metal beast would always make you popular around the sandbox. There were no blinking lights to dazzle, no noises to be heard (unless you count the hard plastic wheels rolling on concrete), even the dumping action is completely manual. But back then, it was a possession to be treasured indeed.

So it’s perhaps no surprise that there is a certain following for these classic trucks today, though like with most other collectibles, a specimen in good condition can be prohibitively expensive. The truck that [PoppaFixIt] found in the trash was certainly not one of those specimens, but with some patience and knowledge of basic chemistry, he was able to bring this vintage toy back to the present.

The first step was to disassemble the truck. Before they switched over to Chinese mass production, these trucks were built with actual rivets. After drilling them out and unfolding the little metal tabs that toy makers loved back in the day, he was able to separate the metal body of the truck from the plastic detail bits. The plastic parts just needed a fresh coat of paint, but the rusted metal body would need a bit more attention.

Remembering a tip he read online, [PoppaFixIt] decided to attempt electrolytic rust removal to get the metal parts back into serviceable condition. A big plastic bin, some washing soda, and old steel window weights for his sacrificial anodes was all the equipment he needed for the electrolysis tank. To power the chemical reaction he used a standard 12 volt car battery and charger wired in parallel; this step is important, as he notes most newer chargers are smart enough not to work unless they see a real battery connected.

After running the setup overnight, the collected rust and junk on the window weights was proof enough the process worked. From there, it was just a fresh coat of yellow paint, a new sticker kit from eBay, and his Tonka truck was ready to face another 30+ years of service.

If you’re looking to restore things larger than a child’s toy, you may be interested in the much larger electrolytic setup we’ve covered previously. Of course if you’re really pressed for time, you could try blasting the rust away with a laser.

Imperial Rocker For Stopping Tiny Rebel Scum

Some of the luckiest kids in the world have to be the ones with hackers and makers as parents. While normal kids are stuck playing with cookie cutter mass produced toys, these kids get one-off gadgets and creations that will be the envy of the playground. Frankly, some of the stuff ends up being so cool that it’ll get the adults wishing they could go back in time and play with it.

One such parent, and one such project, is the Imperial Rocker by [Matthew Regonini]. Hoping to instill an obsession with a galaxy far, far, away on his offspring, [Matthew] designed this AT-AT rocking horse piece by piece in Illustrator, and then cut it all out of birch using his XCarve CNC router. Each piece was then meticulously glued together to produce a final 3D effect from the individual cutouts.

With a liberal application of spring clamps to hold it all together while it dried, all that was left to do was painstakingly sand all the parts so the edges of the laminated construction would be smooth. Dowels were then added for the handlebars and foot pegs, and a few coats of polyurethane seal up the plywood while bringing out a natural look.

[Matthew] notes some issues here and there, notably quite a bit of blowout in some of the detail cuts and a couple miscalculated dimensions. But he reasons that the rocker is going to live a pretty hard life anyway, so best not to sweat the small stuff.

While the Imperial Rocker has that quaint old-school charm, we wonder how long it will be before [Matthew’s] little Stormtrooper starts yearning for the blinking lights and buttons that youngsters just can’t get enough of.

Continue reading “Imperial Rocker For Stopping Tiny Rebel Scum”

DIY Laptop Aims For Complete Hardware Freedom

Open source software has unquestionably gone from fringe idealism to mainstream, even if the average person doesn’t really know it. From their web browser to their smartphone operating system, more people are running open source software today than at any other time in the history of computing, and the numbers are only getting bigger. While we can debate how well some companies are handling their responsibilities to the open source community, overall this is probably a lot closer to an open source utopia that many of us ever believed we’d get.

For argument’s sake, let’s say the software is settled. What’s next? Well, if we’ve got all the open source software we could ever ask for, naturally we now need to run it on open source hardware. Just like our software, we want to see how it works, we want to modify it, and to fix it ourselves if we want. These goals are precisely what [Lukas Hartmann] had in mind when he started work on Reform, the latest entry in the world of fully open source laptops.

A plate of fresh keycaps

Like the Novena that came before it, the Reform leverages the four-core ARM Cortex-A9 NXP i.MX6 SoC to deliver tablet-level performance, though [Lukas] mentions the design may migrated to the upgraded six-core version of the chip in the future which should give it a little more punch. The SoC is paired with the Vivante GC2000 GPU which can be used under Linux without any binary blobs. Most hardware is connected to the system via the USB 2.0 bus, though networking is provided by a ThinkPenguin mini PCI-e wireless adapter, and on-board SATA handles the 128 GB SSD.

While the internals are relatively run-of-the-mill these days, the work that [Lukas] has done on the case and input devices is definitely very impressive. He partnered with industrial designer [Ana Dantas] to get the look and feel of the system down, and built almost everything out of 3D printed parts. Even the keyboard caps and the trackball were manufactured in house on a Formlabs Form 2. Rather than using an off-the-shelf USB HID solution, [Lukas] is using Teensy LC boards to interface the custom input hardware with the OS.

[Lukas] is still working on how and when the Reform will be made available to the public. After some refinements, the team hopes to make both kits and individual parts available, and of course put all the files up so you can build your own if you’ve got the equipment. A mockup Amazon listing for the Reform has been posted to get the public’s feedback on the look and features of the machine, and [Lukas] asks that anyone with comments and suggestions send him an email.

Between the Reform, Novena, and the Olimex, competition in the realm of DIY laptops is frankly staggering. Now we just need more people working on open hardware smartphones.

Thanks to [Adrian] for the tip.

MakerBot Really Wants You To Like Them Again

For the last couple years, a MakerBot press release has generally signaled that more pink slips were going to be heading out to the already shell-shocked employees at their NYC factory. But just last week something that could almost pass as good news came out of the once mighty 3D printer manufacturer, the unveiling of “MakerBot Labs”. A number of mainstream tech sites heralded this as MakerBot’s first steps back into the open source community that launched it nearly a decade ago; signs of a newer and more thoughtful MakerBot.

Reading the announcement for “MakerBot Labs”, you can almost believe it. All the buzz words are there, at least. In fact, if this announcement came from anyone else, in any other field, I’d probably be on board. Sharing knowledge and listening to the community is essential if you want to connect with hackers and makers. But this is MakerBot, and they’ve dug themselves into a very deep hole over the years.

The spectacular fall from grace that MakerBot has experienced, from industry leader to afterthought, makes this hat-in-hand peace offering hard to take seriously. It reads like a company making a last ditch effort to win back the users they were so sure they didn’t need just a few years ago. There is now a whole new generation of 3D printer owners who likely have never even seen a MakerBot printer, and it’s hard to imagine there’s still enough innovation and life in the company to turn that around before they completely fade into obscurity.

Continue reading “MakerBot Really Wants You To Like Them Again”