Homemade LED Clock Stands Test Of Time

In an era when you might get chastised if your mobile phone is more than two years old, it’s easy to forget that hardware was not always meant to be a temporary commodity. We acknowledge a few standout examples of classic hardware still surviving into the modern era, such as vintage computers, but they’re usually considered to be more of a novelty than an engineering goal. In a disposable society, many have forgotten that quality components and a well thought out design should give you a service life measured in decades, not months.

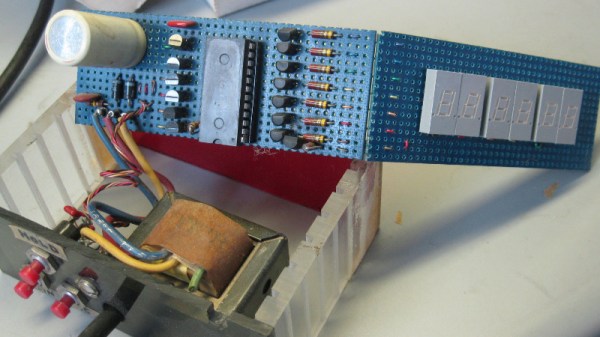
A perfect example of this principle is the beautiful LED clock built 40 years ago by [Davide Andrea]. A teenager at the time, [Davide] built this clock to be used by the local radio station, as clocks that showed seconds were important for timing radio shows. Finding it in storage recently, [Davide] took to the /r/electronics subreddit to report that it still works fine after all these years.

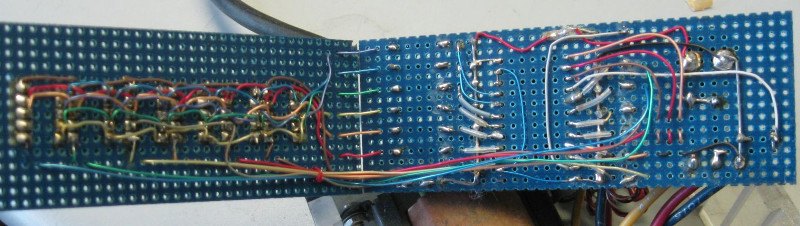
Cracking open the case shows a unique and highly functional construction style. Notches cut into the side panels of the case accept individual protoboards in a “blade” type configuration, with the blades connected by a handful of individual wires. No digging through the parts bin for a “worthless” old IDE cable to tear up back in the 1970’s.

Continue reading “Homemade LED Clock Stands Test Of Time”

Mini Millennium Falcon Is Envy Of The Neighborhood

Here’s a tip for any readers who may be expecting a child in the near future: there’s about a two year period where you can basically use your child as a Halloween prop. They’re too young to express any serious interest in what they want to dress up as, and as an added bonus, they generally spend most of their time being rolled around in a wheeled contraption anyway. As long as you can keep the little one warm and securely seated in the thing, you’ve essentially got free reign to put them into all sorts of elaborate vehicles.

Case in point, the awesome build that [shnatko] has dubbed the “Millennium Flyer”. Built atop his daughter’s plastic Radio Flyer wagon, the Millennium Flyer is constructed out of wood and foam board. By using the mounting holes in the wagon originally intended for an optional canopy, the ship itself can be removed to fly again next year.

[shnatko] notes that he possess no particular talent for the fine arts, so he decided to skin his build by printing out a high resolution image of the Millennium Falcon he found online. The amount of patience (not to mention printer ink) that this method took is considerable, but we think the final results speak for themselves.

To finish off his build [shnatko] found a blue cold cathode light from his PC modding days and rigged it up with a laptop battery he had laying around. Some foam ribs and wax paper to diffuse the light give it that iconic look from the “real” Falcon.

Between this build and the AT-AT rocking horse from a few weeks back, it seems we are in the golden age of childhood Star Wars conveyances. Though we wouldn’t mind seeing this get mounted to a racing Power Wheels either.

3D Printing Belts For Vintage Hardware

It may be hard for some of the younger readers to believe, but there was a time when hardware was full of little rubber belts. Tape decks, VCRs, even some computers: they all had rotating parts that needed to transfer power to other components, and belts were a cheap and quiet way to do it. Unfortunately, now decades later we realize that these little belts are often the Achilles heel of classic hardware, getting brittle and breaking long before the rest of the components are ready to give up the fight.

Which is exactly what [FozzTexx] found when trying to revive his newly purchased Commodore PET 2001. The belt inside of the cassette drive had become hard and fallen to pieces, and rather than hunt around for a replacement, [FozzTexx] reasoned he might be able to print one out of a flexible 3D printer filament like NinjaFlex. Besides, this wasn’t the only piece of vintage tech in his house that needed a belt replacement, so he figured it would be a worthwhile experiment.

As the original belt was little more than dust, [FozzTexx] had to design his replacement from scratch. He started by cleverly replicating the path the belt would need to take with string, and then measuring the inside diameter of the string circle with his calipers. [FozzTexx] then reduced the diameter by 5% to take into account the stretching of the new belt.

The profile of the belt was square, which made modeling and 3D printing much easier. [FozzTexx] just subtracted a smaller circle from a larger one in 2D, and then extruded that circle into the third dimension by 1.18 mm to match the height of the original part. Careful measurement paid off, and the newly printed NinjaFlex belt had his Commodore loading and saving programs on the first try.

We’ve covered the difficulty in sourcing replacement belts for old hardware previously, so it will be interesting to see if others are able to make use of the research [FozzTexx] has done here. Of course, longevity concerns are always brought up when NinjaFlex is used, so hopefully [FozzTexx] keeps us updated.

Books You Should Read: V-2 By Walter Dornberger

In an era where we can watch rockets land on their tails Buck Rogers-style live on YouTube, it’s difficult to imagine a time when even the most basic concepts of rocketry were hotly debated. At the time, many argued that the very concept of a liquid fueled rocket was impossible, and that any work towards designing practical rocket powered vehicles was a waste of time and money. Manned spacecraft, satellite communications, to say nothing of landing on other worlds; all considered nothing more than entertainment for children or particularly fanciful adults.

Walter Dornberger (Bundesarchiv, Bild 146-1980-009-33 / CC-BY-SA 3.0)

This is the world in which V-2, written by the head of the German rocket development program Walter Dornberger, takes place. The entire history of the A-4/V-2 rocket program is laid out in this book, from the very early days when Dornberger and his team were launching rockets with little more than matches, all the way up to Germany’s frantic attempts to mobilize the still incomplete V-2 rocket in face of increasingly certain defeat at the end of World War II.

For those fascinated with early space exploration and the development of the V-2 rocket like myself, this book is essentially unparalleled. It’s written completely in the first person, through Dornberger’s own eyes, and reads in most places like a personal tour of his rocket development site at the Peenemünde Army Research Center. Dornberger walks through the laboratories and factories of Peenemünde, describing the research being done and the engineers at work in a personal detail that you simply don’t get anywhere else.

But this book is not only a personal account of how the world’s first man-made object to reach space was created, it’s also a realistic case study of how engineers and the management that pays the bills often clash with disastrous results. Dornberger and his team wanted to create a vehicle to someday allow man to reach space, while the Nazi government had a much more nefarious and immediate goal. But this isn’t a book about the war — the only battles you’ll read about in V-2 take place in meeting rooms, where the engineers who understood the immense difficulty of their task tried in vain to explain why the timetables and production numbers the German military wanted simply couldn’t be met.

Continue reading “Books You Should Read: V-2 By Walter Dornberger”

Homebuilt Laser Engraver Using Salvaged Parts

Now that anyone can go online and get a fairly decent 3D printer for around $200, they’ve officially fallen out of the “Elite Hacker” arsenal and are now normal, if perhaps highly specialized, tools. That’s great for the 3D printing community as a whole, but what about those who want to be on the fringe of technology? Telling people you have a 3D printer at home doesn’t get that wide-eyed response like it used to. What’s a “l33t” hacker to do?

Enter the laser engraver/cutter: it’s like a 3D printer, but easier to build and has a higher capacity for bodily harm! While there are a couple good options for kits and turn-key setups out there, just like the early days of 3D printers, some of the best machines are still home built. In his latest video, YouTuber [MakerMan] takes us through his build which features an impressively low part count.

To start his build, [MakerMan] strips down four printers and salvages seven high quality 8 mm linear rods; a huge cost saving tip in itself. We’ll certainly be picking up any printers we see in the trash for the next couple months hoping to score some rods. With the addition of some cheap LM8UU bearings and 3D printed holders for them, [MakerMan] has a smooth 2D motion platform for just a couple bucks. The frame of the machine is built out of type of aluminum square tubing you can find at the hardware store, no expensive extrusion here.

For the laser itself, [MakerMan] is using a six watt PLH3D-6W-XF from Opt Lasers. This module features integrated driver and cooling, so all you need to do is provide it power and a stable means of moving it over the work piece. They even offer a magnetic “dock” which allows you to remove the laser from the mount without any tools for servicing or tool changes. [MakerMan] reports he’s been able to engrave stainless steel with this laser module, and cut thin wood.

This isn’t the first laser engraver we’ve seen built out of scrap parts, though if you want to save some work you could just upgrade a cheap commercial model.

Continue reading “Homebuilt Laser Engraver Using Salvaged Parts”

Scratchbuilt Cryptex Would Make Da Vinci Weep

Here’s a fun fact, the kind of thing that you might (but we definitely did not) find out when writing a blog post: Dan Brown actually made up the cryptex for his book, The Da Vinci Code. We therefore have Mr Brown, with a bit of help from the filmmakers over at Sony, to thank every time we see somebody make their own version. To follow that line of logic to its conclusion, we believe you’ll agree that the following is without question the greatest thing Dan Brown has ever done in his life.

Created by [Stephen Peduto] as a ring box for an exceptionally lucky young lady, it required an estimated 127 hours to complete over the course of two months. From the incredible job [Stephen] did photographing and documenting the build, we don’t doubt it for a second. Expertly combing milled aluminum and lathe-turned bocote wood, this has got to be the most gorgeous ring “box” ever made.

Frankly, it’s hard to do justice to what [Stephen] has created in so short a space, and you really should browse through the 140+ images in his gallery. But the short version is that after some furious white board sketching, [Stephen] moved over to AutoCAD and then SolidWorks to design all the parts which would eventually get machined out of aluminum. As a very clever touch, he wisely added 17° slop in the locking mechanism so that the recipient wouldn’t fumble too much at the big moment.

When the machining was all said and done, [Stephen] then switched over to the woodworking part of the project. Rather than numbers or letters for a combination, this cryptex uses the grain pattern in the turned piece of wood. This gives the final product a more organic feel, while at the same time avoiding the head-scratching problem of getting the characters printed or engraved into the wheels.

Towards the end of construction there was a worrying moment when the newly made wooding rings warped so badly that the aluminum inserts would no longer fit. As a last resort, the rings were placed in a box with a humidifier for a week and slowly worked back into shape. [Stephen] says he’s still surprised it worked.

Even if some may argue that a cryptex is nothing but a prettied-up bike lock, people sure do love them. We’re no stranger to high quality cryptex builds here, though even mere mortals can play along if they’ve got a well calibrated 3D printer.

PCB Tesla Coil Is Perfect Desk Toy

A Tesla coil easily makes it to the top spot on our list of “Mad Scientist” equipment we want for the lab, second only to maybe a Jacob’s Ladder. Even then, it’s kind of unfair advantage because you know people only want a Jacob’s Ladder for that awesome sound it makes. Sound effects not withstanding, it’s Tesla coil all the way, no question.

Unfortunately, winding your own Tesla coil is kind of a hassle. Even on relatively small builds, you’ll generally need to setup some kind of winding jig just to do the secondary coil, which can be a project in itself. So when [Daniel Eindhoven] sent his no-wind Tesla coil into the tip line, it immediately got our attention.

The genius in his design is that the coils are actually etched into the PCB, completely taking the human effort out of the equation. Made up of 6 mil traces with 6 mil separation, the PCB coil manages to pack a 25 meter long, 160 turn coil into an incredibly compact package. As you might expect, such a tiny Tesla coil isn’t exactly going to be a powerhouse, and in fact [Daniel] has managed to get the entirely thing running on the 500 mA output of your standard USB 2.0 port.

In such a low-power setup, [Daniel] was also able to replace the traditional spark gap pulse generator with a PIC18F14K50 microcontroller, further simplifying the design. An advantage of using a microcontroller for the pulse generator is that it’s very easy to adjust the coil’s operating frequency, allowing for neat tricks like making the coil “sing” by bringing its frequency into the audible range.

For those looking to build their own version, [Daniel] has put the PCB schematic and firmware available for download on his site. He also mentions that, in collaboration with Elektor magazine, he will be producing a kit in the near future. Definitely something we’ll be keeping an eye out for.

Incidentally, this isn’t the first time [Daniel] has demonstrated his mastery of high voltage. He scared impressed us all the way back in 2010 with his 11,344 Joule capacitor bank, perfect for that laptop-destroying rail gun you’ve been meaning to build.

Continue reading “PCB Tesla Coil Is Perfect Desk Toy”