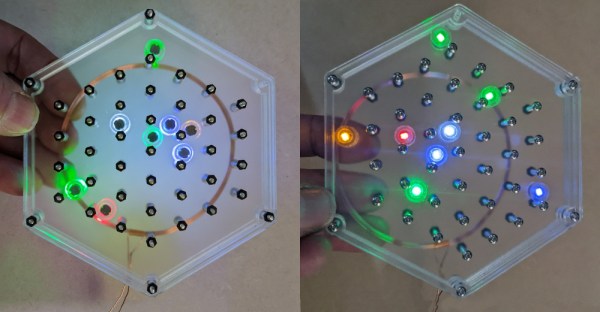
Imagine if you had some magic glowing beads, that would emit beautiful colors without any wires tangling them up. They exist, in the form of wireless induction-powered LEDs, and [Debra] of Geek Mom Projects has been experimenting with them in a new way.
The build takes the wireless LEDs and wraps each one up in a 1/4″-thick clear ring of acrylic. This toughens up the LEDs and helps diffuse their light. They’re then installed in a hexagonal plastic container, featuring a grid of screws not unlike the metal pins of the game Plinko. Thanks to the induction coil mounted behind, the LEDs glow as they ricochet around the metal pins in various ways.
We’d love to see the container full of LEDs mounted on a slowly-turning motor, such that they would tumble around endlessly, glowing all the while. It would be quite mesmerizing, in much the same way as the kaleidoscope project [Debra] built using these parts previously. Video after the break.
Photogrammetry is a great way to produce accurate 3D models of real objects. A turntable is often a common tool used in this work as it helps image an object from all angles. [Peter Lin] wanted a way to run the photogrammetry process with minimal human intervention, and set about building an automated turntable setup.
The build relies on a smartphone to take images of the physical object. The phone is triggered to take photos by an ESP8266, which fires the shutter via the phone’s audio socket. The microcontroller then turns the turntable on for a short period of time after each shot, rotating it by a set angle.
The build still requires objects to be repositioned in various orientations on the turntable now and then, in order to capture the top and bottom areas that would otherwise be obscured. However, the grunt work of taking the photos and rotating the objects is now entirely automated.
It’s a useful build for anyone that finds themselves regularly imaging objects to create 3D models. The results of [Peter]’s rig look great, and as a bonus come with life-like textures ready to go. We’ve seen some other great photogrammetry builds before, too. Video after the break.
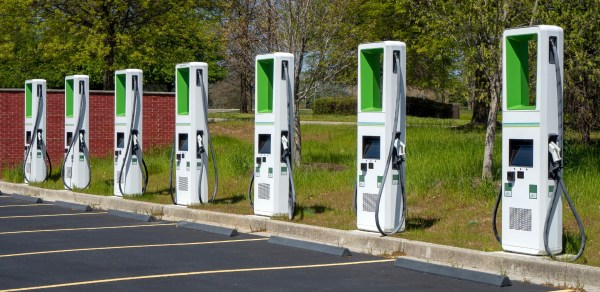
Electric vehicles are now commonplace on our roads, and charging infrastructure is being built out across the world to serve them. It’s the electric equivalent of the gas station, and soon enough, they’re going to be everywhere.
However, it raises an interesting problem. Gas pumps simply pour a liquid into a hole, and have been largely standardized for quite some time. That’s not quite the case in the world of EV chargers, so let’s dive in and check out the current state of play.
AC, DC, Fast, or Slow?
Since becoming more mainstream over the past decade or so, EV technology has undergone rapid development. With most EVs still somewhat limited in range, automakers have developed ever-faster charging vehicles over the years to improve practicality. This has come through improvements to batteries, controller hardware, and software. Charging tech has evolved to the point where the latest EVs can now add hundreds of miles of range in under 20 minutes.
However, charging EVs at this pace requires huge amounts of power. Thus, automakers and industry groups have worked to develop new charging standards that can deliver high current to top vehicle batteries off as quickly as possible.
As a guide, a typical home outlet in the US can deliver 1.8 kW of power. It would take an excruciating 48 hours or more to charge a modern EV from a home socket like this.
In contrast, modern EV charge ports can carry anywhere from 2 kW up to 350 kW in some cases, and require highly specialized connectors to do so. Various standards have come about over the years as automakers look to pump more electricity into a vehicle at greater speed. Let’s take a look at the most common options out in the wild today. Continue reading “EV Charging Connectors Come In Many Shapes And Sizes”→
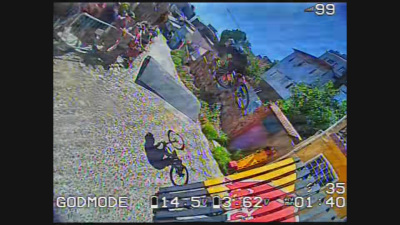
Drones have revolutionized the world of videography in perhaps the biggest way since the advent of digital hardware. They’re used to get shots that are impractical or entirely impossible to get by any other means. The [Dutch Drone Gods] specialize in such work. When it came to filming an urban mountain bike race in a dense Chilean city, they had to bust out some serious tricks.
The FPV video feed was grainy, but good enough to keep the pilot on track. The drone carried a separate second camera for capturing high-quality footage of the run.
Typically, running a drone chase cam behind a biker would require some good first-person flying skills and a quick drone. However, for the Red Bull Valparaiso Cerro Abajo urban downhill event, this alone would not be enough. The tight course winds down staircases between thick concrete walls and even through houses, presenting huge challenges to maintaining signal integrity. Without a clear video signal, the pilot can’t fly the drone without crashing.
To make this all possible, the team used a variety of techniques to help combat the uncooperative radio environment. Directional antennas were used to target different sections of the course. Additionally, a second drone was flown high above the course carrying a radio repeater, helping provide a better line-of-sight contact to the camera drone following the riders when the buildings would otherwise block the signal to the pilot.
Even with all this work, the signal was still scratchy and would cut out at some points. However, with a bit of blind faith when cutting through the worst areas, the [Dutch Drone Gods] and the [Red Bull] team were able to put together an amazing FPV drone shot shadowing [Tomas Slavik] on his run down the extremely difficult urban course.
Details on the precise hardware are scarce. However, it’s something that any experienced drone builder could probably whip up without too much trouble. The idea of using a drone-based repeater is particularly exciting, and something we’re sure could help out many pilots who find themselves operating in difficult urban environments.
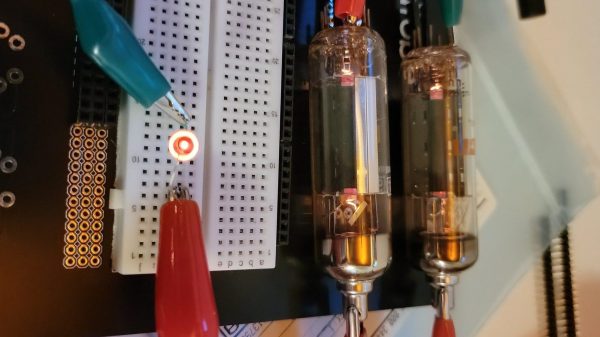
Typically, if you want to convert solar energy into electrical energy, you use either photovoltaic (PV) cells, or you use the sunlight to create steam to turn a turbine. Both of these methods are well-established and used regularly in both small- and grid-scale applications. However, [Nick Poole] wanted to investigate an alternative method, using thermionic converters for solar power generation.
[Nick] has been gearing up to produce various styles of vacuum tubes, and noted that the thermionic effect that makes them work could also be used to generate electricity. They are highly inefficient and produce far less power than a photovoltaic solar cell, meaning they’re not in common use. However, as [Nick] notes, unlike PV cells etched in silicon, a thermionic converter can be built with basic glassworking tools, requiring little more than a torch, a vacuum pump, and a spot welder.
Experiments with a large lens to focus sunlight onto a 6V3A diode tube showed promise. [Nick] was able to generate half a volt, albeit at a tiny current, with the design not being optimized for thermionic conversion. Further experiments involved electrically heating a pair of diode tubes, which was able to just barely light an LED at 1.7 V and a current of 7.5 uA. The conversion efficiency was a lowly 0.00012%, around 5 orders of magnitude worse than a typical PV cell.
[Nick]’s hope is that he can produce a tube designed specifically to maximize thermionic conversion for energy generation purposes. It’s likely there is some low-hanging fruit in terms of gains to be made simply by optimizing the design for this purpose, even if the technique can’t compete with other solar generation methods.
Electric vehicles are slowly but surely snatching market share from their combustion-engined forbearers. However, range and charging speed remain major sticking points for customers, and are a prime selling point for any modern EV. Battery technology is front and center when it comes to improving these numbers.
Solid-state batteries could mark a step-change in performance in these areas, and the race to get them to market is starting to heat up. Let’s take a look at the current state of play.
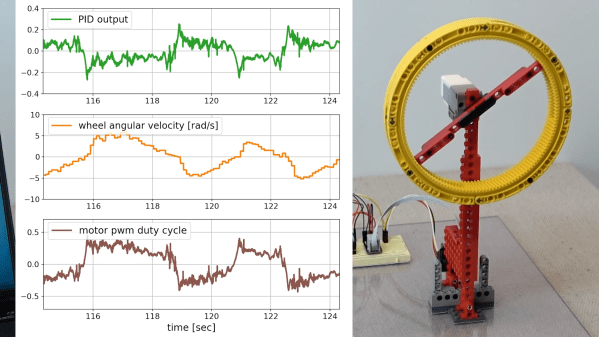
Reaction wheels are useful things, typically used by satellites to keep themselves oriented the right way up in space. Turning the reaction wheel creates an equal and opposite torque in the spacecraft, allowing it to point and rotate itself accurately. The same technique also works here on Earth, and [Brick Experiment Channel] decided to build one out of LEGO to control an inverted pendulum.
The initial design using a small LEGO wheel on an inverted pendulum was only able to work reliably over a 4-degree angle from the vertical. Upgrading the wheel to a larger, heavier one enabled the wheel to instead work over a 28-degree range instead.
A MPU9250 inertial measurement unit was pressed into service for control of the reaction wheel, fitted to the base of the pendulum and read by a Raspberry Pi. The Pi takes accelerometer and gyroscope readings, and then controls the motor on the pendulum with a PID controller to keep the inverted pendulum upright.
The video goes into a great deal of detail on what it takes to make the pendulum run smoothly. From changes to the control coefficients to measuring the motor’s back EMF, [Brick Experiment Channel] demonstrates everything required to make the pendulum robust to outside perturbances.