Pack Your SD Cards Swiss Army Style

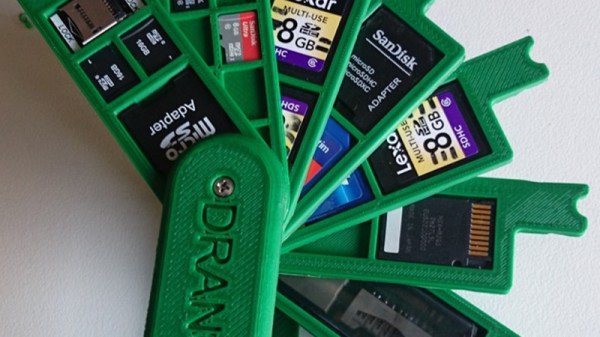
SD cards have largely supplanted most other card-based storage devices, in all but a few niches. Available in standard, micro, and the rather obscure mini sizes, they’re used in everything from digital cameras to car stereos and console ROM carts. For most users, storing them consists of tossing them in a bag, occasionally in a plastic case that’s barely any bigger than the card itself for a little extra protection. This can get frustrating when carrying multiple cards, but [Dranoweb] has a solution.

[Dranoweb]’s design is similar to a Swiss Army knife, repurposed with many fingers, each with slots for holding everyone’s favourite storage devices. All the parts barring the screw are 3D printed. There are various designs of the storage fingers, allowing the build to be customized to suit varying quantities of SD and microSD cards. There’s even a deep-pocketed piece for USB drives and small adapters, and an oversized design for Nintendo DS carts.

It’s a tidy design that makes it that much less likely you’ll lose your microSD in the bottom of your backpack. Now, if you need to interface with an SD card, we can help you there too.

A Big, Mean, Inflated Machine

A Jeep is fun offroad, a motorcycle perhaps even more so. Diehard renegades go even further and get about in Unimogs and on snowmobiles. [amazingdiyprojects] might just have topped them all however, with his latest project – the astonishing Inflatable Car.

Despite the name, it’s a vehicle that defies clear definition. Consisting of a lightweight aluminium frame and exposed seat, the construction is almost 100% hacked. PVC fabric is used with advanced adhesive tapes to create inflatable wheels that are 2 meters in diameter. Vacuum cleaners are used to inflate the massive tyres, with custom 3D printed valves to ensure even inflation. Drive is courtesy of four handheld concrete mixers, repurposed for their torquey motors and robust geartrains. Even the user interface is a triumph of found parts – consisting of former cordless drills, used for their PWM hardware and covered in extra switches.

Looking like a moon lander from a strange 1950s version of the future, the machine is impressively nimble for its size. Episode 1 starts with a single wheel hooked up to the inflation gear and a single drive motor. Just a few short months later, episode 7 has the prototype machine crawling out from the confines of the back garden and out into the street. The machine is already impressively fast and capable, and we can’t wait to see what happens next.

It’s a build that is truly impressive in its scale, though we’ve come to expect no less from [amazingdiyprojects]. Video after the break.

Continue reading “A Big, Mean, Inflated Machine” →

A Modular Mounting System Via 3D Printing

When working with cameras or other tools, it can often be useful to have some manner of stand or tripod to hold things in position, freeing up one’s hands for other tasks. Unfortunately, when it comes to smaller cameras and devices like smartphones and tablets, there are few standardized solutions. [yyh1002] has skirted the problem by creating a customizable modular mounting system, and it’s taken the 3D-printing world by storm.

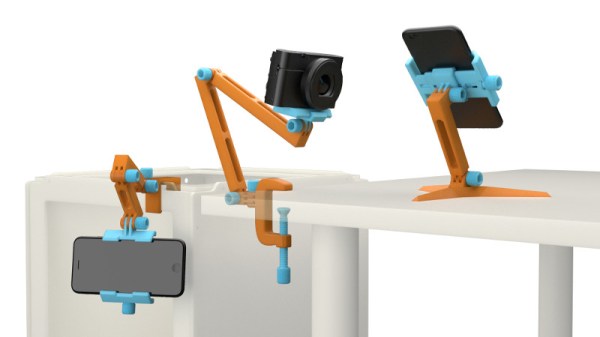
The system was inspired by GoPro mounts, which are a system of plastic arms and screws that can effectively position the small devices in all manner of orientations. [yyh1002]’s system is GoPro-compatible, using the same fasteners and similar geometry, and tons of other modelers have added on.

The parts are 3D printed and consist of a series of arms, clamps and joints that can be configured to suit the task at hand. Source files are available, which allows custom version to be made. This is useful for modifying parts like phone holders to suit different models, to avoid fouling buttons or interfering with camera placement. Thus far, the community has contributed parts as diverse as G-clamps, camera mounts, and parts to mate to Playstation controllers. (Editor’s note: I’m actually printing out a Pi Zero case from this series as I edit this post. Coincidence!)

It’s a useful system, and we look forward to seeing more parts uploaded in future. Meanwhile, don’t forget – it’s remarkably easy to tripod mount just about anything.

Lithium Jump Starter Disassembly Is Revealing

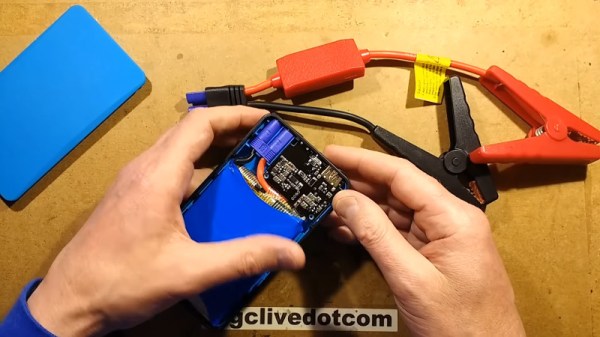
High-capacity lithium batteries tend to make everything in life better. No longer must you interact with your fellow human beings if your car battery goes flat in the carpark. You can jump the car yourself, with a compact device that fits in your glovebox. [Big Clive] decided to pull one apart and peek inside, and it’s quite the illuminating experience.

The first thing to note is there is almost no protection at all for the lithium battery inside. The output leads connect the lithium pack inside directly to the car battery, save for some diodes in series to prevent the car’s alternator backcharging the pack. [Clive] demonstrates this by short circuiting the pack, using a copper pipe as a test load to measure the current output. The pack briefly delivers 500 amps before the battery gives up the ghost, with one of the cells swelling up and releasing the magic smoke.

The teardown then continues, with [Clive] gingerly peeling back the layers of insulation around the cells, getting right down to the conductive plates inside. It’s a tough watch, but thankfully nothing explodes and [Clive]’s person remains intact. If you’ve never seen inside a lithium cell before, this is a real treat. The opened pack is even connected to a multimeter and squeezed to show the effect of the physical structure on output.

It would be interesting to compare various brands of jump starter; we imagine some have more protection than others. Regardless, be aware that many on the market won’t save you from yourself. Be careful out there, and consider jumping your car with an even more dangerous method instead (but don’t). Video after the break.

Continue reading “Lithium Jump Starter Disassembly Is Revealing” →

LittlevGL Brings GUI Tools To Micropython

Microcontrollers are wonderfully useful things, but programming them can be a little daunting if you’re used to the simplicity of compiling for regular PCs. Over time though, this has become easier. Communities have strayed away from assembly code and created higher-level languages such as Micropython, to allow these devices to be programmed in a more accessible manner. Unfortunately, Micropython has historically lacked a decent high-level GUI library. Thankfully, that’s no longer the case, with [amirgon] porting LittlevGL to the platform.

Putting a GUI into a project with a screen seems simple, until one actually gets down to brass tacks. A simple button can consist of a background color, text, and a symbol – and that’s not even considering the use of shading or other visual effects. Having a library to handle the grunt work can massively cut down development time.

LittlevGL is the work of [kisvegabor], and is programmed in C, but this effort has made it possible to integrate it with Micropython code. It’s all object-oriented, and thus works well in the broader Python framework. [amirgon] notes that it’s particularly good for quick development, due to Python’s ability to run code without a slow compiling step.

There are other approaches to this problem, too – with MyOpenLab being a particularly versatile example.

Mayak Turns WiFi Traffic Into Sound

Dial-up modems were well known for their screeching soundtrack during the connection process. Modern networking eschews audio based communication methods, so we no longer have to deal with such things. However, all is not lost. [::vtol::]’s Mayak installation brings us a new sound, all its own.

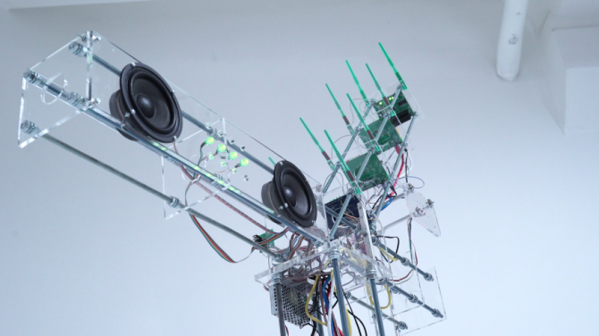
The installation consists of four WiFi routers, connected to four LTE modems. These are configured as open hotspots that anyone can connect to. [::vtol::] was careful to select routers that had highly responsive activity LEDs. The activity LEDs are wired to an Arduino, which processes the inputs, using them to trigger various sounds from an attached synthesizer.

As users connect to the routers and go about their business on the Internet, the activity LEDs flash and the synthesizer translates this into an otherworldly soundtrack. The hardware is all hung on a beautiful metal and acrylic frame, which stands as a striking form in the sparse gallery.

The piece creates a very electronic soundscape, but you may prefer your installations to have a more mechanical racket. Video after the break.

Continue reading “Mayak Turns WiFi Traffic Into Sound” →

Playing Pokemon On A CRT Thanks To A Powerful Microcontroller

Microcontrollers come in a broad swathe of capabilities these days. There are the venerable 8-bit micros that have been around forever and valiantly crunch away, all the way up to modern 32-bit powerhouses with advanced peripherals and huge amounts of RAM and ROM. If you’re blinking a few LEDs or opening a garage door, the former is fine. For what [Jared] had in mind, a little more horsepower was required.

[Jared]’s project started out as an experiment with composite video output on a STM32F446RE microcontroller. Using a 4-bit resistor DAC, the device was able to output NTSC signals, using interrupts and NOPs to handle timing. The hardware worked, and was tested by playing the entirety of Star Wars: A New Hope from an SD card.

Attention then turned to creating a Game Boy emulator for the platform. After many hurdles with various bugs and edge cases, things started working, albeit slowly. The Pokemon game ROM wouldn’t fit in the microcontroller’s limited flash storage, so [Jared] implemented a complicated bank switching scheme. This combined with the limited computational resources meant the game was playable, but limited to just 10 FPS.

Enter the STM32H7. With over double the clock speed and capable of 856 DMIPS versus 225 of the original chip, things were coming together. Pokemon now ran at 60 FPS, and the built-in DAC greatly improved the sound. The DMA subsystem allowed further performance gains, and even running in debug mode, performance far exceeded that of the previous hardware.

With unit prices of most microcontrollers being remarkably low, it goes to show that once you’ve tapped out on performance on one platform, there’s usually a faster option available. It’s possible to emulate the Game Boy on the ESP-32 too, as Sprite_TM showed us in 2016. Video after the break.

[Thanks to Ben for the tip!]

Continue reading “Playing Pokemon On A CRT Thanks To A Powerful Microcontroller” →