DIY Studio Lights To Improve Your Videos

It’s 2018, a full thirteen years since YouTube was founded. With an online sharing service up and running, and high-resolution cameras in just about every mobile phone, the production of video has been democratized. Sadly, for those citizens with eyes, the production of good video is not so widespread. What’s one thing you need for good video? Good lighting – and you can build it yourself.

This build from [DIY Perks] relies upon readily available components and uses simple build techniques accessible to the average maker. Using cheap LED strips (albeit photography-grade ones), along with off-the-shelf plastics and dimmer modules, it’s possible to build a light that preserves colour integrity while being lightweight, compact, and easy to use. The final product is remarkably elegant – at a glance it could be a commercial product. Nifty tricks like daisy chaining the power supplies and combining different spectrum LEDs for better control add to the functionality.

Overall, it’s a build that does take some time, but it could easily be completed in a weekend and the results are top notch. It’s not the first lightbox build we’ve seen here, either. Video after the break.

[Thanks to Keith O for the tip!]

Continue reading “DIY Studio Lights To Improve Your Videos” →

Box Forts For Adults: Best Practices And Design Strategies

Many a grown up can reminisce about building various architectural wonders in their youth. Forts, whether based on boxes or blankets, were the order of the day, and an excellent way to spend a rainy Sunday afternoon.

It just so happens that there is no law against scaling up such activities once one has reached the age of majority. However, to build a structure at this level takes some careful planning and consideration, and that is the purpose of our article here today.

Location, Location, Location

To avoid an awkward conflict, be sure to warn your housemates of impending construction well ahead of time.

The first major consideration when starting your build should be the area in which you wish to do it. Building inside has the advantage of avoiding the weather, however hard floors can lead to sore knees when crawling around. Additionally, you’re a grown up now, so it’s less likely your peers will be impressed to hear you sat inside a box in your living room.

No, if you’re going to do this right, you’ll want to go outside. A nice flat lawn is best, providing soft ground and plenty of space. The challenges of the elements will guide your work – sitting inside your cardboard home feels all the more satisfying when you’re cosy and dry as you listen to the patter of rain on the roof. There’s a real sense of accomplishment when you’ve built something that can survive the harsh outdoors, and besides, the views are better, too. Continue reading “Box Forts For Adults: Best Practices And Design Strategies” →

TI(ny) Is A New Take On The TI-99/4A

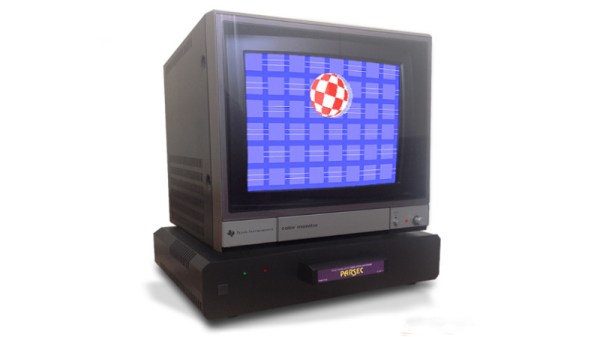
Way back in the 1980s, in the heyday of the personal computer revolution, Texas Instruments were one of the major players. The TI-99/4A was one of their more popular machines, selling 2.8 million units after an epic price war with the Commodore VIC-20. However once it had been discontinued, fans were left wanting more from the platform. Years later, that led [Fabrice] to produce the TI(ny), his take on an upgraded, more integrated TI-99/4A (Google Translate link).

Having spent many years working on these machines, [Fabrice] was very familiar with the official TI schematics – regarding both their proper use and their errors, omissions and inaccuracies. With a strong underlying knowledge of what makes a TI-99/4A tick, he set out to pen his own take on an extended model. [Fabrice] rolls in such features as Atari-compatible joystick ports, slot connectors for PeBOX expansion cards, and an RGB video output. It’s then all wrapped up in a very tidy looking case of somewhat unclear construction; it appears to be modified from an existing small computer case, and then refinished to look almost stock.

The best detail, though? It’s all made with components available in 1983! We see a lot of retro builds that are the equivalent of throwing a modern fuel-injected V8 into a vintage muscle car, and they are fantastic – but this is a project that shows us what was possible way back when.

Overall it’s a tidy build that shows what the TI-99/4A could have been if it was given a special edition model at the end of its life. If you’re looking to relive the glory days of the machine yourself, what better way then firing up the best demo on the platform? As the saying goes – Don’t Mess With Texas.

[Thanks to g_alen_e for the tip!]

A No-Fuss Rack Of Ham

With any hobby, it’s easy for things to get out of hand. Equipment can get scattered around the house, chargers lost in the car while cables languish in the shed… but it doesn’t have to be this way. With a go-bag or go-box, everything required is kept together in a ready-to-go condition. Heading out for a day of filming? Grab the go-bag and you’re all set. [oliverkrystal] wanted to apply this to a ham radio setup, and built this ham shack-in-a-box.

Wanting to use proven components and keep things rugged and usable, the build starts with a 6U-sized plastic rack mount case. This saves weight over plywood versions and is nice and tough. A combination of off-the-shelf rack mount parts and 3D printed pieces are brought together to make it all happen. [oliverkrystal]’s printed cable organisers are a particular treat, and something we think could help a lot of builds out there.

It all comes together as an impressive self-contained unit with two radios, an antenna tuner, in-built illumination and other useful features. No longer does one have to scramble around preparing gear for the weekend’s hamventures – grab the box and you’re ready to go!

Perhaps you don’t have a lot of ham gear, though? Try this setup to get going for less than $100.

Make The Surface Dial Do More Things, Such As MIDI

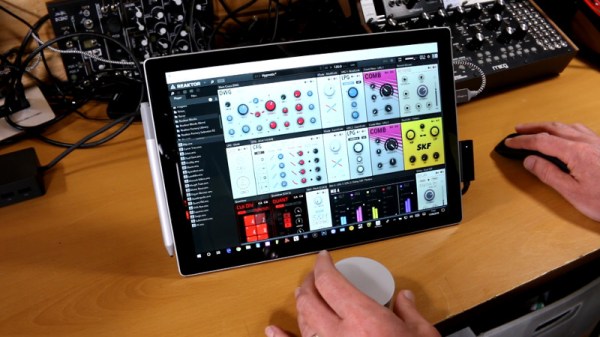
The Surface Dial is a $100+ rotary control. You can turn it, and it’ll make some basic stuff happen on your Microsoft Surface. It’s silver and sleek and elegant but fundamentally, it just works via emulated keyboard shortcuts. This doesn’t really do much for translating analog rotational motion into digital feedback in a nice way, so [SaveTheHuman5] created Elephant to fix this issue.

As standard, there are two ways to work with the Surface Dial as an end-user. The easiest way is to use existing utilities to map dial actions to shortcut keys. However, for interfacing with knobs and sliders in user interfaces, this is clunky. Instead, [SaveTheHuman5] drilled down and created their own utility using the Surface Dial API provided by Microsoft. This allows raw data to be captured from the dial and processed into whatever interactions your heart desires – as long as you’ve got the coding muscles to do it!

The Elephant software allows the knob to be used in two distinct modes – mouse capture, and MIDI. Mouse capture allows one to use a regular mouse to select UI objects, such as knobs in a music application, and then turn the Surface Dial to adjust the control. Anyone that’s struggled with tiny emulated rotary controls on a VST synth before would instantly know the value of this. In MIDI mode, however, the knob simply presents itself as a MIDI device outputting commands directly which would be more useful in performance environments in particular.

Overall, it’s a tidy hack of an otherwise quite limited piece of hardware – the only thing we’d like to see is more detail on how it was done. If you’ve got a good idea on how this could work, throw it down in the comments. And, if your thirst for rotary controls is still not satiated, check out this media controller. Video after the break.

Continue reading “Make The Surface Dial Do More Things, Such As MIDI” →

Metroid, Zelda, And Castelvania Auto-Mapped With NES Emulation & Heuristics

The NES was one of the flagship consoles of the glorious era that was the 1980s. Many of the most popular games on the platform involved some sort of adventure through scrolling screens — Metroid, Super Mario, and Zelda all used this common technique. For many games, keeping track of the map was a huge chore and meant mapping by hand on graph paper or using the screenshots published in Nintendo Power magazine. These day’s there’s a better way. [Daniel] set out to automatically map these huge two-dimensional worlds, developing software he calls WideNES to do it.

WideNES is an add-on to [Daniel]’s own NES emulator, ANESE. As part of the emulator, WideNES can easily read the various registers of the NES’s Picture Processing Unit, or PPU. The registers of the PPU are used to control the display of the background and sprite layers of NES graphics, and by monitoring these, it is possible to detect and map out the display of levels in various NES games.

It’s an interesting piece of software that relies on a thorough understanding of the NES display hardware, as well as the implementation of some neat tricks to deal with edge cases such as vertical scrolling in The Legend of Zelda or room changes in games like Castlevania — the use of perceptual hashing is particularly genius. There’s source and more available on the project page, including a GitHub link, if you’re interested in getting down to brass tacks.

We’re impressed by the manner in which WideNES is able to so neatly map out these games of yesteryear, and can’t wait to see where the project goes next. [Daniel] notes that it should be possible to integrate into more popular emulators without too much trouble. If that’s not enough, check out this reverse-emulation Nintendo hack.

[Thanks to Michael for the tip!]

UnMaker 2.0 Is Wile E Coyote’s Dead Blow Hammer

Hammers! They’re good for knocking in nails, breaking things apart, and generally smashing up the joint, if you’re in such a mood. Typically, they’re made of iron or steel and come in a variety of sizes depending on the purpose — from tiny chipping hammers for delicate sculpture work, to the heavy-duty sledge for tearing through building materials. But what if you built your own comically large mallet? Enter UnMaker 2.0.

The hammer receiving an eye-catching lick of paint.

Basically, it’s a really big hammer. It’s vaguely reminiscent of a dead blow type design, in that it consists of a moderately shock-absorbing outer shell filled with heavier material. In this case, steel ball bearings find a home inside the shell made out of maple and with a traditional tapered handle. In many ways it’s quite a typical build — other than the fact of its gigantic size and 34-pound head weight. Both of these make it a shoe-in for the ACME catalog. That roadrunner won’t know what hit him.

[Kevin] reports that it is not so much “swung” as it is “raised and allowed to drop”, due to its impressive weight. Clearly, it packs a punch. It’s a solid follow-on from the group’s former work – a truly gigantic utility knife.