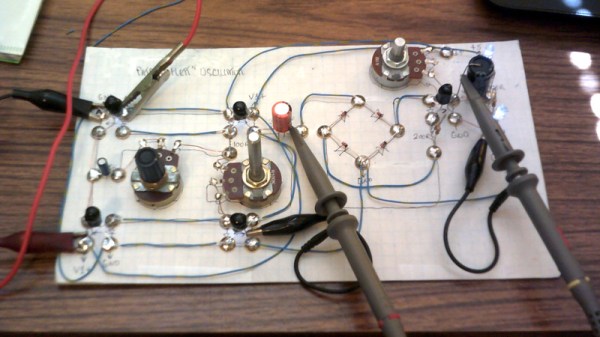
NASA Readies New Electric X-Plane For First Flight

Since 1951, NASA (known in those pre-space days as NACA) and the United States Air Force have used the “X” designation for experimental aircraft that push technological boundaries. The best known of these vehicles, such as the X-1 and X-15, were used to study flight at extreme altitude and speed. Several fighter jets got their start as X-planes over the decades, and a number of hypersonic scramjet vehicles have flown under the banner. As such, the X-planes are often thought of as the epitome of speed and maneuverability.

So the X-57 Maxwell, NASA’s first piloted X-plane in two decades, might seem like something of a departure from the blistering performance of its predecessors. It’s not going to fly very fast, it won’t be making any high-G turns, and it certainly won’t be clawing its way through the upper atmosphere. The crew’s flight gear won’t even be anything more exotic than a polo and a pair of shorts. As far as cutting-edge experimental aircraft go, the X-57 is about as laid back as it gets.

But like previous X-planes, the Maxwell will one day be looked back on as a technological milestone of its own. Just as the X-1 helped usher in the era of supersonic flight, the X-57 has been developed so engineers can better understand the unique challenges of piloted electric aircraft. Before they can operate in the public airspace, the performance characteristics and limitations of electric planes must be explored in real-world scenarios. The experiments performed with the X-57 will help guide certification programs and government rule making that needs to be in place before such aircraft can operate on a large scale.

Continue reading “NASA Readies New Electric X-Plane For First Flight”

A Lego Tensegrity Structure

Tensegrity structures are an impressive demonstration of how to achieve mechanical stability through tensile forces. Since the topic is currently trending it was probably only a matter of time before somebody like [Alexandre Thiery] came with the idea to build a tensegrity model from Lego.

In the GIF below that [Alexandre Thiery] shared on his Twitter account you can see his kids admiring the model. Tensegrity structures consist of elements under constant tension – in most cases strings – and components under compression, in this case beams of Lego. By combining these elements, one can build stable structures that seem to float in midair. A simple daily-life example for tensegrity is a balloon where the skin is the tensional element while the air inside is the component under compression.

[Alexandre Thiery] has come up with the clever idea to simply clamp the strings between two Lego blocks. This certainly paves the way for other more complicated Lego-based tensegrity structures that we will likely see in the future. [Alexandre Thiery] also recently extended his model by stacking an identical structure on top of it.

If you do not have any Lego at hand just fire up your 3D printer to make a tensegrity physics toy or a floating table.

Continue reading “A Lego Tensegrity Structure”

Greatest Keycaps And Where To Find Them

Look at your keyboard. Do the keycaps excite you? That’s what we thought. You pound on that thing day in and day out. Shouldn’t it at least be attractive? Or even happiness-inducing? You don’t necessarily have to replace every single keycap to spark joy. When it comes to artisan keycaps, the point is to have something that stands out.

How about an Escape key that looks like a tall stack of flapjacks or a tiny, intricate cream puff? From a practical standpoint, how about a spiky Escape key that makes you think twice about rage quitting?

If you’re into games or anime, chances are good that there are more than enough artisan keycaps out there to keep you cash-poor for a while. The same goes for scrumptious foodstuffs with Cherry MX-compatible stems.

In this day and age, you can get just about any type of keycap you want, especially those encapsulating pop culture phenomena and fads. Yes there’s a fidget spinner keycap, and it’s adorable.

Continue reading “Greatest Keycaps And Where To Find Them”

Washing Your Hands With 20,000 Volts

These last few weeks we’ve all been reminded about the importance of washing our hands. It’s not complicated: you just need soap, water, and about 30 seconds worth of effort. In a pinch you can even use an alcohol-based hand sanitizer. But what if there was an even better way of killing bacteria and germs on our hands? One that’s easy, fast, and doesn’t even require you to touch anything. There might be, if you’ve got a high voltage generator laying around.

In his latest video, [Jay Bowles] proposes a novel concept: using the ozone generated by high-voltage corona discharge for rapid and complete hand sterilization. He explains that there’s plenty of research demonstrating the effectiveness of ozone gas a decontamination agent, and since it’s produced in abundance by coronal discharge, the high-voltage generators of the sort he experiments with could double as visually striking hand sanitizers.

Looking to test this theory, [Jay] sets up an experiment using agar plates. He inoculates half of the plates with swabs that he rubbed on his unwashed hands, and then repeats the process after passing his hands over the high-voltage generator for about 15 seconds. The plates were then stored at a relatively constant 23°C (75°F), thanks to the use of his microwave as a makeshift incubator. After 48 hours, the difference between the two sets of plates is pretty striking.

Despite what appears to be the nearly complete eradication of bacteria on his hands after exposing them to the ozone generator, [Jay] is quick to point out that he’s not trying to give out any medical advice with this video. This simple experiment doesn’t cover all forms of bacteria, and he doesn’t have the facilities to test the method against viruses. The safest thing you can do right now is follow the guidelines from agencies like the CDC and just wash your hands the old fashioned way; but the concept outlined here certainly looks worthy of further discussion and experimentation.

Regular viewers of his channel may notice that the device in this video as actually a modified version of the hardware he used to experiment with electrophotography last year.

Continue reading “Washing Your Hands With 20,000 Volts”

Pi Cam Replaces Pinhole And Film For Digital Solargraphy

Solargraph from a one-year exposure on film. Elekes Andor / CC BY-SA

Have you ever heard of solargraphy? The name tells you much of what you need to know, but the images created with a homemade pinhole camera and a piece of photographic film can be visually arresting, showing as they do the cumulative tracks of the sun’s daily journey across the sky over many months. But what if you don’t want to use film? Is solargraphy out of reach to the digital photographers of the world?

Not at all, thanks to this digital solargraphy setup. [volzo] searched for a way to make a digital camera perform like a film-based solargraphic camera, first thinking to take a series of images during the day and average them together. He found that this just averaged out the sun from the final image. His solution was to take a pair of photos at each timepoint — one correctly exposed to capture the scene, and one stopped way down to just capture the position of the sun as a pinprick of light. All the foreground images are averaged, while the stopped-down sun images are overlaid upon each other, producing the track of the sun across the sky. Add the two resulting images and you’ve got a solargraph.

To automate the process, [volzo] used a Raspberry Pi and a Pi-Cam fitted in a weatherproof 3D-printed box. A custom hat powers up the Pi every few minutes, which boots up and takes the two pictures. Sadly, the batteries only last for a couple of days, so those long six-month exposures aren’t possible yet. But [volzo] has made all the sources available, so feel free to build on his work. If you prefer to use a DSLR for the job, this Bluetooth intervalometer might help.

A Raspberry Pi Video Intercom System

When it comes to hacks, we’re always amazed by the aesthetic of the design as much as we are by the intricacies of the circuit or the cleverness of the software. We think it’s always fun to assemble projects that were just sort of rigged up in our shop really quickly and made to just work, without worrying about much else. But, when you really invest time in the aesthetics and marry form with function, the results are always one to marvel at.

That’s what the engineers over at [Hacker Shack] did with their Raspberry Pi-based video intercom system over on Hackster. Now we’ve seen RPi doorbell projects here on Hackaday before, but it’s the implementation of a full-duplex video intercom system that makes [Hacker Shack’s] project really stand out. (Unless you want to be a bit more secretive). They used a Raspberry Pi 3 Model B with an off-brand Pi camera, but the R Pi branded camera will also work just fine. Couple the camera with a very crisp LCD display, microphone, and speaker and you’re good to go! Continue reading “A Raspberry Pi Video Intercom System”

Instruction Set Hack For Protected Memory Access

The nRF51 Series SoCs is a family of low power Bluetooth chips from Nordic Semiconductor that is based on ARM Cortex cores. The nRF51822 has the Cortex M0 core and is used in a lot of products. [Loren] has written a blog post in which he claims to be able to circumvent read back protection on the chip, thus giving access to the ROM, RAM and registers as well as allow for interactive debugging sessions.

The hack stems from the fact that the  Serial Wire Debug or SWD interface cannot be completely disabled on these chips even if the Memory Protection Unit prevents access to any memory regions directly. The second key piece is the fact that CPU can fetch stuff from the code memory. Combined with the SWD super powers to make changes to the registers themselves, this can be a powerful tool.

Continue reading “Instruction Set Hack For Protected Memory Access”