This Soap Dispenser Will Crush Your Germs

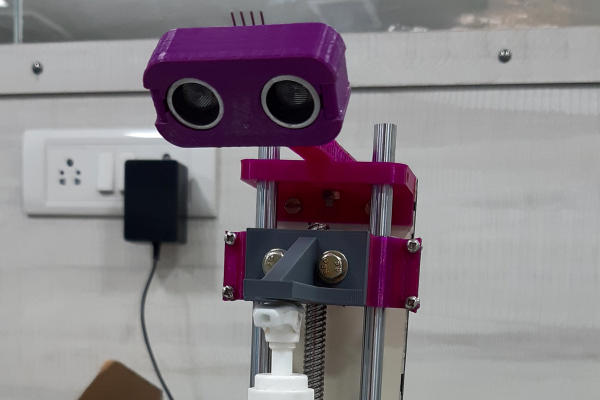
When it comes to cleaning your hands, [Arnov Sharma] is not messing around. He built an automatic soap dispenser using ultrasonic sensors, a stepper motor for activating the pump, and 3D printed components for housing a bottle of soap – a spectacular display of over-engineering. At least he won’t be needing to stand in line at the supermarket for motion detection soap dispensers anytime soon.

Initially, he had the idea to build the dispenser using a common servo motor-based method.  This would involve activating motors to push down on the plunger for the soap bottle to dispense soap. Instead, he for a different approach that ended up being fairly straightforward in theory, although the execution is pretty involved.

Model of the soap dispenser made in Fusion 360

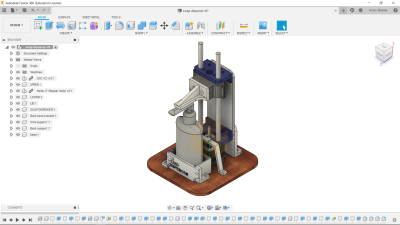
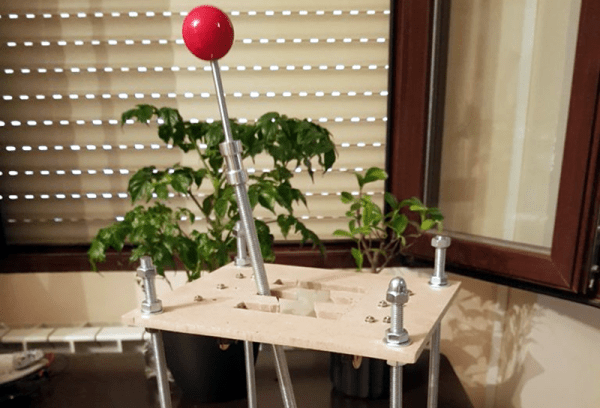
He started off by 3D printing the compartment where the soap bottle would sit and the structural support for the Z-axis rail that would be pushing down on the soap bottle. It’s similar to the type of linear actuator you might find in a 3D printer or PCB mill, where a motor controls a rotating screw that moves the carriage across a belt. (We presume the linear rail came first, and the ultrasonic soap dispenser second.)

In this build, there are two additional rods added to help support the lever pressing down on the soap dispenser.

The setup is controlled by an Arduino, which triggers the movement from the linear actuator if it receives a signal from an ultrasonic sensor. He’s added the model files and Arduino code for other makers curious about building a similar project. Check out his video for the soap dispenser in action – the stepper motor definitely makes for a much more powerful plunge than you might expect.

Continue reading “This Soap Dispenser Will Crush Your Germs”

Modern Radio Receiver Architecture: From Regenerative To Direct Conversion

Modern radio receivers have a distinct advantage over the common early designs which I covered in my previous article. Most of the receivers you will have worked with over the past couple decades are designs by Edwin Armstrong; regenerative, superregenerative, or most commonly superheterodyne. These are distinguished by a few fascinating key traits that bring both benefits and drawbacks.

Today let’s dive into Mr. Armstrong’s receivers. I’ll also talk about DC receivers which, despite the name, are not made to listen to batteries. These are receivers you are much more likely to encounter in modern equipment.

Regenerative and Superregenerative

The regenerative receiver is all about doing more with less. You still see some of these in simple applications like RF remote controls. The idea derives from how an oscillator works. In a simple way of thinking, an oscillator is an amplifier with enough positive feedback that any tiny signal at the right frequency will amplify and then, through feedback, continue to output over and over. If everything were perfect, then, an oscillator would have infinite gain at a given frequency.

Continue reading “Modern Radio Receiver Architecture: From Regenerative To Direct Conversion”

Hackaday Podcast 076: Grinding Compression Screws, Scratching PCBs, And Melting Foam

Hackaday editors Elliot Williams and Mike Szczys are enamored by this week’s fabrication hacks. There’s a PCB mill that isolates traces by scratching rather than cutting. You won’t believe how awesome this angle-cutter jig is at creating tapered augers for injection molding/extruding plastic. And you may not need an interactive way to cut foam, but the art from the cut pieces is more than a mere shadow of excellence. Plus we gab about a clever rotary encoder circuit, which IDE is the least frustrating, and the go-to tools for hard drive recovery.

Take a look at the links below if you want to follow along, and as always, tell us what you think about this episode in the comments!

Take a look at the links below if you want to follow along, and as always, tell us what you think about this episode in the comments!

Direct download (60 MB or so.)

Continue reading “Hackaday Podcast 076: Grinding Compression Screws, Scratching PCBs, And Melting Foam”

Four On The Floor For Your Virtual Race Car

There was a time when building realistic simulations of vehicles was the stuff of NASA and big corporations. Today, many people have sophisticated virtual cockpits or race cars that they use with high-resolution screens or even virtual reality gear. If you think about it, a virtual car isn’t that hard to pull off. All you really need is a steering wheel, a few pedals, and a gear shifter. Sure, you can build fans to simulate the wind and put haptics in your seat, but really the input devices alone get you most of the way there. [Oli] decided he wanted a quick and easy USB gear shifter so he took a trip to the hardware store, picked up an arcade joystick, and tied it all together with an Arduino Leonardo. The finished product that you can see in the video below cost about $30 and took less than six hours to build.

The Leonardo, of course, has the ability to act like a USB human interface device (HID) so it can emulate a mouse or a keyboard or a joystick. That comes in handy for this project, as you would expect. The computer simply has to read the four joystick buttons and then decide which gear matches which buttons. For example up and to the left is first gear, while 4th gear is only the down button depressed. A custom-cut wooden shifter plate gives you the typical H pattern you expect from a stick shift.

Continue reading “Four On The Floor For Your Virtual Race Car”

This Week In Security: Twitter, Windows DNS, SAP RECON

Twitter just had their biggest security breach in years. Mike warned us about it on Wednesday, but it’s worth revisiting a few of the details. The story is still developing, but it appears that malicious actors used social engineering to access an internal Twitter dashboard. This dashboard, among other interesting things, allows directly changing the email address associated with an account. Once the address is changed to the attacker’s, it’s simple to do a password reset and gain access.

The bitcoin address used in the crypto scam ended up receiving nearly $120,000 USD worth of bitcoin, all of which has been shuffled off into different accounts. It’s an old and simple scam, but was apparently rather believable because the messages were posted by verified Twitter accounts.

Screenshot from Motherboard

A series of screenshots have been posted, claiming to be the internal Twitter dashboard used in the attack. More than a few eyebrows have been raised, as a result of that dashboard. First off, the fact that Twitter employees can directly change an account’s email address is asking for trouble. Even more interesting are the tags that can be added to an account. “Trends Blacklist” and “Search Blacklist” do call to mind the rumors of shadow-banning, but at this point it’s impossible to know the details. Motherboard is reporting that Twitter is removing that screenshot across the board when it’s posted, and even suspending accounts that post it. Of course, they’d do that if it were faked as well, so who knows? Continue reading “This Week In Security: Twitter, Windows DNS, SAP RECON”

Make Your Own Filament

According to [Alex] it is easy to make your own rolls of 3D printing filament, even though existing off-the-shelf solutions don’t work very well. His explanation for this is economics. He built a filament extruder using a high torque induction motor and gearbox that was locally sourced. He argues that shipping heavy gear around would make a similar extruder commercially unattractive. He sunk about $600 into the device but estimates that a company would need to charge at least $1,500 or more for the same thing. That may seem steep but as [Alex] points out, a 1 kg roll of filament really only has about 750 grams for filament and plastic pellets cost $2 to $3 per kilogram.

There are other costs, of course, like the electricity required to heat and move the plastic. Still, the system appears to use about $1 of electricity for every 10 kg of filament. You can see the process in the video below.

Continue reading “Make Your Own Filament”

The Mother(board) Of All CNC Controllers

If you’re building a CNC machine from scratch, the number of decisions you have to make is nearly boundless. Metal or wood construction? Welded or bolted? Timing belts or lead screws? And even once the mechanical bits are sorted, you still face a universe of choices in terms of control electronics. That’s where something like this modular CNC controller could really prove to be a game-changer.

The idea behind [Barton Dring]’s latest creation started with his port of GRBL to the ESP32. In fact, the current controller bears a strong family resemblance to his version 1.0 dev board, with a few conspicuous and intriguing additions. First, everything is modular — the main PCB is basically a motherboard with little more than a 5-volt power supply and some housekeeping electronics, plus a lot of headers. There’s support for up to six channels of steppers, either directly on the board with Pololu-style modules or as external drivers using pluggable screw terminal blocks. There’s also room for five IO modules; the current collection of modules includes a four-channel switch input, a relay output, an RS-485 module and a 0-10-V interface for talking to a variable frequency drive (VFD) spindle controllers, and buffered 5-V output module. The best part is that the IO module spec is completely open, so designing custom modules should be a snap.

The video below gives a quick tour of the controller. We’re really impressed with the thought that went into this, and we’ll venture a guess that having something like this available is going to kickstart a lot of stalled CNC machine projects. We can think of one shop that finally lost its last excuse for making the move.

Continue reading “The Mother(board) Of All CNC Controllers”