This Commodore 16 Is An NTSC One… No, Wait, It’s A PAL One!

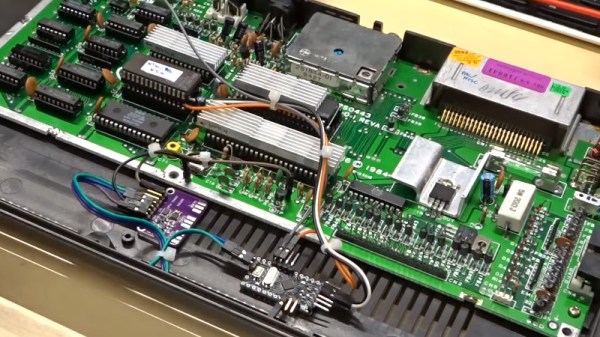
We’re used to our computers being powerful enough in both peripheral and processing terms to be almost infinitely configurable under the control of software, but there was a time when that was not the case. The 8-bit generation of home computers were working towards the limits of their capability just to place an image on a TV screen, and every component would have been set up to do just the job it was intended for. Thus when different countries had different TV standards such as the mostly-European PAL and the mostly-American NTSC, there would have been different models of the same machine for each market. The Commodore 16 was just such a machine, and [Adrian Black] has modified his NTSC model with a custom ROM, an Arduino and an Si5351 clock generator to be switchable between the two.

The differences between a PAL and NTSC C16 are two-fold. The clock for the video chip is of a different frequency, and the ROM contents differ too. [Adrian]’s machine therefore has a larger ROM containing both versions which are switchable via one of the upper address lines. A couple of tracks cut in the crystal oscillator circuit allow him to inject a new clock from the Si5351 module, and and Arduino controls everything. The appropriate ROM and clock are selected via a very simple interface, the reset button is captured and while a short press still resets the computer a long one switches the mode.

Despite having its principal engineer, [Bil Herd] as a colleague here at Hackaday, it’s sad that we don’t see as many Commodore 16s as we should. A recent feature showed a 64k C16, but didn’t make it into a C64.

Continue reading “This Commodore 16 Is An NTSC One… No, Wait, It’s A PAL One!”

Experiments In Creating The Best Epoxy Granite

If you want a big CNC machine you need a strong, vibration-resistant base. They build bells out of metal, so that might not be the best if you want something that doesn’t shake. Epoxy granite is your best bet, but what epoxy granite is the best? That’s the question [Adam Bender] answered in a series of experiments that resulted in a great-looking CNC machine.

While this is a project that resulted in a completed base for a CNC machine, this is also an experiment to determine the best formula for creating your own epoxy granite. The purpose of the experiment is effectively to determine the best-looking epoxy granite and uses four variables in the composition of this composite. Play sand, gravel, dye (in the form of iron oxide and liquid epoxy dye), and two-part epoxy were used to create seven different samples. Samples using rock didn’t turn out that great and still had trapped air. This was true even if the epoxy was put in a vacuum chamber for degassing. The winning combination turned out to be a mix of 80% sand and 20% epoxy with a bit of black dye, vibrated for 30 minutes on a DIY shaker table.

With the correct formula for epoxy granite, [Adam] set up his mold and waxed everything liberally. The internal skeleton, or what the CNC machine will be bolted to, is assembled inside the mold and the epoxy is poured in. The result is fantastic, and an excellent base for a machine that turns metal into chips. You can check out the video below.

Continue reading “Experiments In Creating The Best Epoxy Granite”

3D Prints Turn Any Keyboard Isomorphic

In the history of weird musical instrument interfaces, isomorphic keyboards are a favorite. These keyboards look like a grid of buttons, but when you play them, the relative shapes of chords are always the same. The benefit? Just say no to five hundred years of clavier tradition. It looks cool, too. Theoretically, it’s easier to play independent of whatever key you’re in. [John Moriarty] has built one of these isomorphic keyboards, and unlike everything we’ve ever seen, there are no electronics. It’s all 3D printable and turns any MIDI keyboard into an isomorphic keyboard.

We have seen isomorphic (piano) keyboards before, from a slew of Cherry keyboard switches to a bunch of arcade buttons. There is one downside to these builds, and that is that it’s really just building a MIDI controller. [John]’s build is simply a 3D printable overlay for a traditional piano that turns any standard keyboard into an isomorphic keyboard. The advantage being that this is really just a few pounds of plastic to be printed out and not a mess of wiring and electronics. Simple, removable, reversible. Not bad.

This keyboard effectively adds two differently colored keytops to each key on a keyboard. The best explination of how this keyboard works is in this video, but the basic idea is that all the note names are grouped together by color; C flat, C natural, and C sharp are all blue, for example. This means a third interval is two colors away, and a minor third is two colors to the right and one ‘row’ down. Yeah, it’s weird but that’s what an isomorphic keyboard is.

Since this is just a bunch of 3D printed parts meant to fit on any piano keybed, this is something that’s extremely easy to replicate. All the files for this keyboard overlay are available on Thingiverse, and [John] is offering to print these key tops for others without a 3D printer.

Paper Strandbeest Is Strong Enough To Walk

Most readers will be familiar with the work of the Dutch artist Theo Jansen, whose Strandbeest wind-powered mechanical walking sculptures prowl the beaches of the Netherlands. The Jansen linkage provides a method of making machines with a curious but efficient walking gait from a rotational input, and has been enthusiastically copied on everything from desktop toys to bicycles.

One might think that a Jansen linkage would be beyond some materials, and you might be surprised to see a paper one. Step forward [Luis Craft] then, with a paper walking Strandbeest. Designed in Blender, cut on a desktop CNC paper cutter, and driven by a pair of small robots linked to an Arduino and controlled by a Bluetooth link, it has four sets of legs and can push around desktop items. We wouldn’t have thought it possible, but there it is.

He claims that it’s an origami Strandbeest, but we’re not so sure. We’re not papercraft experts here at Hackaday, but when we put on our pedantic hat, we insist that origami must be made of folded paper in the Japanese style rather than the cut-and-glue used here. This doesn’t detract from the quality of the work though, as you can see in the video below.

We think this is the first paper Strandbeest we’ve seen, but we’ve brought you countless others over the years. Here’s [Jansen]’s latest, wave-like take on the idea.

Continue reading “Paper Strandbeest Is Strong Enough To Walk”

A Briefcase Computer For Your Hacking Needs

Decent laptop computers have been available for decades now. Despite this, there’s still something charming and enigmatic about a computer hidden within a briefcase. [MakeFailRepeat] wanted just such a rig, so did the maker thing and built one.

The project began when [MakeFailRepeat] was donated a 15″ monitor that ran on 12V. Naturally, it needed to be used in an awesome project, and the build began. MDF panels were cut to mount the screen inside an aluminium briefcase, and covered in black felt for a pleasing look and feel. A Logitech wireless keyboard and touchpad combo is used for input. The brains of the operation is a Raspberry Pi, equipped with a UPS HAT to handle battery and mains power, and an Adafruit Speaker Bonnet for sound.

The project was inspired by the classic video game Captive, released on Amiga, Atari, and MS-DOS platforms way back in 1990. While we’re pretty sure [MakeFailRepeat] isn’t trapped on a space station, his briefcase computer should nonetheless prove useful. A computer isn’t the only thing you can build into a briefcase, though. Video after the break.

Continue reading “A Briefcase Computer For Your Hacking Needs”

The Automated Solution To Your Unpopularity

You feel that you’re unpopular and no one likes you. The bad news is that if that’s the case in the real world there’s no easy way to fix it. The good news is there’s a great substitute — your popularity on Instagram. With this vending machine you can replace your personality with followers on Instagram. It’s just a shame we have to wait a year until Coachella.

This project is an interactive installation from [Dries Depoorter] that makes it possible to buy followers and likes in just a few seconds. It’s not limited to Instagram — you can get followers on FaceBook, YouTube, and Twitter, too. The hardware consists of a Raspberry Pi 3B+, an Arduino, coin acceptor, a few character LCDs running over I2C, and somewhat surprising for a one-off ‘art installation’, a lot of DIN rails mounted to a real industrial enclosure. Someone here knows what they’re doing;  there’s something resembling cable management inside this box and this vending machine is built to last.

Using this vending machine is as easy as sticking a few Euro coins in the slot and selecting the number of followers or likes you’d like. In a few minutes afterward, hundreds of notifications pop up on your phone. There’s no mention of the software in this vending machine aside from it being written in Python, which makes us wonder where these Instagram bots are based. Check out the video below.

Continue reading “The Automated Solution To Your Unpopularity”

Freeform ESP8266 Network Attached Data Display

Like many of us, [Josef Adamčík] finds himself fascinated with so-called “freeform” electronic designs, where the three dimensional circuit makes up sections of the device’s structure. When well executed, such designs really blur the line between being a practical device and an artistic piece. In fact his latest design, an ESP8266 MQTT client, would seem to indicate there might not be much of a “line” at all.

The inspiration for this project actually comes from something [Josef] had worked on previously: an ESP8266-based environmental monitoring system. That device had sensors to pick up on things such as humidity and ambient light level, but it didn’t have a display of its own; it just pushed the data out onto the network using MQTT. So he thought a companion device which could receive this environmental data and present it to him in a unique and visually appealing way would be a natural extension of the idea.

As the display doesn’t need any local sensors of its own, it made the design and construction much easier. Which is not to say it was easy, of course. In this write-up, [Josef] takes the reader through the process of designing each “layer” of the circuit in 2D, printing it out onto paper, and then using that as a guide to assemble the real thing. Once he had the individual panels done, he used some pieces of cardboard to create a three dimensional jig which helped him get it all soldered together.

On the software side it’s pretty straightforward. It just pulls the interesting bits of information off of the network and displays it on the OLED. Right now it’s configured to show current temperature on the display, but of course that could be changed to pretty much anything you could imagine if you’re looking to add a similar device to your desktop. There’s also a red LED on the device which lights up to let [Josef] know when the batteries are getting low on the remote sensor unit; a particularly nice touch.

If you’d like to see more of these freeform circuits, we’d advise you to checkout the finalists for our recently concluded “Circuit Sculpture” contest. Some of the finalists are truly beyond belief.