Y-zipper: 3D Printing Flexible–Rigid Transition Mechanism For Rapid And Reversible Assembly

Along with Velcro, zippers have become an integral part of every day life, being a quick and easy way to usually temporarily join fabric together. Which isn’t to say that you cannot do more with the basic zipper concept, including using them to turn floppy 2D shapes into rigid 3D ones, such as with the Y-zipper concept proposed and demonstrated by [Jiaji Li] et al.

Although not a fully new idea, the Y-zipper is compared with a range of similar mechanisms that do not feature the same abilities, including the standard zipper ease of zipping up, the possibility of having curved geometry and automatic actuation.

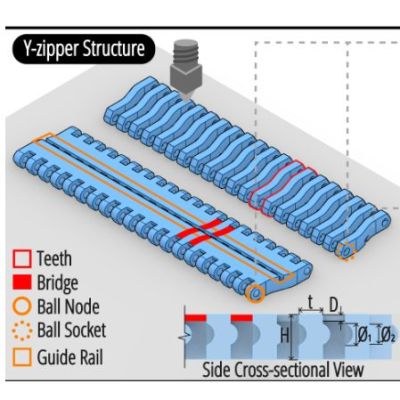
Plus there is that the Y-zipper is designed from the start to be 3Dprinted, while still following the same basic pattern of interlocking teeth that the slider mechanism alternately pushes together or pulls apart.

By modifying the basic straight design of the flat strips, the resulting zipped-up form can take on a distinct bend, as well as turn into a coil or a screw. With a demonstrated joint design it is then possible to join multiple Y-zipper rods together, which could make for an interesting alternative to traditional pop-up tent supports, for example.

Also demonstrated is the use of TPU to create compliant bridges, as well as the direct integration of fabric, to show the versatility of the technology. With the used materials (PLA, TPU) the researchers estimate a maximum viable length of about 3 meters before the printed structures begin to disintegrate.

Measure The Earth’s Rotation Victorian Style

You’ve probably seen a Foucault pendulum in a museum. This Victorian-era science demonstration is named after physicist Léon Foucault and shows how the Earth rotates compared to a pendulum moving in a fixed plane. [RyanCreates] shows you how you can make your own, and it is surprisingly simple.

All you need is a heavy weight like a small mushroom anchor, fishing line, and a swivel — all things you can pick up at any sporting goods store. You’ll need a way to suspend it all, such as an eye hook in the ceiling.

In addition to the mechanical parts, the build calls for a camera to record the results and a lighter or other source of flame. The reason? To release the pendulum, you burn a thread that prevents it from swinging. This allows for a clean release with no sideways force.

The amount of your rotation depends on your latitude. At 33 degrees north, for example, you can expect 360*sin(33)/24 or 8.17 degrees per hour of rotation. [Ryan] measured a somewhat larger number, which was probably due to an error source, especially since he is measuring the angle using captured camera frames in Photoshop. That has to introduce some error, and small pendulums like this are incredibly sensitive to errors.

If you try it and find the source of the error, we’re sure [Ryan] would love to hear from you. Museum pieces are typically much larger, have ultra-low-friction pivots, and use electromagnets to keep the pendulum moving since, after all, even a Foucault pendulum can’t run forever.

VTech Toy Becomes PinkPad, The DIY Linux Laptop

Originally envisioned as a simple DIY laptop project, [kati]’s PinkPad V1 ended up being considerably more involved than expected. But the end result is a perfectly usable, stunningly pink, and remarkably sturdy portable laptop that looks nothing like a hack job.

Originally a VTech toy, the PinkPad is a perfectly functional DIY laptop.

The PinkPad V1 started as a toy laptop for toddlers, repurposed into a DIY laptop running Linux while keeping the original clamshell design and cute aesthetic. As [kati] herself points out, while it may not seem particularly difficult to yank out a toy’s insides and stuff it with a Raspberry Pi, most of the real challenges were related to actually getting all the necessary parts and connectors and wiring to actually fit in a useful way. As anyone with experience in building something knows, working around existing enclosures or hardware almost always brings unexpected challenges.

The original toy laptop? Produced by none other than VTech, whose products have been hacked to create things like a punch card-reading cyberdeck and Z80 hacking station. Our own [Tom Nardi] has also shared his fondness for these devices in several teardowns over the years.

In the end, [kati]’s PinkPad ended up sporting a mini keyboard (whose black keys were turned pink with a little nail polish) and a 5 inch touchscreen LCD. Combined with a rechargeable power supply, it provides all the comforts of an Arch Linux ARM mini laptop.

Thanks [alex] for the tip!

Build The CPU, Then Build The Calculator

It’s possible that among Hackaday readers are the largest community of people who have designed their own CPU in the world. We have featured many here, but it’s possible that not so many of them have gone on to power an everyday project. Step forward [Baltazar Studios] then, with a scientific calculator sporting a self-designed CPU on an FPGA.

The calculator itself is nice enough, with a smart 3D printed case, an OLED display which almost evokes a VFD, and very well made buttons. But it’s the CPU which is of most interest, because while it follows a conventional Harvard architecture with a 12-bit instruction set, it works with 4-bit nibbles. This choice follows one used by HP in their calculator designs, seemingly because it can be optimised for the binary coded decimal which the calculator uses.

With calculators being yet another app on our spartphones or comnputers, there seems to be less use of calculators outside of education in 2026. But if you are a calculator user there’s nothing like a calculator you made yourself, and with a CPU of your own design it has few equals. We like this project almost as much as we like the Flapulator!

The Truth About The Hindenburg

The Hindenburg disaster recently marked its 89th anniversary, and [The History Guy] marked the event with a video that dispels many of the myths surrounding the airship. Example: the disaster did not actually occur on the airship’s maiden voyage. That isn’t true. The ship was on its 63rd voyage. However, it was the first flight of the 1937 season.

The giant ship burned because of the hydrogen gas inside, but the cause of the fire remains debatable and was likely not solely due to hydrogen. In fact, from a technical standpoint, the ship didn’t explode. It only burned.

Some of the myths are just from sloppy reporting or the tendency of people to misunderstand things. Others are a blurring in the common consciousness of the Hindenburg and the Titanic.

It is easy to think of the necessity for safe engineering when you are building, say, a bomb or a spacecraft. But anything capable of wreaking havoc requires careful design and testing. However, ships like the Hindenburg had made many trips without incident. Sure, the Hindenburg was a spectacle, but even the fatality rate was fairly low. Many of those who died jumped to the ground — they might have survived if they had waited a minute.

There are many myths around [Herb Morrison]’s famous “Oh the humanity!” report. We’ve noted before that it was played back at the wrong speed for decades. Airships have a stranger history than you might imagine.

Continue reading “The Truth About The Hindenburg”

The Dark Side Of Unitree Robot Dogs

Arbitrary command execution with the Wi-Fi password. (Credit: Benn Jordan)

Continuing on his quest to expose the dark underbelly of modern technology, [Benn Jordan] recently did a deep-dive into the rise of so-called robot dogs. Although their most striking resemblance with biological dogs is that they also have four legs and generally follow commands, [Benn] found many issues with them that range from safety issues due to limited sensory capabilities, to basic security vulnerabilities, all the way to suspicious network traffic from Unitree’s robot dog firmware.

Although not the only seller of this type of quadruped robot, Unitree Robotics has made a name for itself by offering very capable and yet very cheap products. Their basic quadruped robot costs only a few thousand clams and features Lidar and heaps of processing power, all of which should make it a pretty useful device.

Despite this, [Benn] found that the original task that he’d envisioned for the robot, as in protecting his chickens from uninvited visitors, wouldn’t quite work as the robot is rather blind. The reason for this is the placement of the Lidar below the head, which obscures most of what’s behind and around the robot. Rather than risk trampled chickens and chicks, this plan was thus abandoned.

When digging further into the robot, he found an easy to exploit arbitrary command execution flaw via the Wi-Fi password entry field, a year-old CVE-2025-2894 exploit, as well as highly suspicious traffic to Chinese servers whenever the robot’s software figured that it was not being watched.

Although much of this can be circumvented with hacks, issues like the sensory limitations and general distrust of firmware updates makes using these robots a rather daunting and often ill-advised proposition.

Continue reading “The Dark Side Of Unitree Robot Dogs”

Trying To Fix A GoPro Hero 10 With No Camera Input Issue

In the search for more exciting broken electronics to repair, [Hugh Jeffreys] bought a GoPro Hero 10 for US$100 with an apparently rather common issue of no camera input, along with a cracked display. This particular camera issue is rather obvious, with just darkness where the camera’s input should appear on the display. Since [Hugh] already needed a spare display, he figured that he might as well get an even more broken GoPro Hero 10 for parts.

Another US$40 later, [Hugh] found himself the proud owner of a second GoPro, this one being water damaged and no longer turning on. Getting to the internals requires removing the glued-in display, which is even trickier than with a smartphone. By inserting a thin blade, adding solvents and not prying, you can slowly work it loose.

With two disassembled GoPros it was now possible to swap modules. After a factory reset and firmware update had failed to fix the first GoPro, the camera module from the donor unit was inserted, but this made no difference. Amusingly, after cleaning the water-damaged unit’s PCBs, it was found to be in good working condition, so ultimately the second GoPro was repaired, leaving the ‘no camera input’ issue undiagnosed.

It’s possible that a board-level repair on the first unit can address the original issue, but without schematics this would likely entail a lot of blindly poking around, in the hope of finding a damaged MLCC or other obvious fault. There is also the possibility that this is a firmware issue, with some reporting luck mashing the report button, but others disagree.

Since [Hugh] did do the firmware reset and updating steps, and even inserted a whole new working camera module, it would seem to narrow the problem down to a board-level issue. Whatever the case may be, it’s a frustrating issue with a rather expensive device.

Continue reading “Trying To Fix A GoPro Hero 10 With No Camera Input Issue”